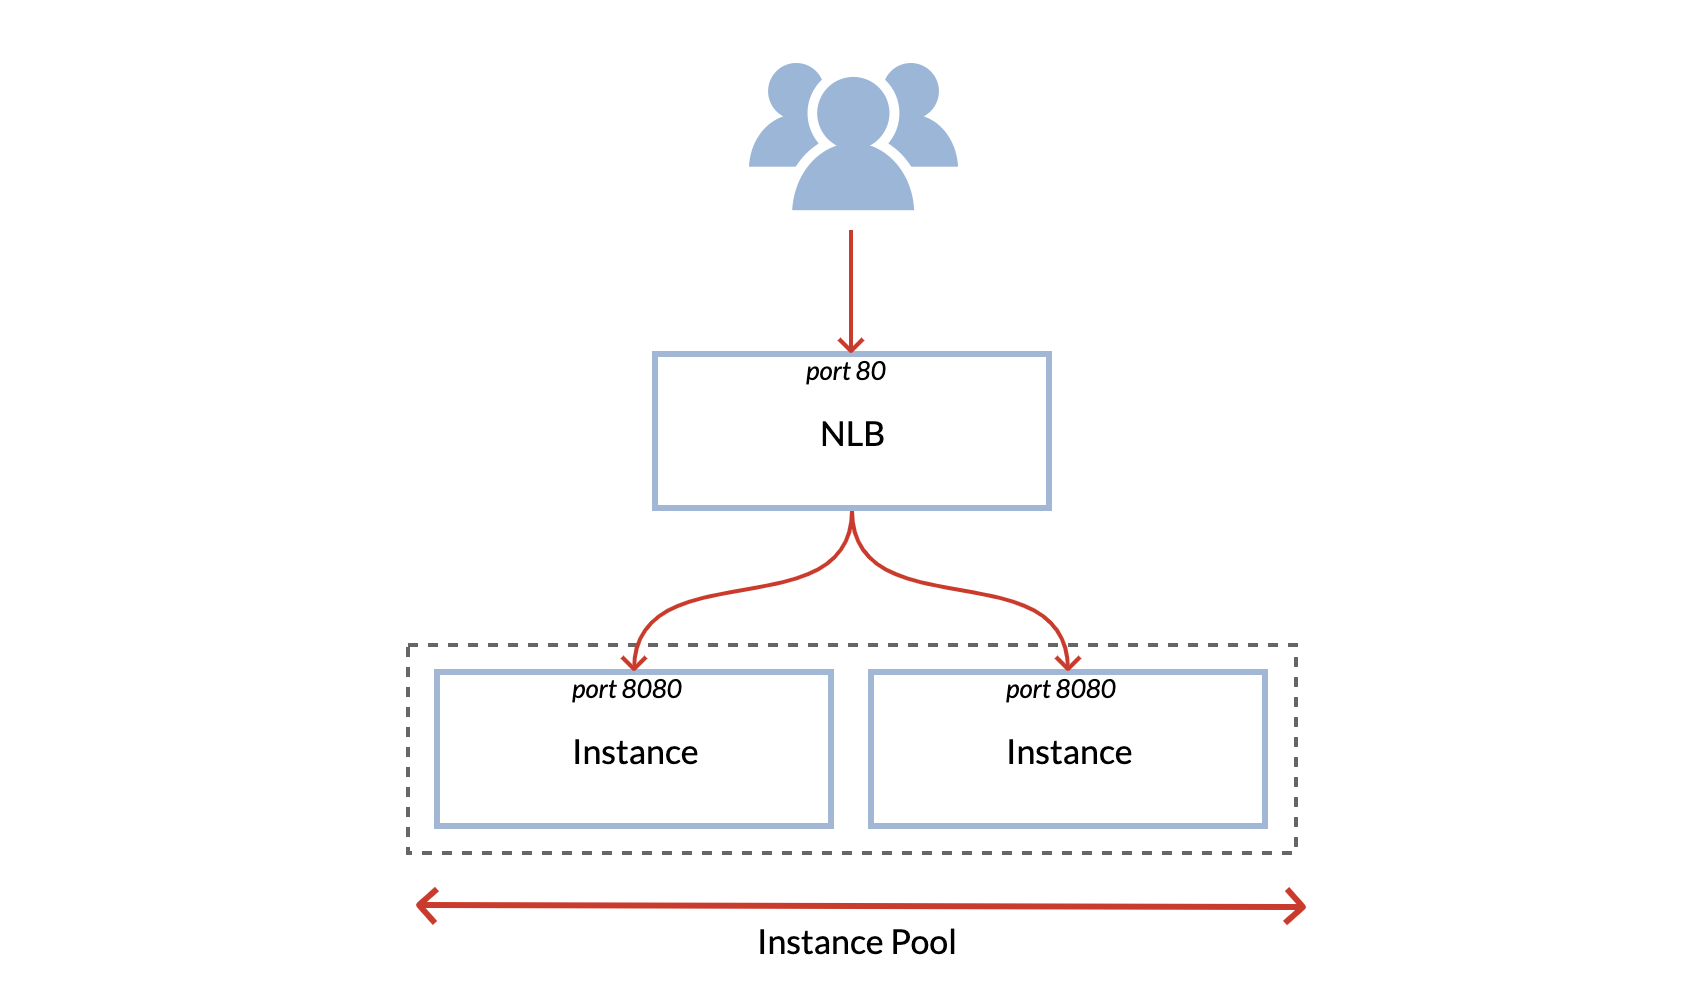
The best way to introduce you to our freshly released Network Load Balancer (NLB) is to show it in action. We will guide you through a simple example, creating an NLB which will forward traffic to Python HTTP servers listening on port 8080. A simple design which will look like this:
This example will use the Exoscale CLI to create the resources, but you can of course manage your Instance Pools and NLB using our web application, or our Terraform provider.
Creating the Instance Pool
We will first create a new Security Group to allow traffic on ports 22 (SSH) and 80 (HTTP) on your backend machines:
exo compute security-group create load-balancer-http

Create security group "load-balancer-http" ⠴                                              done
┼──────────────────────────────────────┼────────────────────┼─────────────┼
│                  ID                  │        NAME        │ DESCRIPTION │
┼──────────────────────────────────────┼────────────────────┼─────────────┼
│ c66a4626-adff-40b4-a340-9ca82be918b8 │ load-balancer-http │             │
┼──────────────────────────────────────┼────────────────────┼─────────────┼

exo compute security-group rule add load-balancer-http --port 22 --protocol tcp --network 0.0.0.0/0
 ✔ Adding rule to Security Group "load-balancer-http"

exo compute security-group rule add load-balancer-http --port 8080 --protocol tcp --network 0.0.0.0/0
 ✔ Adding rule to Security Group "load-balancer-http"
Also, if you don’t have one yet, don’t forget to create a Keypair first, in order to be able to SSH into your Instances.
Now we can create an new Instance Pool. A multiplicity of two instances is enough for this simple demo but NLB will adapt to much larger pools as well:
exo compute instance-pool create python-backends \
    --disk-size 10 \
    --security-group load-balancer-http \
    --size 2 \
    --zone ch-gva-2 \
    --template "Linux Ubuntu 20.04 LTS 64-bit" \
    --description "Load balancer example" \
    --instance-type micro \
    --ssh-key my-keypair
 ✔ Creating Instance Pool "python-backends"... 18s
┼──────────────────────┼──────────────────────────────────────┼
│    INSTANCE POOL     │                                      │
┼──────────────────────┼──────────────────────────────────────┼
│ ID                   │ dd89407a-98a2-4609-9892-375bfb428123 │
│ Name                 │ python-backends                      │
│ Description          │ Load balancer example                │
│ Instance Type        │ standard.micro                       │
│ Template             │ Linux Ubuntu 20.04 LTS 64-bit        │
│ Zone                 │ ch-gva-2                             │
│ Anti-Affinity Groups │ n/a                                  │
│ Security Groups      │ load-balancer-http                   │
│ Private Networks     │ n/a                                  │
│ Elastic IPs          │ n/a                                  │
│ IPv6                 │ false                                │
│ SSH Key              │ my-keypair                           │
│ Size                 │ 2                                    │
│ Disk Size            │ 10 GiB                               │
│ Instance Prefix      │ pool                                 │
│ State                │ scaling-up                           │
│ Labels               │ n/a                                  │
│ Instances            │ pool-dd894-xldlc                     │
│                      │ pool-dd894-qpdbe                     │
┼──────────────────────┼──────────────────────────────────────┼
We need to inspect the Instance Pool to retrieve the member names, in order to access the individual instances and start an HTTP server:
exo compute instance-pool show python-backends --zone ch-gva-2
┼──────────────────────┼──────────────────────────────────────┼
│    INSTANCE POOL     │                                      │
┼──────────────────────┼──────────────────────────────────────┼
│ ID                   │ dd89407a-98a2-4609-9892-375bfb428123 │
│ Name                 │ python-backends                      │
│ Description          │ Load balancer example                │
│ Instance Type        │ standard.micro                       │
│ Template             │ Linux Ubuntu 20.04 LTS 64-bit        │
│ Zone                 │ ch-gva-2                             │
│ Anti-Affinity Groups │ n/a                                  │
│ Security Groups      │ load-balancer-http                   │
│ Private Networks     │ n/a                                  │
│ Elastic IPs          │ n/a                                  │
│ IPv6                 │ false                                │
│ SSH Key              │ id_rsa.pub                           │
│ Size                 │ 2                                    │
│ Disk Size            │ 10 GiB                               │
│ Instance Prefix      │ pool                                 │
│ State                │ running                              │
│ Labels               │ n/a                                  │
│ Instances            │ pool-dd894-xldlc                     │
│                      │ pool-dd894-qpdbe                     │
┼──────────────────────┼──────────────────────────────────────┼
It’s time to SSH into our instances and start a simple HTTP server. To do so,
the most practical way is to simply execute exo ssh <instance-name>, then
create a basic python web server and leave your terminal session running:
exo compute instance ssh pool-dd894-xldlc
mkdir http && echo ${HOSTNAME} > http/host
cd http
python3 -m http.server 8080
The same commands should be executed on the second instance. We now have
on both instances a web server running on port 8080 which displays
the hostname of the pool member at the url http://
Creating the Network Load Balancer
Let’s now create our Network Load Balancer. We need to deploy it in the same zone as our Instance Pool in order to target the latter:
exo compute nlb create load-balancer-example --zone ch-gva-2 --description "Network Load Balancer tutorial"
 ✔ Creating Network Load Balancer "load-balancer-example"... 3s
┼───────────────────────┼──────────────────────────────────────┼
│ NETWORK LOAD BALANCER │                                      │
┼───────────────────────┼──────────────────────────────────────┼
│ ID                    │ 3be4504a-8cce-4f6d-a79d-8f82f2b37f77 │
│ Name                  │ load-balancer-example                │
│ Zone                  │ ch-gva-2                             │
│ IP Address            │ 85.217.161.150                       │
│ Description           │ Network Load Balancer tutorial       │
│ Creation Date         │ 2024-10-04 08:30:24 +0000 UTC        │
│ State                 │ running                              │
│ Services              │ n/a                                  │
│ Labels                │                                      │
We can see that our load balancer has been successfully created, and an IP address (85.217.161.150) has been attached to it.
We should now add Services to it. Services are entities added to a Network Load Balancer to configure the load balancing rules for the target Instance Pool. They are composed of several options:
- Protocol: the load balancer protocol: TCP or UDP.
- Port: the port on which the traffic will be sent on the load balancer.
- Target port: the port which will receive the traffic on the backend machines.
- Strategy: the load balancing strategy. The round-robin strategy will send each request to the next backend in the list. The source-hash strategy will send the requests to the same member based on the source IP and port of the request.
- Health check: The health check which will be periodically executed on the backend machines. A machine detected down will not be forwarded traffic anymore.
The health check can be configured using a variety of methods, which are described in the product documentation. In this example, we will create an HTTP health check on port 8080.
exo compute nlb service add 3be4504a-8cce-4f6d-a79d-8f82f2b37f77 example-service \
    --description "service example" \
    --healthcheck-interval 10 \
    --healthcheck-mode http \
    --healthcheck-port 8080 \
    --healthcheck-retries 1 \
    --healthcheck-timeout 5 \
    --healthcheck-uri / \
    --instance-pool dd89407a-98a2-4609-9892-375bfb428123 \
    --port 80 \
    --protocol tcp \
    --strategy round-robin \
    --target-port 8080 \
    --zone ch-gva-2
 ✔ Adding service "example-service"... 3s
┼──────────────────────┼──────────────────────────────────────┼
│     NLB SERVICE      │                                      │
┼──────────────────────┼──────────────────────────────────────┼
│ ID                   │ 83b2e0eb-3430-47a4-9a6c-8edf8366a534 │
│ Name                 │ example-service                      │
│ Description          │ service example                      │
│ Instance Pool ID     │ dd89407a-98a2-4609-9892-375bfb428123 │
│ Protocol             │ tcp                                  │
│ Port                 │ 80                                   │
│ Target Port          │ 8080                                 │
│ Strategy             │ round-robin                          │
│ Healthcheck Mode     │ http                                 │
│ Healthcheck Port     │ 8080                                 │
│ Healthcheck URI      │ /                                    │
│ Healthcheck Interval │ 10s                                  │
│ Healthcheck Timeout  │ 5s                                   │
│ Healthcheck Retries  │ 1                                    │
│ Healthcheck Status   │ n/a                                  │
│ State                │ running                              │
┼──────────────────────┼──────────────────────────────────────┼
Here we added a new Service to our NLB, targeting the Instance Pool which we have initially created. The NLB will listen on port 80 and forward the traffic to the Instance Pool backend machines on port 8080 by using the Round Robin strategy.
Since we launched our web server on port 8080 on the members of the Instance Pool, you should now see the Health Checks executed by the load balancer arriving on your backend machines.
You can now execute requests to your load balancer IP on port 80, and traffic will be forwarded on port 8080 on your backend machines:
~$ curl 85.217.161.150/host
pool-dd894-xldlc
~$ curl 85.217.161.150/host
pool-dd894-qpdbe
$ curl 85.217.161.150/host
pool-dd894-qpdbe
$ curl 85.217.161.150/host
pool-dd894-xldlc
$ curl 85.217.161.150/host
pool-dd894-qpdbe
Managing Network Load Balancers
You can add up to 10 Services to your Network Load Balancer, update and modify both the Service and the load balancer with exo compute nlb update and exo compute nlb service update. Note that you cannot update the instance pool of a service.
When an Instance Pool is used by a service, it cannot be destroyed. You will first need to destroy the Service in order to do so.
You can of course remove a Service from the load balancer. For example, if we want to remove the previously created Service, we can do:
exo compute nlb service delete load-balancer-example example-service
 ✔ Deleting service "83b2e0eb-3430-47a4-9a6c-8edf8366a534"... 3s
And finally, let’s destroy the whole NLB. You don’t have to delete its Services before deleting it:
exo compute nlb delete load-balancer-example
[+] Do you really want to delete Network Load Balancer "load-balancer-example"? [yN]: y
✔ Deleting Network Load Balancer "load-balancer-example"... 9s
You can find all details about the Network Load Balancer in the NLB product documentation.