Our managed Kubernetes solution (SKS) is the ideal place to get your apps running in minutes. In this article, we will show you how to initialize SKS automatically via Terraform, create a database, and allow access to the database from the cluster only.
You will need:
- Terraform
- Kubectl
- Helm
- Access to the Exoscale UI or CLI
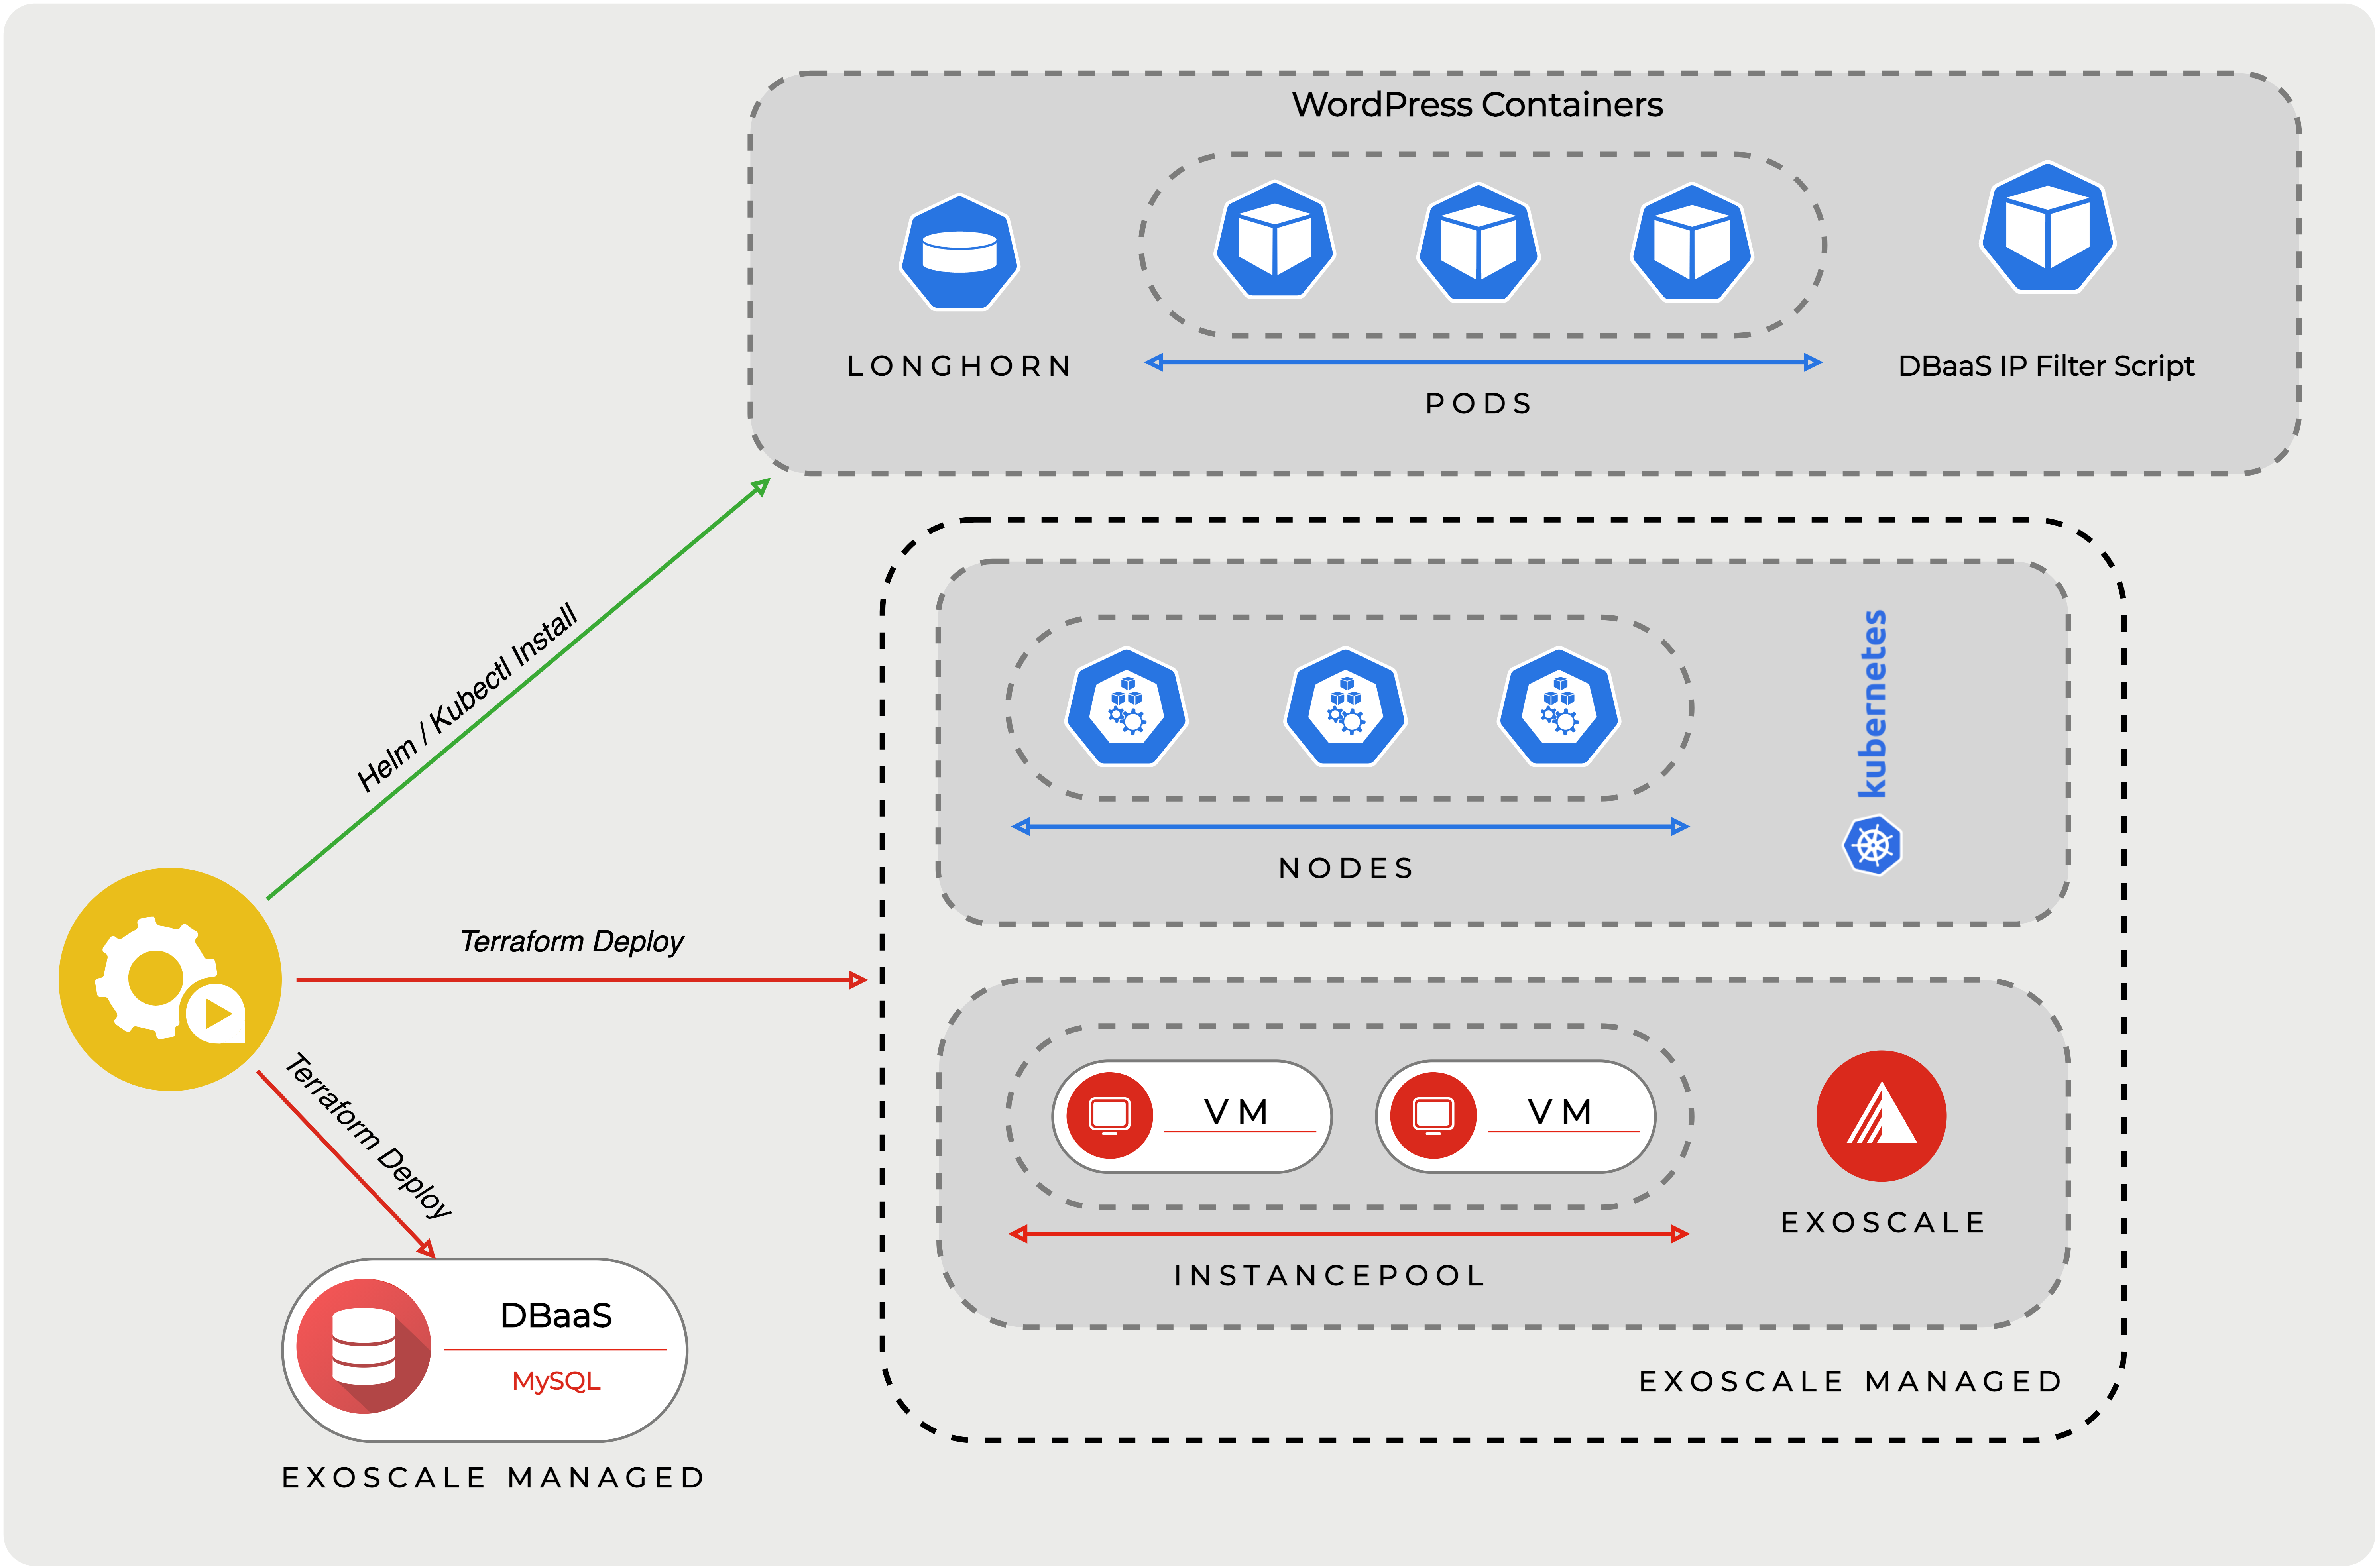
Terraform will be used as tool for IaC (Infrastructure as a Code) to set up Exoscale SKS (our managed Kubernetes service) and a MySQL DBaaS instance (Database as a Service). We will resort then to Helm and kubectl to deploy WordPress, Longhorn (for media files) and a script for securing access to our managed database.

If you just want to know, how to secure your Exoscale DBaaS to only allow access from an SKS cluster, you can skip to the last chapter.
Infrastructure via Terraform
Terraform allows you to automatically spin up, update, and destroy infrastructure on-demand - everything via code. Make sure to install the terraform-cli beforehand: Terraform downloads
For this article, we will work in a freshly (arbitrary named) directory, where we will split our Terraform configuration into multiple files.
Start with a new file in this directory, called provider.tf describing to use Exoscale infrastructure:
terraform {
  required_providers {
    exoscale = {
      source  = "exoscale/exoscale"
      version = "~> 0.30.0"
    }
  }
}
Next create a file called zone.tf and simply define the zone:
locals {
  zone = "de-fra-1"
}
The zone variable will be used in most resources.
Terraform: SKS Cluster
Terraform is especially handy for setting up a Kubernetes cluster. Creation of required security groups and nodepools is possible in one rush (create a sks.tf file):
# Change version to the currently available Exoscale SKS version
resource "exoscale_sks_cluster" "SKS-Cluster" {
  zone          = local.zone
  name          = "webcluster"
  version       = "1.23.1"
  description   = "Cluster for our App"
  service_level = "pro"
}

# This provisions an instance pool of nodes which will run the Kubernetes
# workloads. It is possible to attach multiple nodepools to the cluster:
# https://registry.terraform.io/providers/exoscale/exoscale/latest/docs/resources/sks_nodepool
# Check instance types: https://www.exoscale.com/pricing/#/compute/

resource "exoscale_sks_nodepool" "workers" {
  zone               = local.zone
  cluster_id         = exoscale_sks_cluster.SKS-Cluster.id
  name               = "workers"
  instance_type      = "standard.medium"
  size               = 3
  security_group_ids = [exoscale_security_group.sks_nodes.id]
}

# Create a security group so the nodes can communicate and we can pull logs

resource "exoscale_security_group" "sks_nodes" {
  name        = "sks_nodes"
  description = "Allows traffic between sks nodes and public pulling of logs"
}

resource "exoscale_security_group_rule" "sks_nodes_logs_rule" {
  security_group_id = exoscale_security_group.sks_nodes.id
  type              = "INGRESS"
  protocol          = "TCP"
  start_port        = 10250
  end_port          = 10250
  description       = "Kubelet"
  user_security_group_id = exoscale_security_group.sks_nodes.id
}

resource "exoscale_security_group_rule" "sks_nodes_calico" {
  security_group_id      = exoscale_security_group.sks_nodes.id
  type                   = "INGRESS"
  protocol               = "UDP"
  start_port             = 4789
  end_port               = 4789
  description            = "Calico CNI networking"
  user_security_group_id = exoscale_security_group.sks_nodes.id
}

resource "exoscale_security_group_rule" "sks_nodes_ccm" {
  security_group_id = exoscale_security_group.sks_nodes.id
  type              = "INGRESS"
  protocol          = "TCP"
  start_port        = 30000
  end_port          = 32767
  description       = "NodePort services"
  cidr              = "0.0.0.0/0"
}
As shown in the quick-start guide we then create:
- A cluster with Kubernetes Version 1.21.7 (you may have to adjust that)
- A nodepool consisting of 3 medium-sized nodes with our workers, where eventually the app will run
- A Security group consisting of:
- TCP 10250; only accessible by other nodes; for the node agent
- UDP 4789; only accessible by other nodes; for the cluster networking
- TCP 30000-23767; public; for public services, like a web app
All resources are directly linked inside the terraform file (like the security group to the node pool via security_group_ids).
Find details of the available Exoscale terraform resources in the terraform docs.
Terraform: DBaaS
For creating a database, we first specify the following two variables: username and password. When deploying the infrastructure, you can then dynamically specify one. A possible use case would be the specification of a username and password as a secret in your CI system, then use this secret to further deploy scripts.
Insert into a new file (e.g. db.tf):
variable "username" {
  description = "The username for the DB master user"
  type        = string
  sensitive   = true
}

variable "password" {
  description = "The password for the DB master user"
  type        = string
  sensitive   = true
}

# Create a MySQL database for WordPress:
# https://registry.terraform.io/providers/exoscale/exoscale/latest/docs/resources/database

resource "exoscale_database" "app-database" {
  zone = local.zone
  name = "app-database"
  type = "mysql"
  plan = "hobbyist-1"
  maintenance_dow  = "sunday"
  maintenance_time = "23:00:00"
  termination_protection = false

  mysql {
    admin_username = var.username
    admin_password = var.password
  }
}

output "database_uri" {
  value = exoscale_database.app-database.uri
}
Besides the variables, “exoscale_database” specifies the database resource. In this case, we create a MySQL database with the hobbyist-1 plan. If you don’t want the database to be easily deletable, set termination_protection to true.
Terraform apply
At this point, we built our whole infrastructure as a code. This approach has multiple advantages:
- Deploy - and re-deploy - the whole infrastructure with a single command
- Infrastructure is documented as code and can be versioned via Git or similar
- The state of the infrastructure is saved in a file
- Setups can be easily tested and destroyed afterwards
- DevOps automatable
The next step will be terraform init. This command is used to initiate the state file and download the Exoscale provider plugin.
Every time you use commands to apply, destroy or plan the terraform, you have to use the defined variables. Simply use this inside your shell:
export TF_VAR_username=blog
export TF_VAR_password=ARandomPassword
When you are ready, use the command terraform apply to plan the infrastructure and deploy it. You will get an overview of what exactly will be deployed and have the chance to review and confirm it before it will be eventually applied.
terraform apply
Access to the cluster
Use the exoscale-cli to generate a kubeconfig file. Specify the name of the cluster (webcluster), the name of the admin, and the zone:
exo compute sks kubeconfig webcluster admin-installer -z de-fra-1 > kubeconfig
Installing a sample application: WordPress
Storage for media-files
WordPress needs storage for media files. For this, we will quickly install Longhorn:
export KUBECONFIG=kubeconfig

helm repo add longhorn https://charts.longhorn.io

# Helm will simply use the kubeconfig to connect to the cluster

helm install longhorn longhorn/longhorn --namespace longhorn-system --create-namespace
Check its status by issuing kubectl get pods -n longhorn-system. The installation takes around 3 minutes.
When you want to automate it in a script, you can wait for the installation by doing a rollout status on the “deployer” and then wait for all deployments to be finished:
kubectl rollout status deployment longhorn-driver-deployer -n longhorn-system --timeout=100s

# We need to wait for some seconds until the driver-deployer starts creating the deployments

sleep 10
kubectl wait --for=condition=available --timeout=60s --all deployments -n longhorn-system
Using a WordPress chart
For WordPress, we will simply use a ready-made helm chart by Bitnami.
The first step is to get the database credentials using terraform output -raw database_uri which will print us the contents of the variable database_uri.
To split it up we can use the following commands:
connectionurl=$(terraform output -raw database_uri)
user=$(echo $connectionurl | tr "/@:?" "\n" | sed -n '4p')
password=$(echo $connectionurl | tr "/@:?" "\n" | sed -n '5p')
host=$(echo $connectionurl | tr "/@:?" "\n" | sed -n '6p')
port=$(echo $connectionurl | tr "/@:?" "\n" | sed -n '7p')
db=$(echo $connectionurl | tr "/@:?" "\n" | sed -n '8p')
Next, we will invoke Helm. We specify that it should not deploy a database by itself in Kubernetes, instead, we use the credentials of the DBaaS. Also, we have the opportunity to specify the WordPress credentials.
export KUBECONFIG=kubeconfig

helm repo add bitnami https://charts.bitnami.com/bitnami

helm install \
    --set mariadb.enabled=false \
    --set externalDatabase.host=$host \
    --set externalDatabase.user=$user \
    --set externalDatabase.password=$password \
    --set externalDatabase.database=$db \
    --set externalDatabase.port=$port \
    --set persistence.storageClass=longhorn \
    --set wordpressUsername=admin \
    --set wordpressPassword=vXUdxiWA4c \
    blog bitnami/wordpress
It will install all components, and give you also hints on how you can connect to the instance.
With kubectl get svc we can list all services (note: this may take some minutes until it will be available). And then use the given External-IP to connect to the blog and write the first article.
❯ kubectl get svc
NAME TYPE CLUSTER-IP EXTERNAL-IP PORT(S) AGE
blog-wordpress LoadBalancer 10.97.61.32 194.182.169.151 80:31426/TCP,443:30477/TCP 2m
Further notes
Instead of creating scripts calling helm or kubectl, you can also directly use the kubectl or helm Terraform plugin. However, it would be still a good idea to separate the deployment of the IaaS Services (like SKS) from the app itself.
Also note that using the kubectl plugin has the drawback of being dependent on updates of the plugin (i.e. updating your Kubernetes version may make certain configurations non-functional - like in this case).
DBaaS: IP-Filter
DBaaS supports an IP-filter property, where one can specify which IPs are allowed to connect to the database. As nodes in the cluster could change, we use a script to automatically provide the IPs of all Kubernetes Nodes to the managed database.
First clone the repository, or download exo-k8s-dbaas-filter.yaml from our GitHub repository.
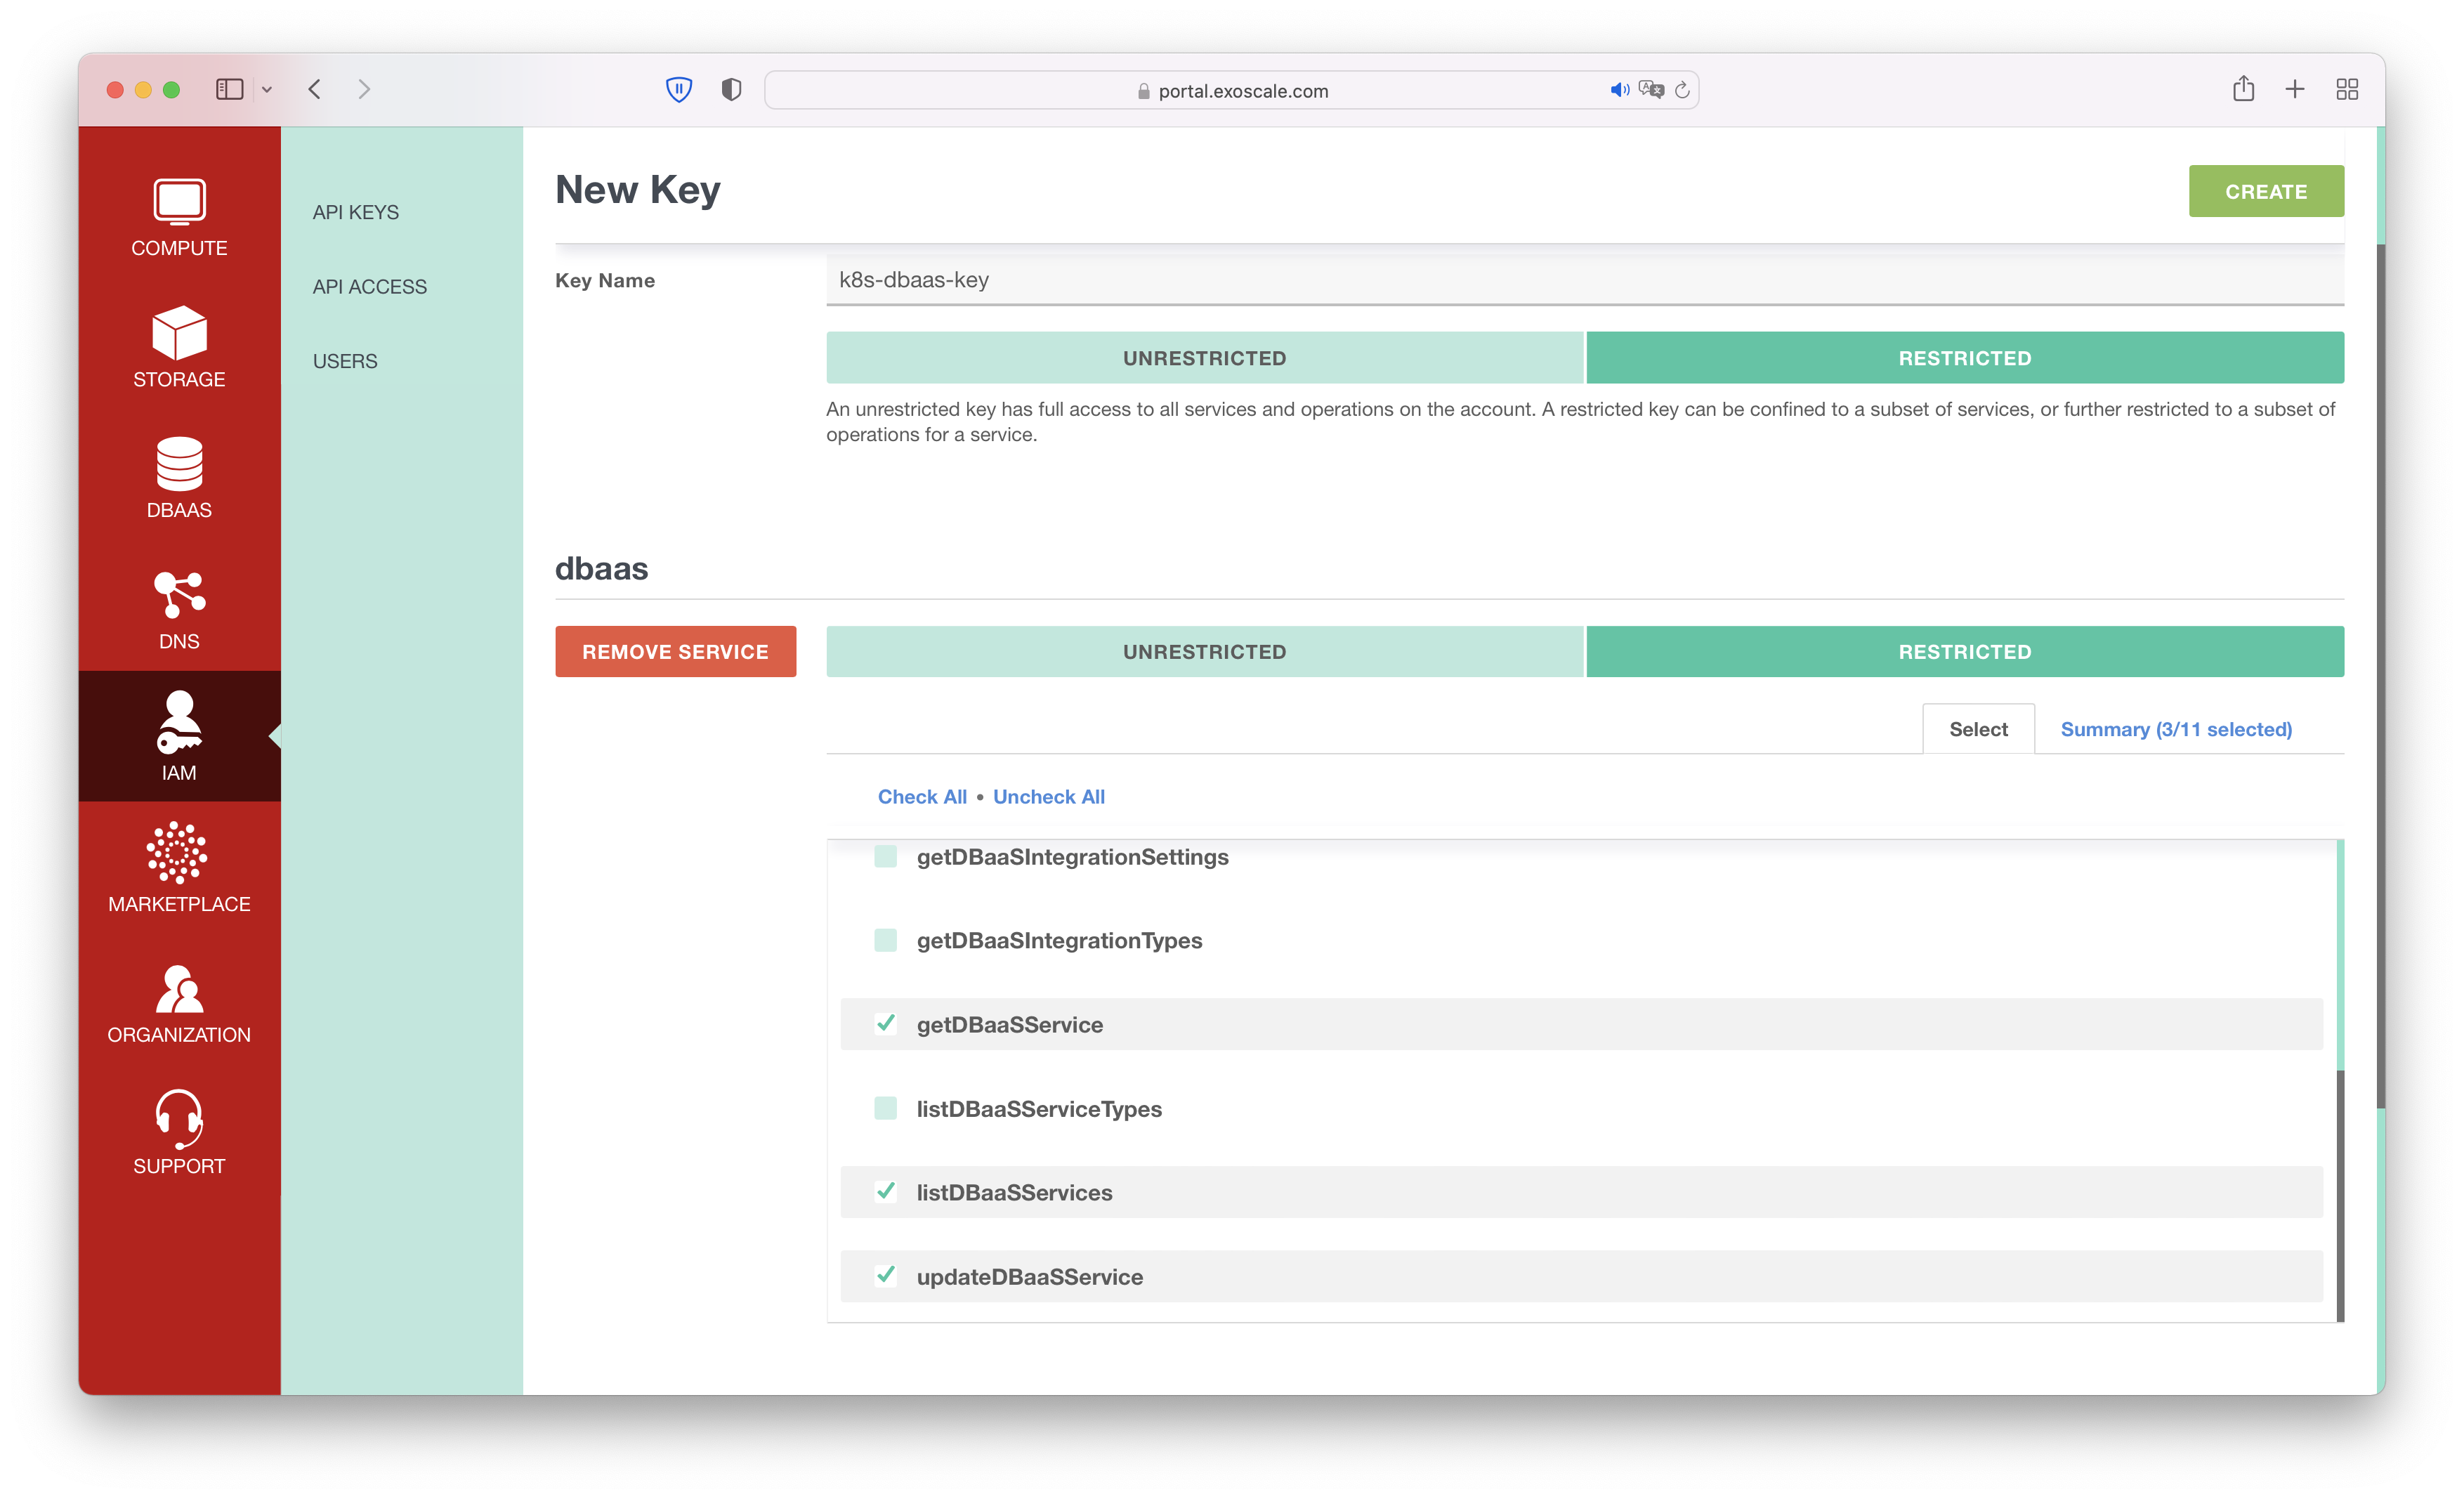
In the Exoscale UI, click on IAM -> API KEYS -> ADD KEY. Choose a name, and select Restricted, add dbaas as service, click on Restricted again, and select: getDBaaSService, listDBaaSServices, updateDBaaSService.

It will show you the API Key and Secret. Make sure to keep them confidential.
Open a console and use kubectl to create a secret for your API key:
export EXOSCALE_API_KEY=HEREYOURKEY
export EXOSCALE_API_SECRET=HEREYOURSECRET

# Point this to your kubeconfig file
export KUBECONFIG=kubeconfig

kubectl -n kube-system create secret generic exoscale-api-credentials \
   --from-literal=api-key='KEY' \
   --from-literal=api-secret='SECRET
It will connect to your cluster, and apply the API Key as Kubernetes secret.
Then open exo-k8s-dbaas-filter.yaml and around line 119 you can specify the name of your database by adjusting the command which is used to update the IPs.
Example: to update a MySQL database, named wordpress in Frankfurt, use:
exo dbaas update --mysql-ip-filter $IPLISTFOREXO wordpress -z de-fra-1
On line 109 you can add further IPs (e.g. of the administrators’ computer).
Make sure to apply the manifest then with kubectl apply -f exo-k8s-dbaas-filter.yaml, it will keep the database IPs updated automatically now even when nodes and pods are added or removed from the SKS cluster.
Conclusion
The steps for getting your application to run are quite straightforward: Create a managed Cluster, a managed Database, and find a chart for your application. It benefits from automatic backups, scalability, and ease of configuration. Should you need to scale up, then edit the cardinality of nodes and pods in your configuration files or in case you want to take down everything and start over again just type terraform destroy. If you want to go into more advanced Kubernetes topics, our community docs are a good start.
And, by using SKS and DBaaS in combination with Terraform, you have powerful tools at hand, where you can deploy in seconds.


