TL;DR) Terraform is a powerful tool to manage an Infrastructure using a description language. In this article, we show how to manage existing resources such as Compute instances and Firewalling Security Groups; as well as how to apply changes to them. It relies on a plugin specially tailored to work with Exoscale infrastructure.
Introduction
Previously published articles showed how to deploy new infrastructure like a Kubernetes cluster, OpenShift.io, or HAProxy using Ansible or the CloudStack API client. Most of the time though, we are managing existing setups, instances, security groups and what not.
With the latest release of our Terraform provider, it’s easier than ever to handle the Infrastructure as Code (IaC). This post details how one can import and manage their existing infrastructure setup in Terraform.
Setup
Once you’ve installed Terraform, install the provider built for Exoscale. As of yet, it’s not part of the official list of providers but we are working on it.
Terraform provider setup
Create a new directory in which you will store your Terraform configuration files,
change your shell location inside it then initialize the provider by running
terraform init:
$ mkdir my-terraform-conf && cd my-terraform-conf

my-terraform-conf$ terraform init

Initializing the backend...

Initializing provider plugins...
- Checking for available provider plugins...
- Downloading plugin for provider "exoscale" (terraform-providers/exoscale) 0.12.1...

Terraform has been successfully initialized!

You may now begin working with Terraform. Try running "terraform plan" to see
any changes that are required for your infrastructure. All Terraform commands
should now work.

If you ever set or change modules or backend configuration for Terraform,
rerun this command to reinitialize your working directory. If you forget, other
commands will detect it and remind you to do so if necessary.

my-terraform-conf$ terraform version
Terraform v0.11.2
+ provider.exoscale v0.9.3
Configuration
Managing the infrastructure uses the CloudStack API. In order to do so, we have to
configure the provider with the API credentials linked with our account.
Into the Portal, navigate to Account > Profile > API Keys. Put
your API Key and Secret Key into a file called terraform.tfvars.
# terraform.tfvars
token = "EXO..." # API Key
secret = "..."   # Secret Key
Terraform uses its own format called the HashiCorp Configuration
Language (HCL). Although, the extension used is often .tf.
HCL is related to JSON with the addition of comments and references.
Those values will get imported into input variables.
# variables.tf
variable "token" {}
variable "secret" {}
Now, we are ready to configure the freshly installed provider.
# config.tf
provider "exoscale" {
  version = "~> 0.9"
  token = "${var.token}"
  secret = "${var.secret}"
}
Tip: having separate files makes it easier to keep the sensitive
information out of a version control system such a Git or
Mercurial (hg).
Importing a Compute instance
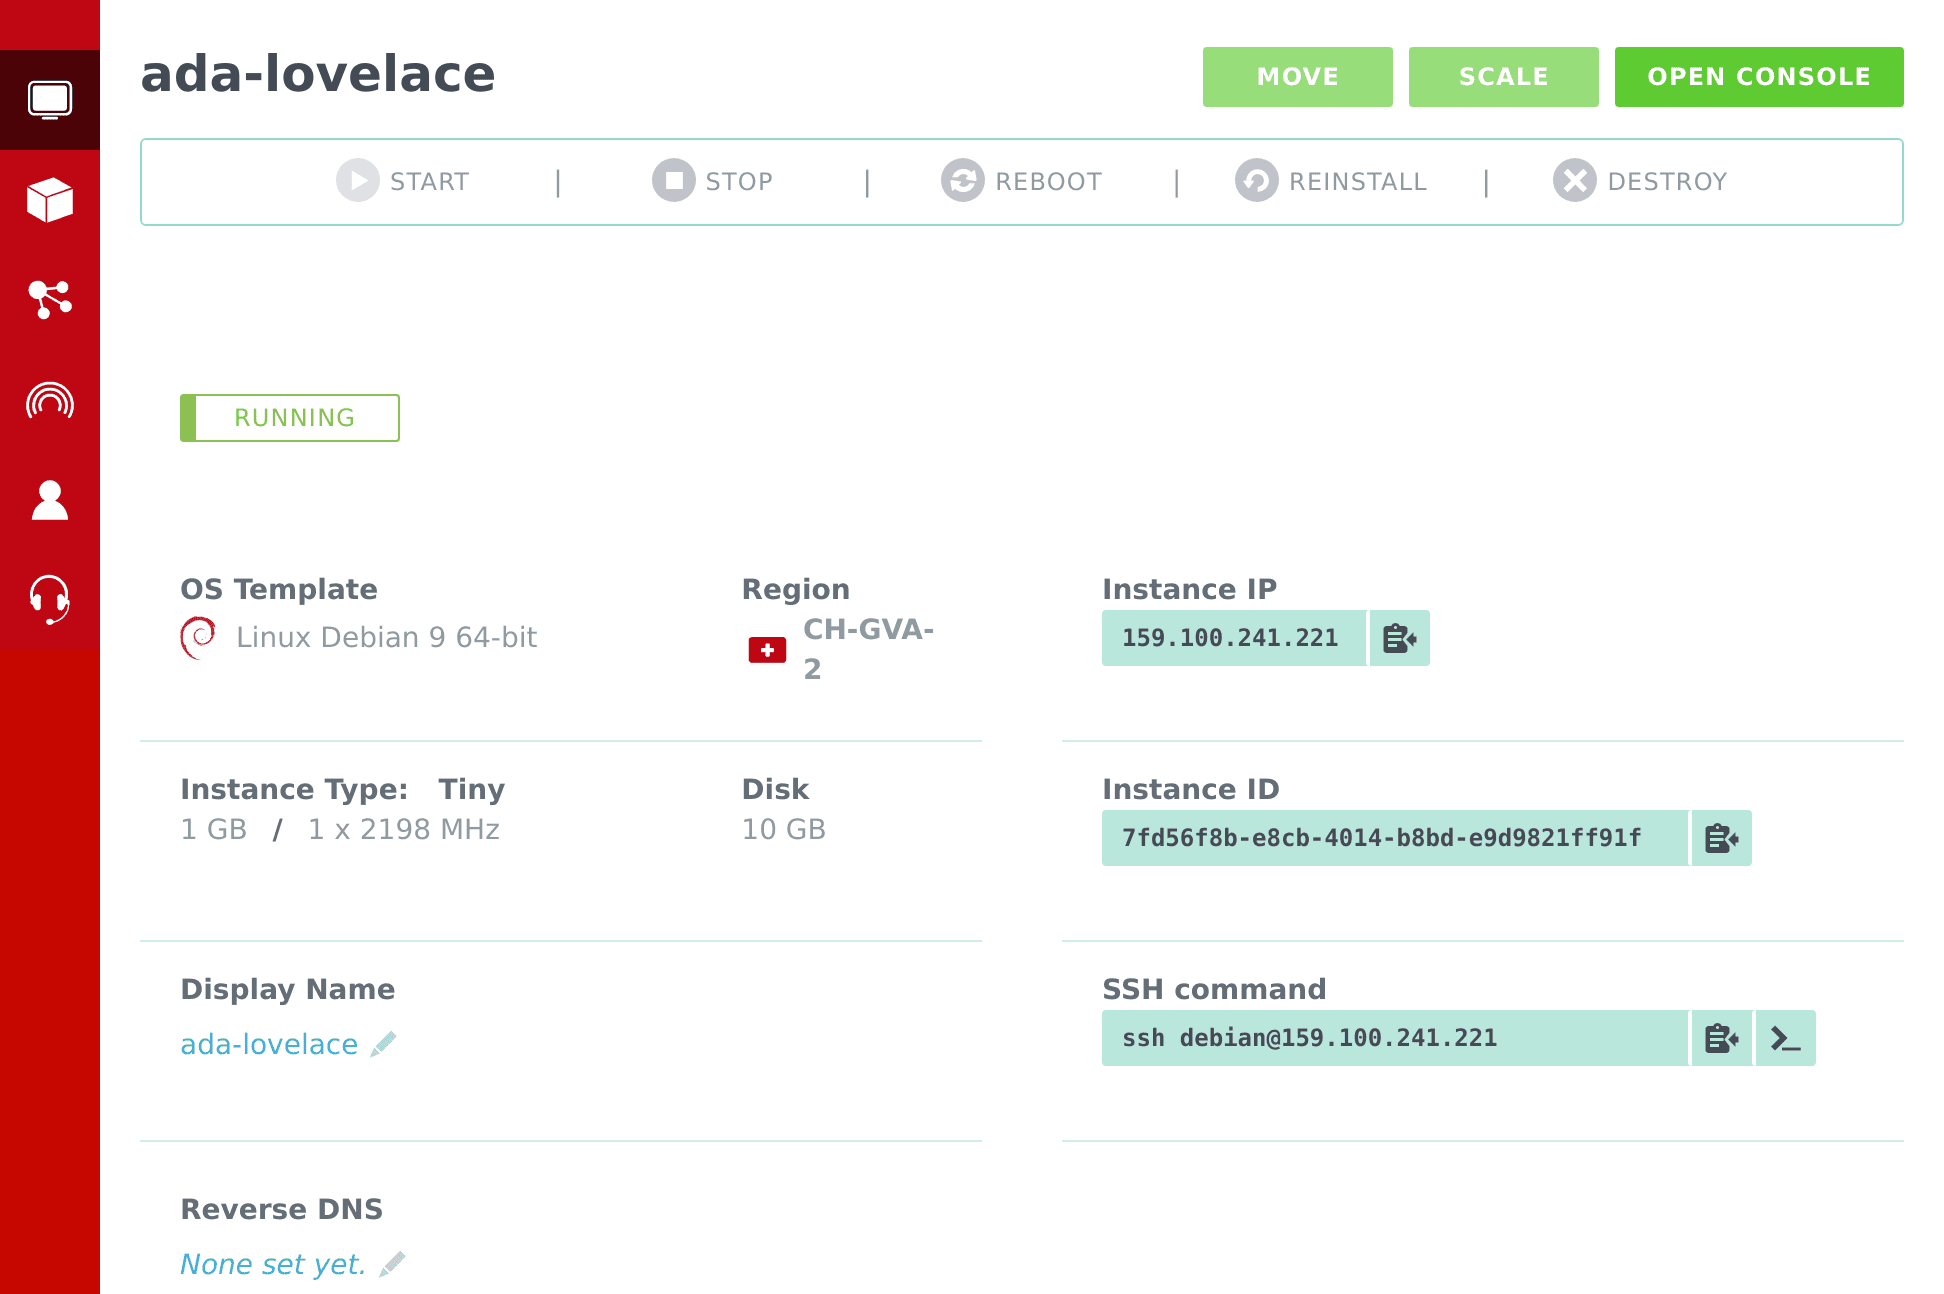
For the sake of the exercise, we will create a crash-test dummy Compute instance, modestly called after a famous computer scientist, Ada Byron, Countess of Lovelace.
In Terraform, we manage resources of various kinds. A Compute instance is of
the exoscale_compute kind. ada-lovelace represents the hostname. Before
importing a resource, it’s important to create an empty resource.
# machines.tf
resource "exoscale_compute" "ada" {
  # ...
}
The import requires two pieces of information: the resource name
composed of its kind (exoscale_compute) and label (ada) as well as the
identifier (Instance ID).
$ terraform import exoscale_compute.ada 7fd56f8b-e8cb-4014-b8bd-e9d9821ff91f

exoscale_compute.ada: Importing from ID "7fd56f8b-e8cb-4014-b8bd-e9d9821ff91f"...
exoscale_compute.ada: Import complete!

Import successful!

The resources that were imported are shown above. These resources are now in
your Terraform state and will henceforth be managed by Terraform.
Then, the show command displays the imported details of our resources.
$ terraform show
exoscale_compute.ada:
  id = 7fd56f8b-e8cb-4014-b8bd-e9d9821ff91f
  affinity_groups.# = 0
  disk_size = 10
  display_name = ada-lovelace
  ip_address = 159.100.241.221
  key_pair = yoan@exo
  name = VM-7fd56f8b-e8cb-4014-b8bd-e9d9821ff91f
  security_groups.# = 1
  security_groups.3814588639 = default
  size = Tiny
  state = Running
  template = Linux Debian 9 64-bit
  zone = ch-gva-2
Now comes the tedious part, we have to accordingly update our file. Some values
are computed meaning you can read them but cannot change them, e.g. the
ip_address which is provided.
# machines.tf
resource "exoscale_compute" "ada" {
  display_name = "ada-lovelace"
  key_pair = "yoan@exo"
  disk_size = 10
  size = "Tiny"
  template = "Linux Debian 9 64-bit"
  zone = "ch-gva-2"

  security_groups = ["default"]
}
Once done, trying to apply the plan should not do anything.
$ terraform plan

exoscale_compute.ada: Refreshing state... (ID: ea4d2802-62cb-42d8-a25c-b9b856c7778d)

No changes. Infrastructure is up-to-date.
Very good! The definition matches the reality. Our infrastructure has been put into code.
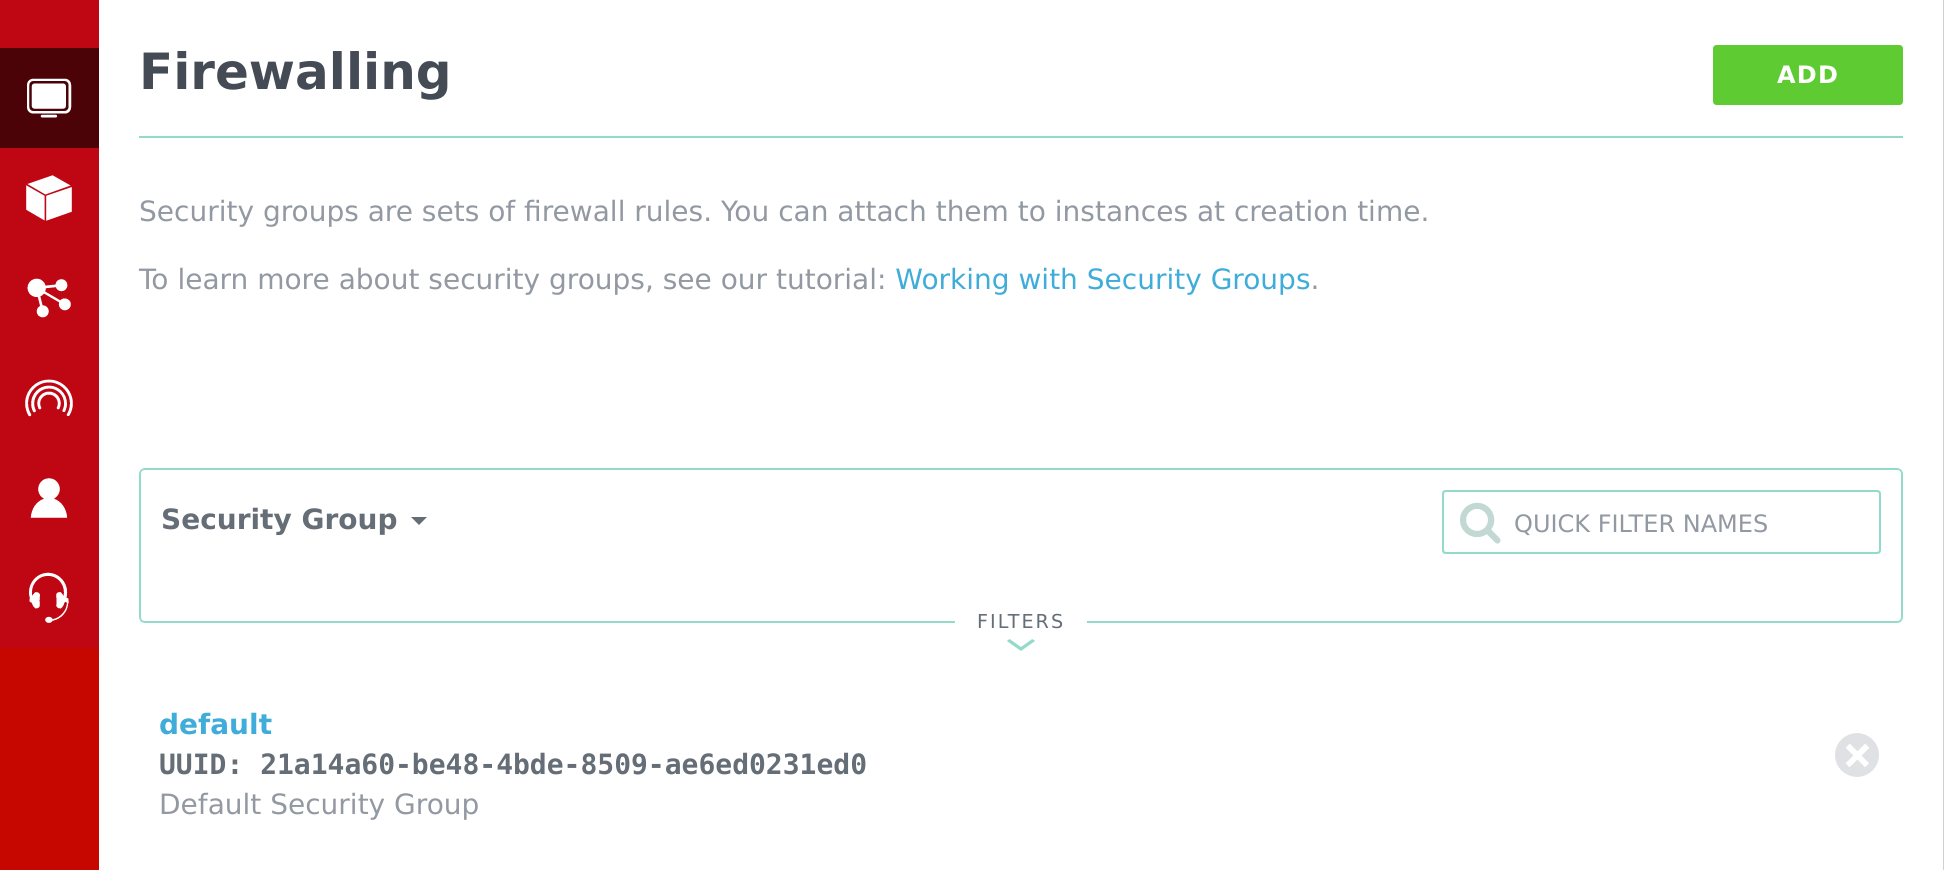
Importing an existing security group
As a Compute instance must belong to a Security Group, we will also
manage the provided default Security Group with Terraform. In the
Firewalling section, we will find its identifier.
# security_groups.tf
resource "exoscale_security_group" "default" {
  # ...
}
And, just like for the Compute instance, import the Security Group.
$ terraform import exoscale_security_group.default 21a14a60-be48-4bde-8509-ae6ed0231ed0
exoscale_security_group.default: Import complete!
  Imported exoscale_security_group (ID: 21a14a60-be48-4bde-8509-ae6ed0231ed0)
  Imported exoscale_security_group_rule (ID: 96366510-f356-42b2-91e8-5fd0b2a36c3f)
  Imported exoscale_security_group_rule (ID: 6b7d3e9b-b7a6-4bcb-9c98-145751bf2d99)

Import successful!
It imported three resources, the Security Group as well as the two rules it contains.
$ terraform show
exoscale_security_group.default:
  id = 21a14a60-be48-4bde-8509-ae6ed0231ed0
  description = "Default Security Group"
  name = "default"

exoscale_security_group_rule.default:
   ...

exoscale_security_group_rule.default-1:
   ...
We can now fill their description. Depending on the protocol or the rule, some bits are not required. E.g., a TCP rule only needs to have a port range and does not require the ICMP type and code details.
# security_groups.tf
resource "exoscale_security_group" "default" {
  name = "default"
  description = "Default Security Group"
}

resource "exoscale_security_group_rule" "default" {
  type = "INGRESS"
  security_group_id = "${exoscale_security_group.default.id}"
  protocol = "ICMP"
  icmp_type = 8
  icmp_code = 0
  cidr = "0.0.0.0/0"
}

resource "exoscale_security_group_rule" "default-1" {
  type = "INGRESS"
  security_group_id = "${exoscale_security_group.default.id}"
  protocol = "TCP"
  start_port = 22
  end_port = 22
  cidr = "0.0.0.0/0"
}
Verify that no mistakes were made. The ordering of the rules may differ
from the given example as default-1 could be the ICMP rule instead of
the TCP one.
$ terraform plan

No changes. Infrastructure is up-to-date.
As you’ve probably noticed, we replaced the security_group_id with a computed
value instead of the real ones. Doing so informs Terraform that those resources
are linked and must be managed together.
Linking the Security Group to the Compute instance
We should also link the Compute instance with the Security Group in a similar
fashion than we did for the rules. In this use case, we are free to use
the .name or the .id property.
 # machines.tf
 resource "exoscale_compute" "ada" {
   # ...

-  security_groups = ["default"]
+  security_groups = ["${exoscale_security_group.default.name}"]
 }
Verify that the previous change didn’t change anything.
$ terraform plan

No changes.
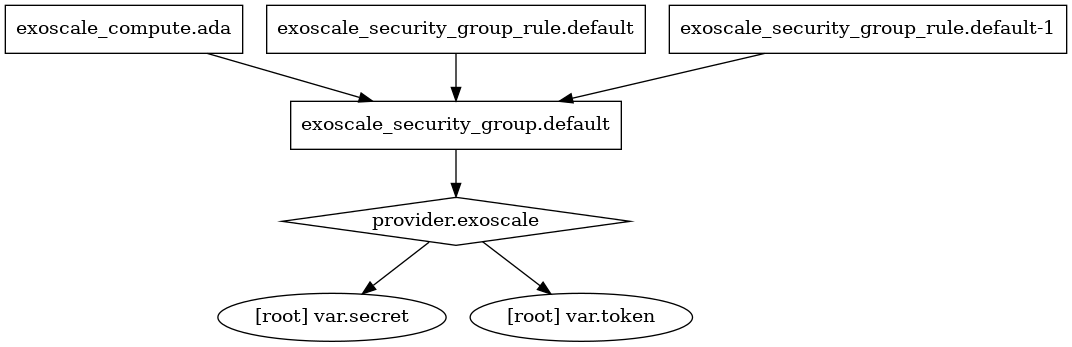
Terraform can show how the resources are linked with one another.
$ terraform graph | dot -Tpng > graph.png
Altering the Security Group
Before any drastic operations like scaling the Compute instance, we will modify
the rules by adding a description to rules of the default Security Group.
 # security_groups.tf
 resource "exoscale_security_group_rule" "default" {
   ...
   protocol = "ICMP"
+  description = "Ping"
   ...
 }

 resource "exoscale_security_group_rule" "default-1" {
   ...
   protocol = "TCP"
+  description = "SSH Access"
   ...
 }
Now comes the time to apply those changes.
$ terraform apply

...

Plan: 2 to add, 0 to change, 2 to destroy.
As you’ve experienced in the web interface, a rule cannot be altered and must be recreated. How pleasant is this way of doing it?
Scaling up the Compute instance
Another feature we can use here is to give our machine more Disk space as well as more CPU and memory power.
 # machines.tf
 resource "exoscale_compute" "ada" {
   key_pair = "yoan@exo"
-  disk_size = 10
-  size = "Tiny"
+  disk_size = 42
+  size = "Medium"
   template = "Linux Debian 9 64-bit"
   zone = "ch-gva-2"

   security_groups = ["${exoscale_security_group.default.name}"]
 }
NB: the disk space can only be expanded, made bigger. But the size can go either way.
When applying the new plan, the Compute instance will stop and start again using the new configuration.
And stopping it
Last but not least, you can manage the state of the instance.
resource "exoscale_compute" "ada" {
  # ...

  state = "Stopped"
}
Let’s stop it.
$ terraform apply

  ~ exoscale_compute.ada
      state: "Running" => "Stopped"


Plan: 0 to add, 1 to change, 0 to destroy.
Scaling horizontally?
Terraform is also able to scale horizontally using the count parameter.
Let’s explore how we would import our machines if we had two instances: ada-lovelace-0 and ada-lovelace-1.
# machines.tf
resource "exoscale_compute" "ada" {
  count = 2
  display_name = "ada-lovelace-${count.index}"
  ...
}
And then, by specifying which one is which, Terraform will link them to the Compute resource.
$ terraform import "exoscale_compute.ada[0]" <ID>

$ terraform import "exoscale_compute.ada[1]" <ID>
Conclusion
We’ve only scratched the surface of what can be done with Terraform. Most of the resources that are accessible through the Portal can be managed using the exoscale provider. E.g. DNS Domains, Anti-Affinity Groups, IP Addresses, etc.