Advanced Secure Shell: 6 Things You Can Do With SSH
 Sanja Bonic
Secure SHell is a network protocol that enables secure connections. It is heavily used to connect to servers, make changes, upload things, and exit. Sometimes these actions happen via tools and sometimes directly via the terminal. Here you’ll learn some things about using SSH in the terminal that go beyond the standard ssh user@yourserver.tld.

Let’s dive right into the advanced SSH techniques assuming you already know the basic technique for security and usability: SSH keys. For this article, we will use user as the SSH user and yourserver.tld as the domain or IP that you need to replace with the correct user name and host data. In order to change the configuration of SSH server-side, you will need root access either via logging in as root or via a user with sudo rights. In order for your system-wide changes in /etc/ssh/sshd_config to take effect, you will need to reload the SSH service. Depending on your operating system, this can be done, for example on Debian-based systems, via entering service ssh reload into the terminal as root or with sudo rights. Every time you change something on the server-side SSH configuration, you will need to reload (or restart) the service.
Configuration Order. Same as with other Linux system tools, the order with which configuration options are taken, is as follows.
- Command-line options given directly in the terminal/app.
- User’s configuration file (
~/.ssh/config). - System-wide configuration file for the client (
/etc/ssh/ssh_config).
This means that any parameter that is input while executing an SSH command takes precedence over the options that are in configuration files, so commands that are used only once are best input directly whereas specific hosts you connect to often or different user names are best kept in the configuration files. The system-wide configuration file for the SSH daemon itself can be found in etc/ssh/sshd_config.
Host Matching. There is a wildcard matching in the SSH configuration files which means that you can apply a set of directives to a wider range of hosts and then use specific directives for each host, for example:
~/.ssh/config
Host myhost-*
  Port 1234

Host myhost-one
  Hostname myhost-one.yourserver.tld
  User admin

Host myhost-two
  Hostname myhost-two.yourserver.tld
  User anotheradmin
In the above example, connections to both servers will go through port 1234 using different user names. With these basics, let’s start with 6 things you can do with SSH.
1. SFTP
I want to access files stored on my server without installing anything extra.
Most FTP applications (for example FileZilla) can use SFTP (SSH File Transfer Protocol) and it is the preferred way to transfer files to your web host. You put the address, port, and username of your SSH connection and are ready to transfer files easily with a GUI. Usually, you need to go to the settings of the application you are using in order to use your private SSH key for connections when password is disabled.

On the terminal, you can use SFTP by entering sftp user@yourserver.tld which brings you to an interactive console within the terminal. Keep in mind that you cannot use all SSH commands within this console as it is SFTP with limited command options like creating directories, browsing accessible directories, and downloading/uploading files. For more information, you can start with reading SFTP Using Command Line.
2. Keep Alive
My firewall keeps shutting down my connection!
Sometimes you need to keep a connection alive because the firewall you are behind wants to terminate the connection. There are three directives that can prevent an SSH connection from being dropped too early.
TCPKeepAlivecan be used in both the SSH client and daemon configuration files. It decides whether to send TCP messages to keep a connection standing. The default argument isTCPKeepAlive yes. If the TCP messages are sent, a crash or connection drop will be noticed, which might not always be wanted and some users will want to set this toTCPKeepAlive no, if their firewall keeps terminating the session or they are using internet that suffers from connection drops.ServerAliveIntervalin the client configuration specifies the seconds that the client will wait before sending a packet to the server to verify whether the connection is still alive. Setting the value to 0 disables this option which disconnects the SSH session after some idle time. The directiveServerAliveCountMaxspecifies how many times this packet will get sent before a connection is cancelled, if no response from the server is available.ClientAliveIntervalis a directive to be used in the SSH daemon configuration file/etc/ssh/sshd_config. It specifies the seconds that the server will wait until it sends a packet to the client. Setting this to 0 disables the option. The directiveClientAliveCountMaxis an integer value of how often the packet will get sent before terminating a connection if no response from the client is received.
A client’s SSH config file that has the same keep alive settings for all hosts looks like this:
~/.ssh/config
Host *
ServerAliveInterval 30
ServerAliveCountMax 10
This configuration means that the client will wait 30 seconds before sending a null packet and will try that for 10 times until it will accept that the connection can be dropped, if the server does not reply.
3. SSH Agent
I am so annoyed that I have to put in my passphrase every time, maybe I should just generate keys without passphrases?
A common and valid security practice is to encrypt your SSH private key and use a passphrase to decrypt it. The downside of this is that you have to retype your passphrase every time you initiate an SSH connection which can be burdensome, it is essentially a password to retype repeatedly. In order to solve this, you can use ssh-agent. It is a tool that keeps private keys in memory during a session. When the agent is started, all windows and applications that need an SSH connection will refer to the agent to get your private key, so you only have to type your passphrase once at the beginning of your session.
On most Linux systems, ssh-agent is running by default, so no further installation is needed. If you want to check whether ssh-agent is running, you can do so via the terminal:
ps x | grep ssh-agentIf it is not running yet, you can start it with:
eval $(ssh-agent)Once it is running, you can list all keys currently available to the ssh-agent with:
ssh-add -LIf the key you want to use is missing, you can add it via ssh-add /path/to/your/ssh/privatekey. When you are trying to connect to a host and get the error Too many authentication failures for user, it means that the ssh-agent is trying to go through all keys available. The best option is to define an IdentityFile /path/to/your/ssh/privatekey/forthishost in your config file. If you want to make sure that your connection will only allow the IdentityFile you define, you can use the directive IdentitiesOnly yes in your config, which tells SSH to use only those keys that are provided via the terminal or config file. An example for this is as follows:
~/.ssh/config
Host yourserver
HostName yourserver.tld
IdentityFile ~/.ssh/yourprivatekeyname
IdentitiesOnly yes
User user
Agent Forwarding
I’m so going to just type the passphrase once at startup and not bother with it again, even when I connect from host to host.
Agents can also be forwarded in order to be able to use the same credentials from connected host to connected host. While this is convenient, keep in mind that an agent holds your private key in memory. A malicious program on one of the connected hosts can use your key to execute commands while you are connected. Agent forwarding is thus an unsafe method and should only be used when you are connecting to machines that you trust.
In order to use agent forwarding, you need to set ForwardAgent yes in your client’s ssh_config and AllowAgentForwarding yes on your /etc/ssh/sshd_config on each server you want to use the agent forwarding on.
4. Tunneling via Local Port Forwarding
I want to do things that aren’t allowed on my computer but I know a machine from where they are allowed.
Tunneling is one of the most common advanced use cases for SSH. It encrypts application traffic inside an SSH connection and protects possibly unsafe data traffic, which is especially useful as connection to legacy software or otherwise poorly secured applications and systems, thereby making it a security wrapper for software that cannot or will not be changed and is unsafe to use for data traffic on its own.
Server
Server-side changes are configured in the file /etc/ssh/sshd_config. Lines with a leading # are comments, so if you need one of those options, you can either duplicate the line and make your changes or uncomment the original line. For tunneling, specifically port forwarding, to work, you will need to allow TCP forwarding.
/etc/ssh/sshd_config
AllowTcpForwarding yesReload the ssh service if you made changes to the server configuration file. How to reload or restart a service on your server depends on your operating system. In most cases, the following should work:
service ssh reloadClient
There are several ways to use SSH tunnels. In most use cases, you will use SSH tunnels to achieve something like this:
- You want to execute some queries on a database that is only accessible through another machine, so you will tunnel your connection through that machine. The following example shows how to tunnel to a PostgreSQL database server via
yourserver.tldand then use the terminal-based psql frontend from there.
ssh -L 5000:psql.server.ip:5432 user@yourserver.tld
psql -p 5000 -h 127.0.0.1 -U postgres- Some websites are blocked in your network, so you will tunnel into a machine that allows these connections and surf these websites from there. The following command enables you to use your local machine to tunnel into a machine where the website is not blocked. On your local computer, you can then open your browser using the address
http://localhost:1337which will open upyourwebsite.comusing its default HTTP port 80.
ssh -L 1337:yourwebsite.com:80 user@yourserver.tld5. X11 Forwarding
There is some really expensive software on the server that I don’t have a license for - I could just connect to the server and display the software on my home screen.
You can initiate X11 forwarding via SSH, meaning you can display the remote computer’s desktop environment and forward X11 packets to the computer that you are using. This is useful in some cases, specifically where you have to use the GUI of a specific software. In our case, we’ll test X11 forwarding with xclock.
Prerequisites
The xauth package must be installed on the server in order to forward X11 packets to the client. If you want to test xclock, you will have to install that as well.
Server
On the server, you will need to enable X11Forwarding in /etc/ssh/sshd_config. Look for a line with X11Forwarding and set it to yes. If it is already there and commented out, you need to uncomment it by deleting the leading #.
/etc/ssh/sshd_config
X11Forwarding yesDo not forget to reload the ssh service in case you had to change the configuration file.
Client
ssh -X user@yourserver.tldYou should now be using X11 forwarding from the server to your client machine. By typing xclock, a window with a clock should pop up on your desktop machine, as shown in the screenshot.
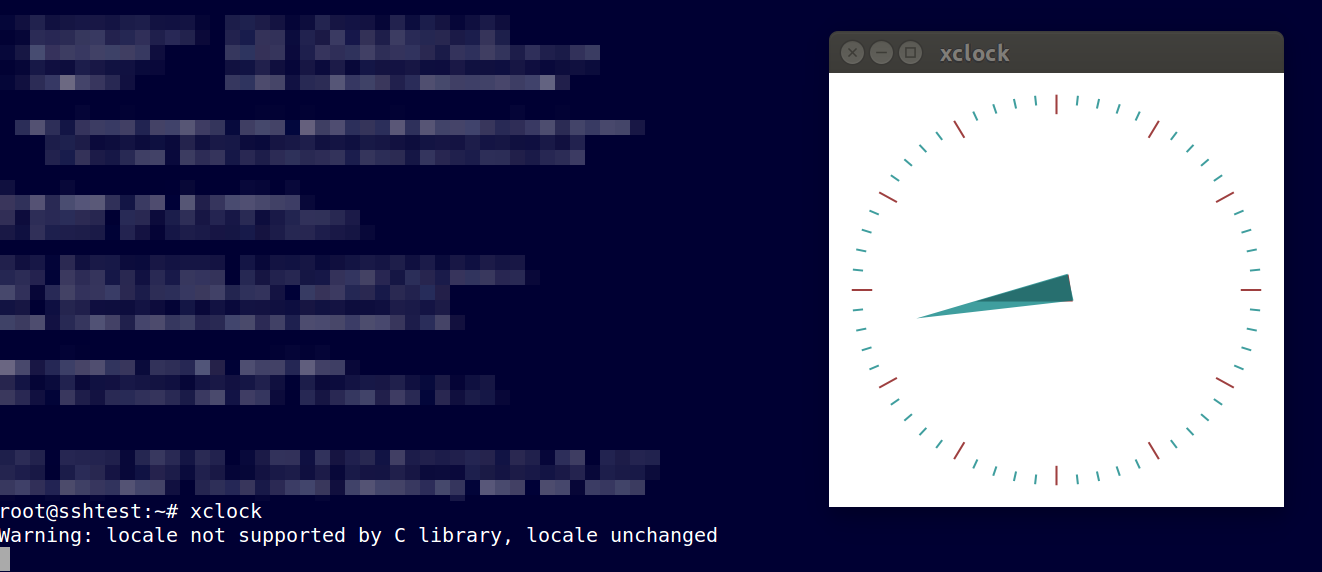
X11 forwarding is a great tool when you want to use a software that due to licensing reasons can be installed only on one server or has different performance needs than your normal computer can provide.
6. ProxyJump
I want to access my private network that has no connection to the outside world - I’ll set up a server I can connect to and then jump to the machines I need from there.
A common access strategy when using SSH is to connect to a bastion and then from there jump to devices, which have no public routes. This bastion is then referred to as the first jump host in which can be a chain of proxies. ProxyJump is a new addition to OpenSSH which simplifies using jump hosts. This is used as an additional layer of security for machines that you don’t want to have exposed publicly.
One use case for this is to have a small machine that serves as a bastion entity behind a router where you run your sshd and jump to other hosts from there - this can, for example, be useful for home networks. This is not much different from port forwarding and tunneling from one machine to the next, except there is now a keyword ProxyJump enabled for this use case and multiple jump hosts can be specified in one go, via a comma-separated list containing [user@]host[:port]. In the terminal, the usage is via the -J parameter, like this:
ssh -J proxy.server.tld:22 yourserver.tldFor a more complicated version jumping through several hosts and with different usernames, use this:
ssh -J user1@proxy.server1.tld:port1,user2@proxy.server2.tld:port2 user@yourserver.tldSince jump hosts are something you would most likely use on a regular basis, it is advisable to include them in your user or system-wide SSH config. The above example in a config file would look as follows:
~/.ssh/config
Host yourserver.tld
  HostName yourserver.tld
  ProxyJump user1@proxy.server1.tld:port1,user2@proxy.server2.tld:port2
  User user
You could also specify SSH configurations for each of the jump hosts and use their aliases in the configuration for the host that uses ProxyJump.
~/.ssh/config
Host firstproxy
  HostName proxy.server1.tld
  Port 1234
  User user1

Host secondproxy
  HostName proxy.server2.tld
  Port 5678
  User user2

Host yourserver.tld
  HostName yourserver.tld
  ProxyJump firstproxy,secondproxy
  User user
Note that the new ProxyJump and the older directive ProxyCommand compete with each other on a first come, first serve basis - that means whichever is specified first, counts. Every subsequent command will be disregarded. If ProxyJump is not supported by your SSH client, you can replace the ProxyJump directive by ProxyCommand ssh firstproxy -W %h:%p.
Want More?
Are you interested in more posts like this? Tell us what topics you want to hear in detail about on Twitter via @Exoscale. Contributions to the blog are also welcome if you want to write an article yourself.