Secure a CI/CD Chain on Exoscale with Vault - Part 2
 Johnatan Illi
In the first part of this series we’ve laid the foundations of an infrastructure that can be used to secure a CI/CD pipeline. This infrastructure relies on Vault to issue short-lived Exoscale API credentials to the GitLab CI runners, so they are granted just the necessary permissions to perform their tasks within a limited time window.
Before moving on to the second part of the series, let’s recap some important bits from our previous actions:
- We’ve defined a Vault Exoscale secrets backend
gitlab-ci-runnerrole issuing Exoscale API credentials valid up to 15 minutes restricted to the set of API operations required by the GitLab CI runners. - Then, we’ve defined a Vault policy named
exoscale-create-apikeygranting access to the Exoscale secrets backendgitlab-ci-runnerrole, and associated this policy to a Vaultgitlab-ci-runnerAppRole: this is the AppRole that will be used by the GitLab CI runners in this part of the series. - Finally, we’ve create another Vault policy (
gitlab-ci-runner-secrets) which we associate to a Vault token allowing its bearer to retrieve a secret ID from thegitlab-ci-runnerAppRole.
In this second part, we will proceed to setup the CI/CD pipeline of an example application to perform the following tasks securely:
- Build and register a custom template containing the application
- Test that the application meets our functional requirements (smoke testing)
- Deploy the application

Prerequisites
Our example CI/CD pipeline relies essentially on the following tools:
Vault
As we showcased in our previous article, Vault is the backbone of our secure CI/CD pipeline implementation, providing the workers restricted Exoscale API credentials for a limited time. You can get an overview of it works and how it is integrated with Exoscale here.
Packer
Packer allows us to create a virtual machine disk image of our application, that will then be registered to Exoscale as a Compute instance custom templates. You can learn more on how to use Packer on Exoscale in this previous blog article.
GitLab Runners
To run our GitLab CI jobs on Exoscale, we have deployed GitLab Runners on an Instance Pool as presented in the Build Highly Available Gitlab Runners Infrastructure Using Instance Pool article.
CI/CD Pipeline Implementation
GitLab CI Setup
In order to focus on the relevant bits, this articles assumes the following:
- Our example application is deployed on an Exoscale Instance Pool to ensure scalability.
- For the sake of simplicity and brevity, the application is a simple Hello, World! server similar to what has been showcased in our past article Creating Custom Templates Using Packer.
- The GitLab CI runners have all the tools required (
exoCLI, Packer, Vault) installed.
As explained in the previous part, Vault AppRole is an authentication method composed of 2 pieces of information: a role ID (unique and static, similar to a username), and a secret ID (which can – and should – be dynamically generated multiple times for a given role ID, similar to a password).
These 2 parts should not be stored durably together, so that in case of a data leak or security breach the worst that happens is only half of the credentials are known and therefore cannot be used to gain access to granted permissions.
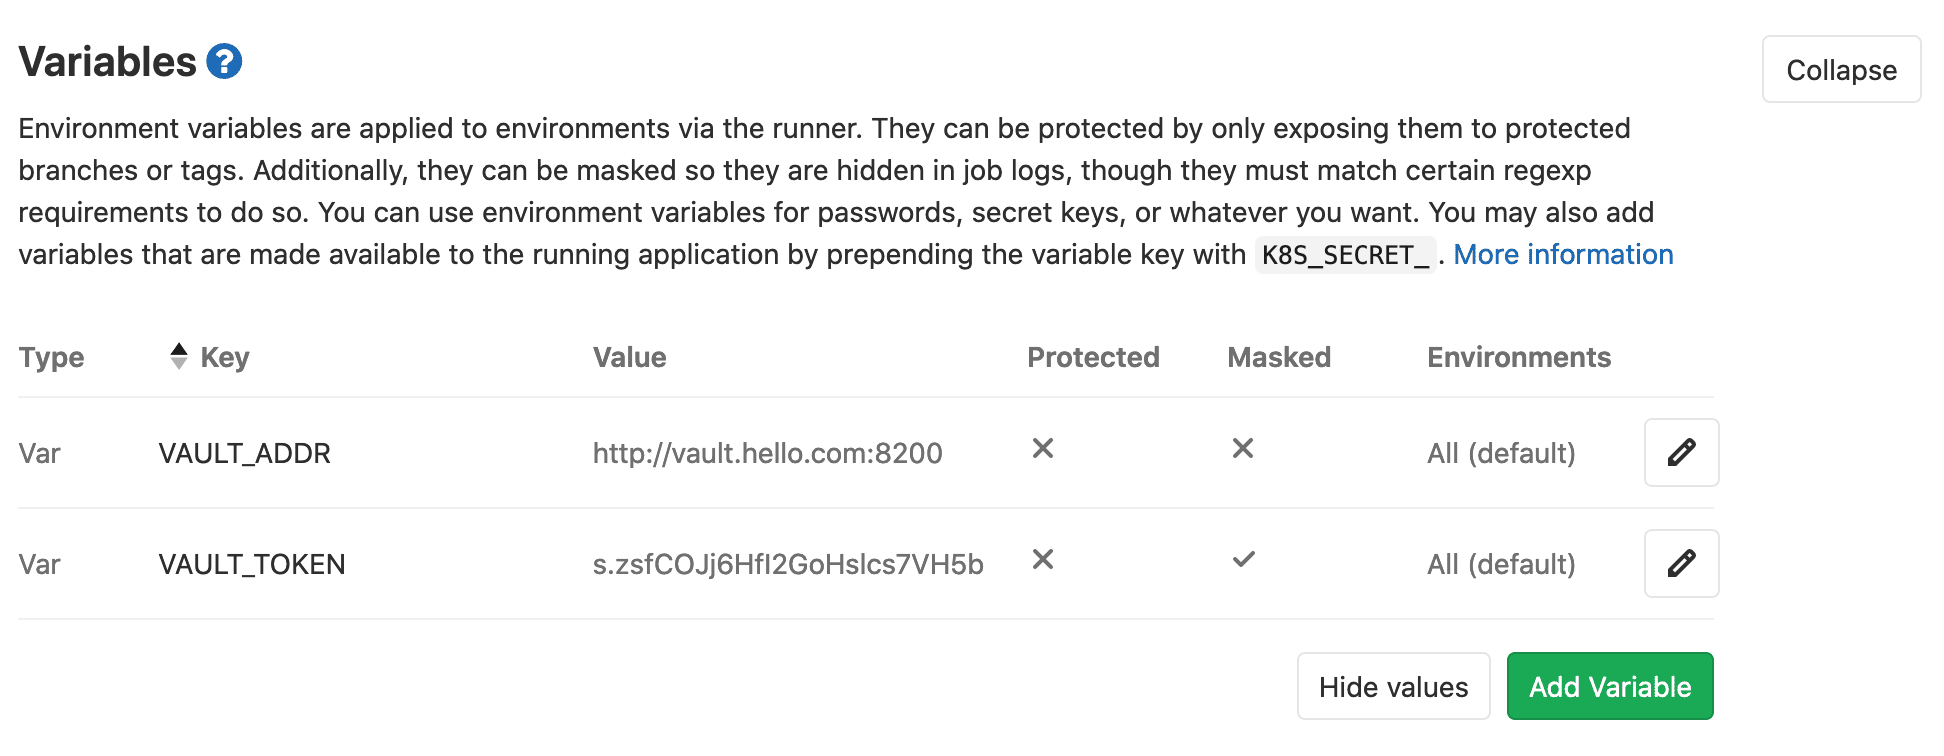
As a result, we will store the gitlab-ci-runner AppRole role ID directly on the runners’ Compute instance in the GitLab CI runner configuration; in addition, the Vault token created at the end of the previous part – which is associated to the gitlab-ci-runner-secrets policy – into a GitLab CI variable that will be passed to the GitLab CI runners with the other job metadata.
The GitLab CI backplane configuration is minimal, as most of the pipeline configuration is done through a .gitlab-ci.yml file versioned in the application Git repository.
Before proceeding to describe all the sequential steps of our CI/CD pipeline (corresponding to GitLab CI stages), we start by setting a few variables and configuration helpers that will be used throughout the pipeline:
# This helper defines the sequence of commands that the GitLab CI runners have to execute in order to retrieve Exoscale API credentials
.vault_get_api_credentials: &_vault_get_api_credentials >
  export VAULT_SECRET_ID=$(vault write -field=secret_id -f auth/approle/role/gitlab-ci-runner/secret-id) &&
  test -n "${VAULT_SECRET_ID}" || (echo "ERROR: failed to retrieve Vault gitlab-ci-runner AppRole secret ID" ; exit 1) &&
  export VAULT_TOKEN=$(vault write -field=token auth/approle/login role_id=${VAULT_ROLE_ID} secret_id=${VAULT_SECRET_ID}) &&
  credentials=$(vault read -format=JSON exoscale/apikey/gitlab-ci-runner) &&
  export EXOSCALE_API_KEY=$(jq -r .data.api_key <<< "${credentials}") EXOSCALE_API_SECRET=$(jq -r .data.api_secret <<< "${credentials}")

# This helper is a convenience macro that will define a variable containing the name of the Compute instance custom template resulting of the build, which will be suffixed with the tag associated to the Git commit or with the first characters Git commit hash if no tags are specified
.get_template_name: &_get_template_name >
  template_name=hello-$(test -n "${CI_COMMIT_TAG}" && echo ${CI_COMMIT_TAG} || echo ${CI_COMMIT_SHA:0:7})

# Global variables used across all stages
variables:
  EXOSCALE_ZONE: de-muc-1
  APP_INSTANCE_POOL: hello-app

# We apply the following tags to all the jobs that will be defined in the pipeline. The "vault" tag ensures our CI jobs will be dispatched only to our custom GitLab CI runners that are equipped with Vault client as well as the VAULT_ROLE_ID part of the AppRole.
default:
  tags:
    - vault
Our CI/CD pipeline consists of the following stages:
stages:
  - build
  - test
  - deploy
Build Stage
The build stage builds the hello application custom template using Packer. Note: as illustrated in our previous article showcasing Packer usage on Exoscale, we use the exoscale-import post-processor to register the template automatically once the disk image build is complete.
build:
  stage: build
  before_script:
    - *_vault_get_api_credentials
    - *_get_template_name
  script:
    - 'cd packer/'
    - 'ssh-keygen -q -t rsa -C "packer" -N "" -f id_rsa'
    - 'printf "#cloud-config\nssh_authorized_keys:\n- \"%s\"\n" "$(< id_rsa.pub)" > user-data'
    - 'cloud-localds seed.img user-data'
    - 'PACKER_SSH_PRIVATE_KEY=$(readlink -f id_rsa) packer build -var template_name=${template_name} hello.json'
Test Stage
During the test stage, we boot a Compute instance based on the custom template we’ve just registered, and run a few external tests to ensure that no regressions happen between changes (also called smoke testing):
test:
  stage: test
  before_script:
    - *_vault_get_api_credentials
    - *_get_template_name
    - instance=hello-${CI_COMMIT_SHA:0:7}-test
    - 'exo -Q vm create ${instance} --zone ${EXOSCALE_ZONE} --template hello-${CI_COMMIT_SHA:0:7} --template-filter mine --security-group hello'
    - 'for i in {1..10}; do curl -s -o /dev/null http://$(exo -O text --output-template "{{.IPAddress}}" vm show ${instance}):8080 && break || sleep 10s; done'
  script:
    - 'curl -s http://$(exo -O text --output-template "{{.IPAddress}}" vm show ${instance}):8080 > hello.out'
    - 'exo -Q vm delete -f ${instance}'
    - 'grep -q "Hello, World!" hello.out || (echo "ERROR: unexpected application output: $(< hello.out)" ; exit 1)'
Deploy Stage
At this point our application is ready to be deployed to production, which in our scenario is running on an Instance Pool.
To deploy the new version of our application, we update the Instance Pool to point to the new custom template, then temporarily scale it up to double its original size to provision new members using the up-to-date template, wait a little while for them to boot up, and finally downsize the pool to its original size to discard the older members running the previous version of the application:
deploy:
  stage: deploy
  before_script:
    - *_vault_get_api_credentials
    - *_get_template_name
  script:
    - 'pool_size=$(exo -O text --output-template "{{.Size}}" instancepool show ${APP_INSTANCE_POOL} -z ${EXOSCALE_ZONE})'
    - 'exo instancepool update ${APP_INSTANCE_POOL} --zone ${EXOSCALE_ZONE} --size $((${pool_size} * 2)) --template ${template_name} --template-filter mine'
    - 'sleep 60s'
    - 'exo -Q instancepool update ${APP_INSTANCE_POOL} --zone ${EXOSCALE_ZONE} --size ${pool_size}'
  only:
    - master
Please note that, although it is realistic and totally functional, this scenario cut a few corners for the sake of simplicity and brevity: a more bullet-proof implementation would actually ensure that the new Instance Pool members are ready to serve before discarding the older ones.
Also, as a precaution it would be safer to introduce an intermediate stage where the pipeline would deploy to a staging environment, and require manual confirmation before actually deploying to the production pool – e.g. using GitLab CI’s when:manual predicate.
Closing Words
We hope that this series of articles has successfully showcased the power of the Exoscale platform our tooling in a practical setting. Cloud security has never been more important than it is now, and our team is dedicated to offer state-of-the-art solutions to our customers.