Automating Instances: Start and stop after schedule
 Denis Arnst
Are you looking to save on your cloud computing costs? One simple way to do so is by automating the stopping and starting of your instances. By stopping your instances for example at night, when they are not being used, and starting them back up in the morning, you can significantly reduce your monthly bill. With some simple steps you can easily set up a cronjob to automate your instances.
Scheduling API Calls: Automating with Cronjobs
To allow automated starting and stopping of instances, you need to create a (micro) Linux instance and set up a cronjob that leverages the Exoscale API.
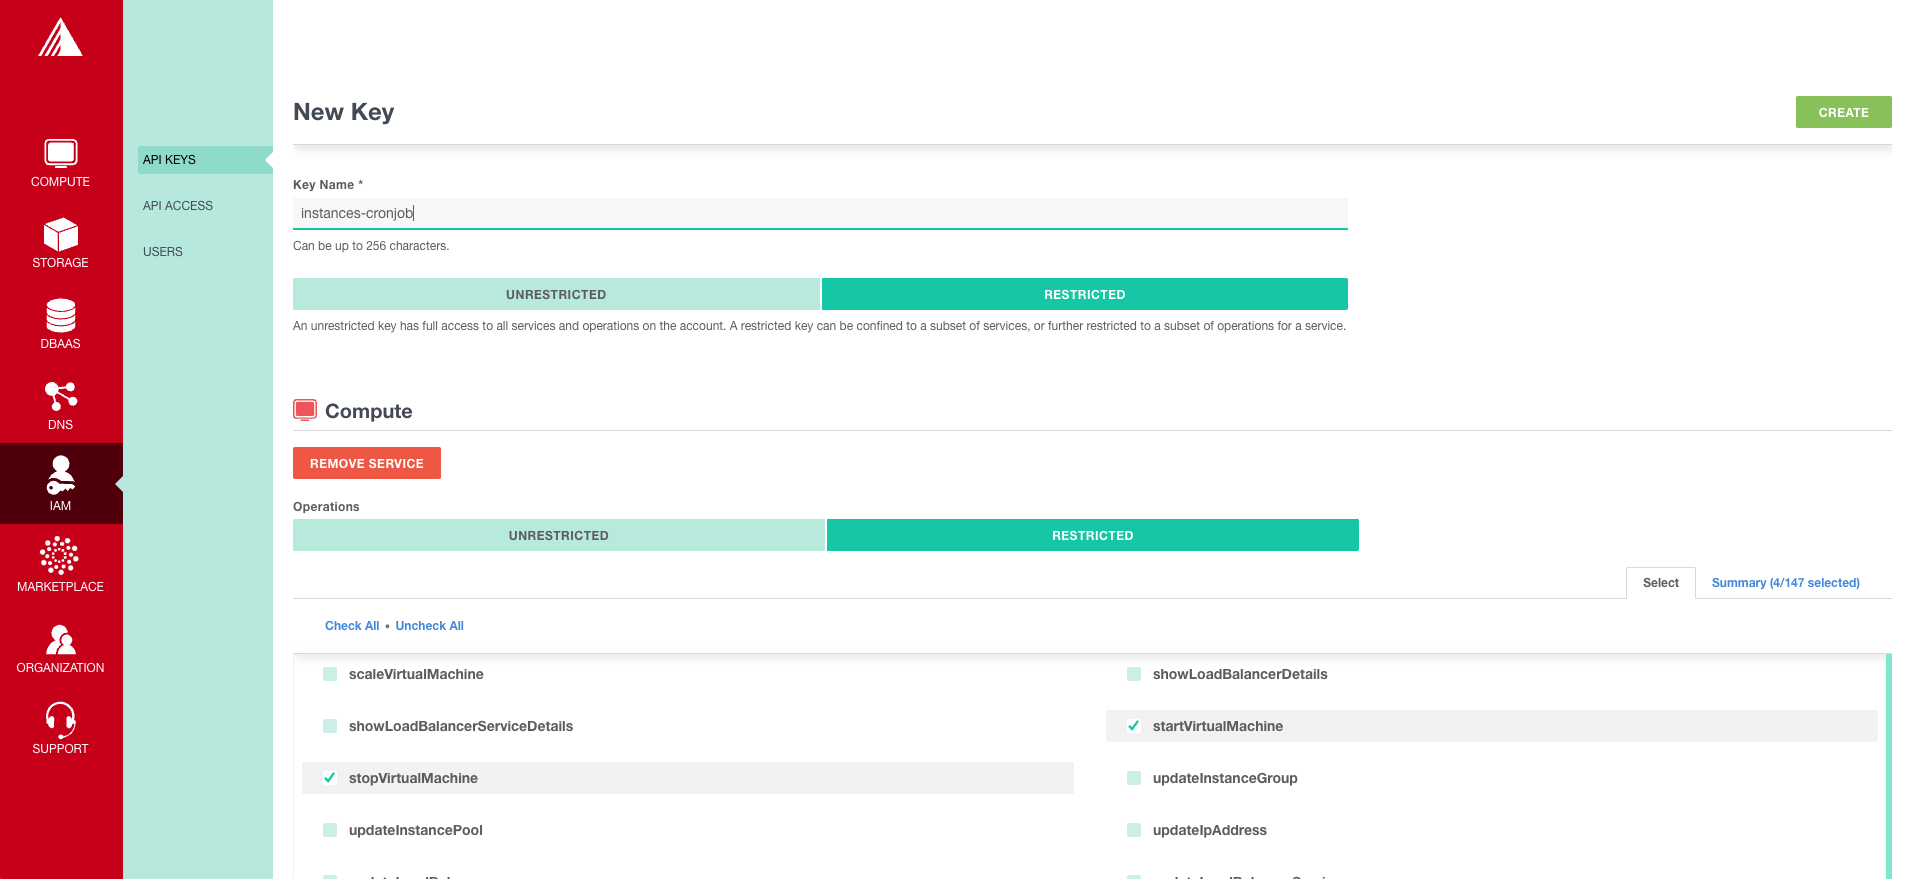
First, you need an API key for the Exoscale CLI. Log into the [Portal](https://portal.exoscale.com/login?next=%2F%3F) and click on `IAM -> API Key -> Add Key`. Select *Restricted* and add the *Compute* service. There you should select `stopVirtualMachine`, `startVirtualMachine` and `listVirtualMachines`, `queryAsyncJobResult`. Remember the secret, but don't share it with anyone.
For the actually setup of the cronjob you can choose between two methods. Either you log in via SSH and set up the cronjob manually, or you can use cloud-init to automate the process. Both methods require a Linux instance. Make sure you create a Security-Group beforehand which allows access to Port 22/TCP for SSH from your IP or Subnet.
Method 1: Using SSH to set up a Cronjob
Start by creating a Linux instance. Use the Exoscale CLI or go to Compute -> Instances -> Add within the Portal. Select Ubuntu from the Template list, choose any Zone, and choose an instance type (Micro should be sufficient). Additionally, select the Security Group where you allow SSH. Then go ahead and create your instance.
Once the instance is created, you can log in to it via SSH using a tool like ssh or putty. You will need to provide the IP address or hostname of your instance, as well as the username and password shown in the Exoscale UI or by using the Exoscale CLI (*hint*: It's always easier and better to specify a keyfile instead of using a password).
Once you are logged in to your instance, you need to setup the Exoscale CLI. Download the [latest version](https://github.com/exoscale/cli/releases) (.deb package when you use Debian/Ubuntu) install it using `dpkg`:
sudo -s # Log in as root if not yet
VERSION=1.64.0
wget https://github.com/exoscale/cli/releases/download/v$VERSION/exoscale-cli_"$VERSION"_linux_amd64.deb
dpkg -i exoscale-cli_"$VERSION"_linux_amd64.deb
After installation has finished, run exo config to submit your API key. You can already try stopping or starting an instance by issuing exo compute instance stop NAME -z de-fra-1 replacing the name and zone respectivly.
Next you need the cronjob. Cron is a Linux utility that allows you to schedule tasks to be run automatically at a specified time or interval. To create the cronjob, you'll need to edit the crontab file for the user you want to run the job. Simply run the following command:
crontab -eThis will open the crontab file in a text editor. At the bottom of the file you can add a new line with the schedule and command for your cronjob. For example, to stop your instance at 10 PM and start it again at 6 AM, you could use the following schedule and command:
0 22 * * * exo compute instance stop NAME -z de-fra-1 --force --quiet
0 6 * * * exo compute instance start NAME -z de-fra-1 --force --quiet
The first line tells cron to run the exo compute instance stop NAME -z de-fra-1 --force --quiet command at 10 PM every day, while the second tells cron to run the exo compute instance start NAME -z de-fra-1 --force --quiet command at 6 AM every day. The exo command is the Exoscale CLI, which allows you to interact with the Exoscale API from the command line.
Remember to replace NAME with the name of your instance and de-fra-1 with the Zone where your instance is located. Be sure to save and close the crontab file after adding your cron job. Your instance will now be automatically stopped at 10 PM and started again at 6 AM every day.
Method 2: Using cloud-init to fully automate the set up of the Cronjob
Instead of using SSH to configure our automation, you can use cloud-init. Cloud-init is a tool that is used to customize the initialization of a cloud instance, perform tasks such as installing packages, writing files, and running scripts. To leverage this tool, you need to write a Cloud-init or bash script which you can insert into the User Data field during instance creation.
For our use case you can follow this example:
#cloud-config

# Install dependencies
packages:
  - curl

# Download the Exoscale CLI package
runcmd:
  - EXOSCALE_CLI_VERSION=1.64.0
  - curl -L -o /tmp/exoscale-cli.deb https://github.com/exoscale/cli/releases/download/v${EXOSCALE_CLI_VERSION}/exoscale-cli_${EXOSCALE_CLI_VERSION}_linux_amd64.deb

# Install the Exoscale CLI
  - dpkg -i /tmp/exoscale-cli.deb

# Set up the cron job to stop and start the instance
write_files:
  - path: /etc/cron.d/exoscale-instance-scheduling
    permissions: '0644'
    owner: root
    content: |
      SHELL=/bin/bash
      PATH=/usr/local/sbin:/usr/local/bin:/sbin:/bin:/usr/sbin:/usr/bin
      MAILTO=root
      # Stop the instance at 10 PM and start it again at 6 AM
      0 10 * * * root exo compute instance stop NAME -z DE-FRA-1 --force --quiet
      0 6 * * * root exo compute instance start NAME -z DE-FRA-1 --force --quiet
  - path: /root/.config/exoscale/exoscale.toml
    permissions: '0644'
    owner: root
    content: |
      defaultaccount = "instancecron"

      [[accounts]]
        account = "instancecron"
        defaultZone = "de-fra-1"
        endpoint = "https://api.exoscale.com/v1"
        environment = ""
        key = "YOURKEY"
        name = "instancecron"
        secret = "YOURSECRET"
To use this cloud-init script, you need to replace the name of your instance and the desired stop and start times in exo-commands, as well as your Exoscale API key and secret in the api_key and api_secret variables. After inserting those into the User Data field during instance creation, it should automatically set up your cronjob. To modify it, you can either log into SSH and edit the file /etc/cron.d/exoscale-instance-scheduling or simply delete the instance and recreate it with an updated plan.
To debug it, look for cloud-init errors in `/var/log/cloud-init-output.log`, or look for errors reported by cron in the syslogs: `cat /var/log/syslog | grep cron`.
Start Automating
Whether you are a small business owner, a startup, or an enterprise organization, automating your instance management in the cloud can help to reduce your cloud costs and maximize your return on investment. By using the Exoscale CLI and the steps outlined in this blog post, you can start now and immedidately benefit of automated instance management in your Exoscale cloud environment.