Libcloud 0.14 and Exoscale
Libcloud 0.14 and Exoscale
This is a guest post by Tomaz Muraus. Tomaz Muraus is a project chair and a PMC member on the Apache Libcloud project. In his free time, he loves writing code, contributing to open-source projects, advocating for software freedom and cycling. Be sure to check out his website at https://www.tomaz.me.
In this blog post we are going to have a look at Apache Libcloud, an open-source Python library for interacting with many of the popular cloud service providers using a unified API.
What is Libcloud?
Apache Libcloud is an open-source Apache 2.0 licensed Python library for interacting with many of the popular cloud service providers using a unified API. It was created to make it easy for developers to build products that work between any of the services that it supports.
Latest version supports more than 30 different providers (including Exoscale) and exposes four main APIs:
Compute and Block Storage - services such as Amazon EC2, OpenStack Nova, CloudStack and Exoscale open cloud
Object Storage and CDN - services such as Amazon S3 and OpenStack Swift
Load balancers - services such as Amazon ELB and Rackspace Cloud Load Balancers
DNS - services such as Linode DNS, Rackspace Cloud DNS and Zerigo DNS
Libcloud 0.14.0
This past week, Libcloud 0.14.0 was released. This version represents a big milestone for the project and it includes many new features, changes and improvements. Among other things it also includes a new driver for Exoscale open cloud which is based on the CloudStack one.
Other changes worth a mention:
New standard compute API for SSH key-pair management
Addition of a programmatic way of updating the pricing file and ability to use a custom pricing file
Many improvements and new features in the CloudStack driver
Ability to export Libcloud’s DNS zone to BIND zone format
New compute and load balancer driver for Google Compute Engine (GCE)
and much more
For a full list of changes, please refer to the following links: Changes with Apache Libcloud 0.14.0-beta3, Changes with Apache Libcloud 0.14.0.
Getting started with Libcloud and Exoscale driver
As noted above, Libcloud 0.14.0 now includes an official driver for Exoscale open cloud. In this section we are going to have a look at how to get started with Libcloud and Exoscale driver.
To get started you first need to install the library. Libcloud is a Python library which means you can install it using Python package manager called pip:
pip install apache-libcloud==0.14.0
After you have installed it, you can start using it.
Example 1 - Create a node
This example shows how to create a new Exoscale instance or in a Libcloud terminology, a so called node.
https://gist.github.com/Kami/6d066089979c2bab7c43
import random
from pprint import pprint

from libcloud.compute.types import Provider
from libcloud.compute.providers import get_driver

API_KEY = 'exoscale api key'
API_SECRET_KEY = 'exoscale api secret key'

cls = get_driver(Provider.EXOSCALE)
driver = cls(API_KEY, API_SECRET_KEY)

size = [size for size in driver.list_sizes() if size.name == 'Micro'][0]
image = [image for image in driver.list_images() if 'Ubuntu 12.04 LTS 64-bit'
         in image.name][0]

name = 'exoscale-node-' + str(random.randint(0,100))
node = driver.create_node(name=name, image=image, size=size)

pprint(node)
On line 10 we obtain a reference to the Exoscale driver and on line 11, we instantiate it with our credentials.
On line 13 we select a size we want to use. In this case this is the smallest available size called Micro. On line 14 we select an image (operating system) we want to use. In this example, we have selected 64 bit version of Ubuntu 12.04 LTS.
On line 19 we then call create_node with our selected size, image and name.
To make the example work, you need to set API_KEY and *API_SECRET_KEY *variable to your API credentials. Those credentials can be obtained in the Exoscale control panel.
A couple of seconds after you run this example, you should see a new instance pop up in the control panel.

Example 2 - Bootstrap a node
In this example we are going to have a look at how to bootstrap a node. Bootstrapping means creating a node and once the node comes online, executing arbitrary shell commands on it.
Bootstrapping comes very handy when you want to create a new server and get it up to the point when you can run your configuration management system on it. In cases like this, bootstrap script will consist of steps which install configuration management client and necessary certificates on the server.
https://gist.github.com/Kami/e7d99298c9903dc13003
import os
import random
from pprint import pprint

from libcloud.compute.types import Provider
from libcloud.compute.providers import get_driver
from libcloud.compute.deployment import ScriptDeployment

API_KEY = 'exoscale api key'
API_SECRET_KEY = 'exoscale api secret key'

# Note: This example uses curl and bash installer for demonstration purposes only.
# On production, you should use a more secure method (e.g. directly using signed
# and verified Debian packages).
BOOTSTRAP_SCRIPT = '''#!/usr/bin/env bash
curl -L https://www.opscode.com/chef/install.sh | sudo bash
'''

PUBLIC_KEY_FILE = os.path.expanduser('~/.ssh/id_rsa.pub')

cls = get_driver(Provider.EXOSCALE)
driver = cls(API_KEY, API_SECRET_KEY)

size = [size for size in driver.list_sizes() if size.name == 'Micro'][0]
image = [image for image in driver.list_images() if 'Ubuntu 12.04 LTS 64-bit'
         in image.name][0]

# 1. Import an existing public SSH key
key_pair = driver.import_key_pair_from_file(name='test-key-pair',
                                            key_file_path=PUBLIC_KEY_FILE)

# 2. Bootstrap a node
name = 'exoscale-node-' + str(random.randint(0, 100))
script = ScriptDeployment(script=BOOTSTRAP_SCRIPT)
node = driver.deploy_node(name=name, image=image, size=size, deploy=script,
                          ex_keyname=key_pair.name,
                          ssh_key_file=PUBLIC_KEY_FILE)

pprint(node)
pprint(script.stdout)
First couple of lines in this example are the same as in the previous one - we select and a size and an image.
On line 29 we import and existing public SSH key. This SSH key will be installed on the created server and used to connect to the server during the bootstrap step.
On line 35 we then call deploy_node method with our select node name, image, size and bootstrap script.
Keep in mind that in this example deploy_node method first waits for the node to come online and after it’s online, it executes our bootstrap script on it. This means that running this example could take a couple of minutes.
After the example completes, the node should be online and have our selected ssh key and chef client installed on it.
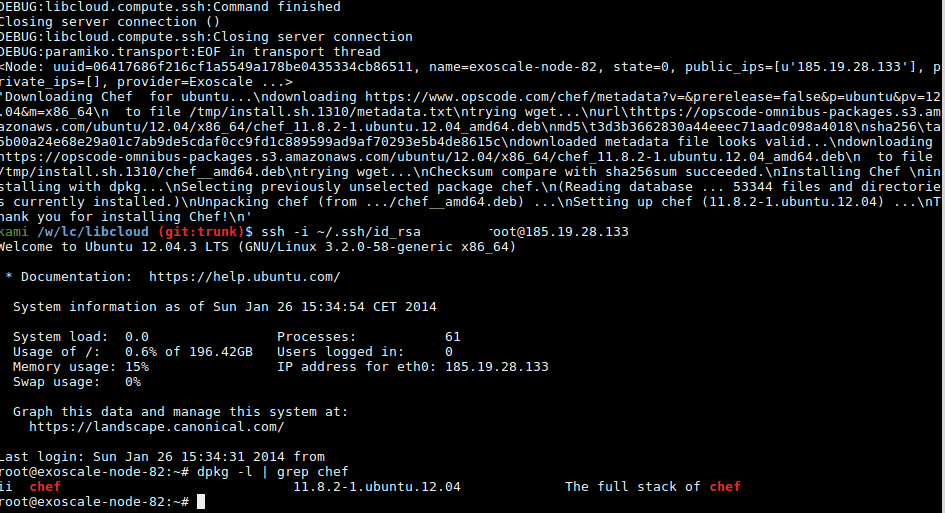
After the script has finished, we can verify that the chef client has been successfully installed on the server.
Where I can find more information / Where to go from here?
As demonstrated in this post, Libcloud is a very powerful library which makes a lot of otherwise boring and complex system administration and automation tasks simple and fun.
In this post we have just barely scratched the surface so we encourage you that for more information and examples, you check the following links bellow:
If you at some point get stuck or need additional help, don’t hesitate to contact us via our mailing list or our IRC channel.

