Terraform on Exoscale
 Matthew Revell
!!! note “Updated on August 19th, 2024”
This article has been updated to reflect the recent changes into the [Exoscale Terraform provider][tf].
There are a number of projects that promise infrastructure as code. Hashicorp’s Terraform is particularly interesting as it is:
- provider agnostic;
- all about infrastructure, rather than software configuration;
- easy to get started.
Recently we’ve been working on a new Exoscale provider for Terraform! It’s in the early stages but it’s worth taking out for a spin.
In this guide we’ll get familiar with Terraform and look at how to use it to provision services on Exoscale.
Quick introduction to Terraform
Terraform is a tool that lets you provision, change and version your infrastructure. That infrastructure could be virtual machines, DNS records, object storage and so on.
To describe the infrastructure that you want to deploy with Terraform you need to write human readable configuration files. They look something like this:
resource "exoscale_compute_instance" "postgres" {
  name = "postgres-123"
  template_id = data.exoscale_template.my_template.id
  zone = "ch-dk-2"
  type = "standard.large"
  disk_size = 200
  ssh_key = "db-key"
}
So, it’s easy to read, easy to write, easy to version and easy to collaborate on.
Let’s get started and fire up our first compute instance on Exoscale.
If you don’t already have an Exoscale account, you can create one in just a couple of minutes.
Terraform configuration files
Terraform works with two formats of configuration file: standard JSON (*.tf.json) and Hashicorp Configuration Language files (*.tf). We’ll work with .tf files as they allow comments and do away with some of the curly braces.
We could have multiple configuration files, each with many commands. We’ll start off simply, though, with a one file that holds our infrastructure configuration and another file for credentials that we don’t want to commit to version control.
Authenticating with Exoscale
To tell Terraform that we’re using Exoscale, and also to authenticate with an account, we need just a few lines at the top of the configuration file:
provider "exoscale" {
  key = "${var.exoscale_api_key}"
  secret = "${var.exoscale_secret_key}"
}
Storing our credentials in variables
Rather than commit our Exoscale credentials to version control, Terraform lets us define variables.
So, let’s quickly open up a new variables.tf file; we can call it anything, so long as it ends in .tf as Terraform will load any .tf file.
Here we’ll define the two variables we used above:
variable "exoscale_api_key" {
  default = "your-api-key-here"
}

variable "exoscale_secret_key" {
  default =  "your-api-secret-here"
}
We’ll want to add the variables.tf file to our .gitignore. You can read more about variables in the Terraform docs.
What you can do on Exoscale with Terraform
The Exoscale Terraform provider lets you work with the all the major components of your Exoscale account. We’ll start simply with a single virtual machine.
Terraform resources
In the Terraform world, the basic components of infrastructure are called resources. As we saw a moment ago, the resources available to you depends on what the provider offers.
Adding an Exoscale virtual machine
Let’s open our configuration file again and start typing below the provider information:
resource "exoscale_compute_instance" "testing"  {
  name = "testname"
  template_id = data.exoscale_template.my_template.id
  zone = "ch-dk-2"
  type = "standard.micro"
  disk_size = 10
  ssh_key = "YOUR-KEYPAIR-NAME"
}

data "exoscale_template" "my_template" {
  zone = "ch-gva-2"
  name = "Linux Ubuntu 24.04 LTS 64-bit"
}
The first line is for Terraform itself:
- exoscale_compute_instance - the resource type;
- testing - a label that we can use within Terraform.
Within the braces are the details we want to pass to Exoscale. As you can see, we’re launching a micro instance with 10 GB of disk space running Ubuntu 24.04 in the DK2 zone.
Let’s try it.
Viewing and applying a plan
Terraform is idempotent, meaning that the outcome is the same each time we run a particular configuration. If we’ve applied a plan already and it is unchanged the second time we run it, then nothing should happen.
However, if we make changes to an existing resource then that could result in the original being destroyed and re-created.
To avoid any nasty mistakes, we should check what Terraform will do before we apply our configuration:
$ terraform plan
data.exoscale_template.my_template: Reading...
data.exoscale_template.my_template: Read complete after 0s [id=ecfdb13a-5e02-41c2-945e-5314e6295cbc]

Terraform used the selected providers to generate the following execution plan. Resource actions are indicated with the following symbols:
  + create

Terraform will perform the following actions:

  # exoscale_compute_instance.testing will be created
  + resource "exoscale_compute_instance" "testing" {
	  + created_at          = (known after apply)
	  + disk_size           = 10
	  + id                  = (known after apply)
	  + ipv6                = false
	  + ipv6_address        = (known after apply)
	  + mac_address         = (known after apply)
	  + name                = "testname"
	  + private             = false
	  + private_network_ids = (known after apply)
	  + public_ip_address   = (known after apply)
	  + ssh_key             = "my-ssh-key"
	  + state               = (known after apply)
	  + template_id         = "ecfdb13a-5e02-41c2-945e-5314e6295cbc"
	  + type                = "standard.micro"
	  + zone                = "ch-dk-2"
	}

Plan: 1 to add, 0 to change, 0 to destroy.
Once we’re happy with the plan, we can set it into action:
$ terraform apply
data.exoscale_template.my_template: Reading...
data.exoscale_template.my_template: Read complete after 1s [id=ecfdb13a-5e02-41c2-945e-5314e6295cbc]
Terraform used the selected providers to generate the following execution plan. Resource actions are indicated with the following symbols:
+ create
Terraform will perform the following actions:
# exoscale_compute_instance.testing will be created
+ resource "exoscale_compute_instance" "testing" {
+ created_at = (known after apply)
+ disk_size = 10
+ id = (known after apply)
+ ipv6 = false
+ ipv6_address = (known after apply)
+ mac_address = (known after apply)
+ name = "testname"
+ private = false
+ private_network_ids = (known after apply)
+ public_ip_address = (known after apply)
+ ssh_key = "my-ssh-key"
+ state = (known after apply)
+ template_id = "ecfdb13a-5e02-41c2-945e-5314e6295cbc"
+ type = "standard.micro"
+ zone = "ch-dk-2"
}
Plan: 1 to add, 0 to change, 0 to destroy.
Do you want to perform these actions?
Terraform will perform the actions described above.
Only 'yes' will be accepted to approve.
Enter a value: yes
exoscale_compute_instance.testing: Creating...
exoscale_compute_instance.testing: Still creating... [10s elapsed]
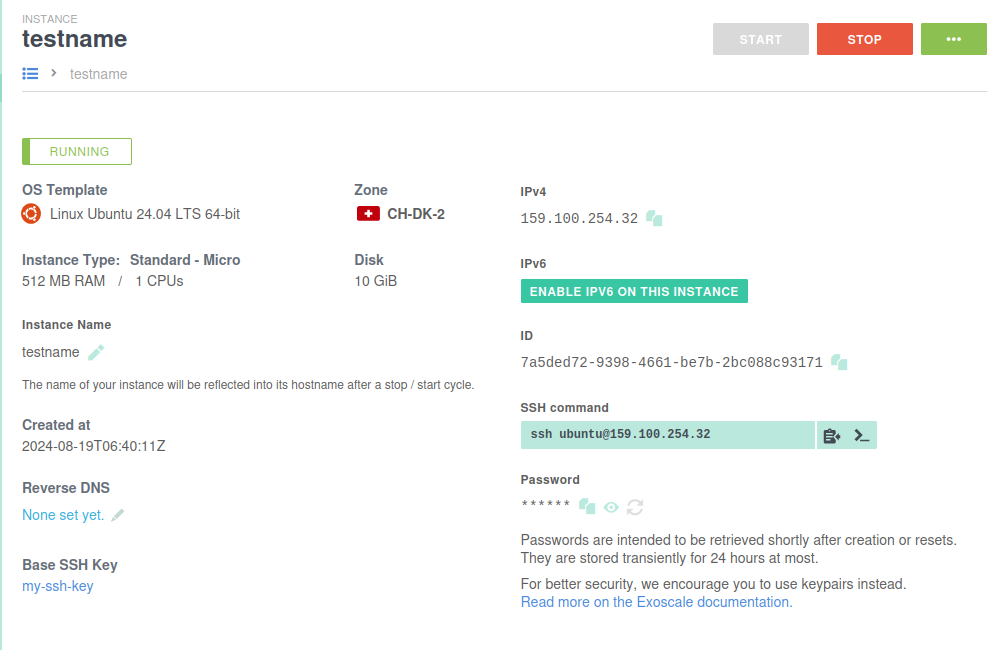
exoscale_compute_instance.testing: Creation complete after 15s [id=7a5ded72-9398-4661-be7b-2bc088c93171]
Apply complete! Resources: 1 added, 0 changed, 0 destroyed.
Now we have a new Micro instance running in our Exoscale account.
Next steps
So, with just a few lines of configuration we’ve launched a virtual machine.
Let us know how you’ve got on with the Exoscale Terraform provider. You can also file issues on the GitHub project.
Next time, we’ll look at using Terraform to launch a cluster that could power a typical SaaS application.