
One package to serve the web. Go.
This article is a minimalist approach to creating a web server and website without any dependencies - after you install Go, you’re ready to go. Featuring Go, HTML, and CSS, this article lets you approach hosting a website or web app from scratch, understand the principles behind them, and see how minimalist you can go while having a functioning application running.
The example code for this tutorial is available in the repository examples.
Prerequisites
The one package web server and site work on your local machine as well as any instance as long as it has a regular operating system. For an introduction on how to create an instance at Exoscale, check out our documentation. Do not forget to create a security group that allows incoming traffic at port 80 for your web server. For accessing your instance via SSH and HTTP you will need to have two rules enabled:

After setting up the instance, you can proceed with installing Go, which is the one package you need on top of your operating system in order to serve the web. It does not matter which operating system you are using. The Go website has a guide on how to install the latest version of Go - alternatively you can use your package manager and use the version that is available for your operating system.
Quickstart
Assuming you have Go installed on an operating system of your choice, we can now proceed to creating the web server and website. All code examples featured in this article are either Go, HTML, or CSS with zero dependencies, libraries, or frameworks. Only standard Go packages are featured. The web server includes a templating system that allows styling and adding different content for each page.
Structure It
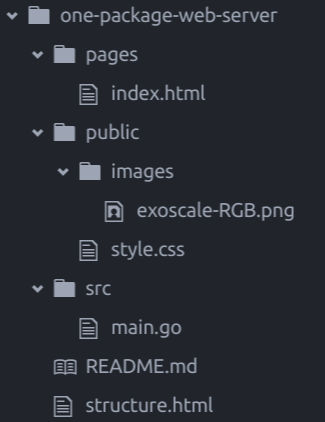
The repository is structured into an src folder containing one .go file which includes the templating system as well as the web server itself. The structure.html file represents the general structure of the website in HTML, defining the template names that are then used for the actual pages on the website, which are in the folder pages. The names of the files in the pages folder represent the URL that will be used for those files, i.e. a file about.html can be accessed via <yourdomain.com>/about.
index.html indicates the root domain and is the page visible under yourdomain.com or localhost:8080 locally. Any static files and publicly accessible files are in the folder public.
Code It
Let’s start with the structure.html file that is in the root of the repository.
{{define "structure"}}
<!doctype html>
<head>
<meta charset="utf-8">
<meta name="description" content="{{template `title`}}" />
<meta name="viewport" content="width=device-width, user-scalable=yes" />
<title>{{template "title"}}</title>
<link rel="stylesheet" href="public/style.css">
</head>
<body>

<header>{{template "heading"}}</header>
{{template "body" .}}
</body>
</html>
{{end}}
It is a short HTML file containing the template names needed for further pages used, such as title, heading, and body. title is used twice in structure.html: once for the meta description and once for the actual title used as tab title in the browser. Anything that is added to structure.html will appear on all sites using it as template basis, e.g. if a footer is added to structure.html, it will appear on all pages using this template.
Next are the actual pages. In our example, we only need an index.html.
{{define "title"}}Exoscale Examples{{end}}

{{define "heading"}}<h1><a href="https://www.exoscale.com"><img class="left" src="/public/images/exoscale-RGB.png" height="50px" alt="Exoscale logo"></a>Exoscale Examples</h1>{{end}}

{{define "body"}}
<section>
<article>
<p><b>This could be your minimal blog.</b> Just add a theme, some pictures, and you're good to go.</p>
</article>
</section>
{{end}}
We define the title content as “Exoscale Examples”, add an image and headline to the section we defined as heading in the structure.html, and add a body containing any HTML5 markup you want. Here you can include articles, images, videos, (animated) SVGs - in short: your website or application.
In the public folder we can include JavaScript files, images, and other static files that are publicly accessible. One example would be style.css:
h1 {font-size: 220%; font-weight: bold; padding: 1em; text-align: center;}
header {text-align: center;}
section {margin: 2em 10% 0 10%;}
For our minimalist approach, there are only two things left: the web server and templating system. For this, we create a main.go file which we save into an src folder. While not the shortest possible way to create a web server in Go, this code enables you to create new pages in the pages folder which automatically have the same URL as the filename used and serve static files in the public folder.
package main
import (
"flag"
"html/template"
"net/http"
"os"
)
// templateHandler assigns each URL to the corresponding template structure.
func templateHandler(w http.ResponseWriter, r *http.Request) {
layout := "../structure.html"
content := "../pages/" + r.URL.Path + ".html"
if r.URL.Path == "/" {
content = "../pages/index.html"
}
info, err := os.Stat(content)
if err != nil {
if os.IsNotExist(err) {
http.NotFound(w, r)
return
}
}
if info.IsDir() {
http.NotFound(w, r)
return
}
tmpl, err := template.ParseFiles(layout, content)
if err != nil {
http.Error(w, http.StatusText(500), 500)
return
}
tmpl.ExecuteTemplate(w, "structure", nil)
}
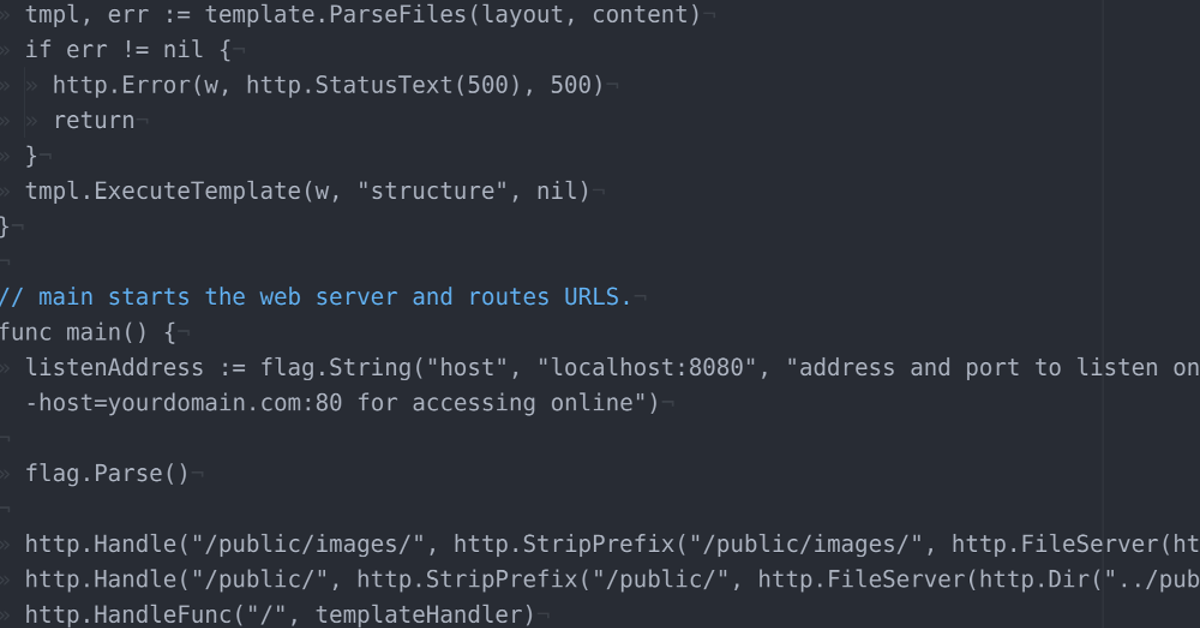
// main starts the web server and routes URLS.
func main() {
listenAddress := flag.String("host", "localhost:8080", "address and port to listen on, type -host=yourdomain.com:80 for accessing online")
flag.Parse()
http.Handle("/public/images/", http.StripPrefix("/public/images/", http.FileServer(http.Dir("../public/images"))))
http.Handle("/public/", http.StripPrefix("/public/", http.FileServer(http.Dir("../public"))))
http.HandleFunc("/", templateHandler)
http.ListenAndServe(*listenAddress, nil)
}
The code used for this blog post needs only four packages from the standard Go library: flag, html/template, net/http, and os. The templating system uses structure.html as base and then executes the content in the pages folder against the structure used. The actual web server is just a few lines of code in func main() containing various handlers needed to handle the specific folders. The order of the handlers is important as the first matching handler is always used, hence it is necessary to have the longer paths first.
Ship It
In the terminal, navigate to the location of the main.go file (in the src folder in our example) and type the following command for starting up a local server.
go run main.go
For access from any browser via a domain name, you will need to point your domain name to the IP of the Exoscale instance. This is usually done with the registrar you used for domain registration. Once the domain points to the IP of your Exoscale instance, Exoscale is hosting your domain for you.
After having copied the repository to the instance, you navigate to the location of the main.go and run the application with a flag using your domain name and port 80.
go run main.go -host=yourdomain.com:80
Then, from any browser, go to yourdomain.com and you should see the website you created. Note: It is not recommended to run your Go application via go run. Rather build the application and then run the executable if you want to host this code in production. Building a go file creates a static binary. With the correct arguments, you can also cross compile the code, which means the resulting binaries can run on several operating systems. For our simple use case, the command is go build main.go. When executing the resulting binary, do not forget to use the -host=yourdomain.com:80 flag in order to access your application. On a Linux system this would look like the following:
./main -host=yourdomain.com:80 &`
Notice the ampersand (“&”) which tells the process to be run in the background so you can continue using the terminal.
Improve It
You can play around and improve this project as you see fit. It gives some insight into starting a website or web app from scratch instead of using bloated libraries from the start. Some ideas on what to add:
- HTTPS
- more styling: CSS, JS
- error files and error handling
- add more features to the app (commenting system, social media integrations)
- add a lightweight database and/or play around with open data
- …and many more
Words of Warning
Can this be run in production? This code example is an entirely minimalist approach. It does not use HTTPS or any libraries, frameworks, dependencies. For a personal website, though, this code works and could be run in production as is. If you want to learn more about Go, we can recommend Effective Go as a start for good programming in Go.