

No matter how many servers you run in production or what flavor of Linux distribution you use, leaving administration ports open on the Internet for your web application, SaaS, or Docker cluster is considered insecure. A good practice to protect access to your production systems is to create a bastion. In a nutshell, a bastion is the only host from which you can manage all your services. Firewall rules must be created, so that all the administration interfaces of your services are reachable only from this special host.
This document describes how to configure security groups, create such a server and deploy essential security measures to protect it, using Exoscale Cloud infrastructure.
This diagram illustrates what we are going to achieve:

Instance creation
Security group
First things first, let’s create a security group for our bastion. Navigate to COMPUTE > FIREWALLING and click on the ADD-button. Give it a name and click CREATE.
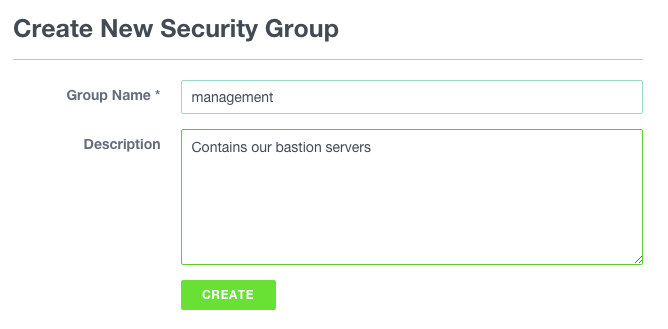
As we have not yet defined any rule, all instances belonging to it will be impossible to connect to. By default all inbound traffic is filtered.
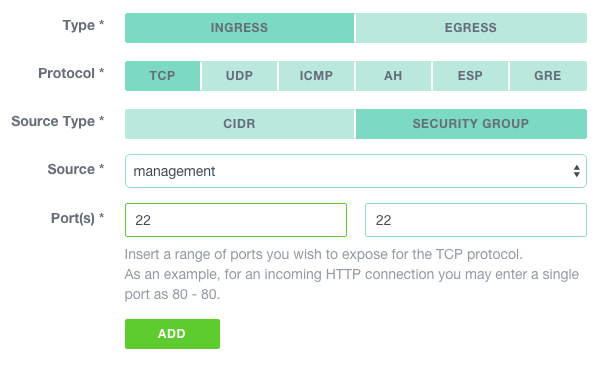
Let’s add a rule to allow SSH from our admin workstation. In the COMPUTE > FIREWALLING section, click on the newly created group.
Then, click on the NEW RULE button and create a rule using the public IP address of your admin workstation as source and tcp/22 as the authorized port.
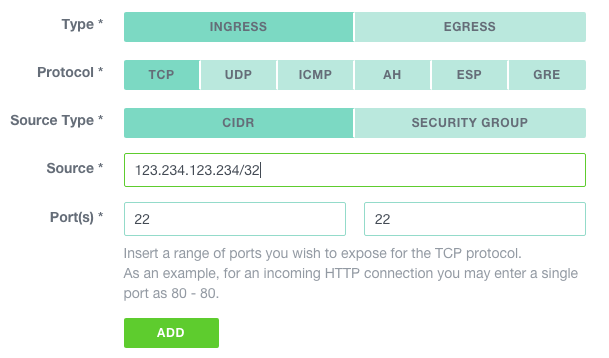
Click on ADD to complete our management security group setup.
For more information about security groups, please check the documentation.
SSH key pair
If this is not already done, generate keys on the workstation you will use to connect to the bastion.
$ ssh-keygen -t rsa -b 4096 -C 'bastion'
ssh-keygen has numerous options to enhance security of the generated keys, please read the documentation.
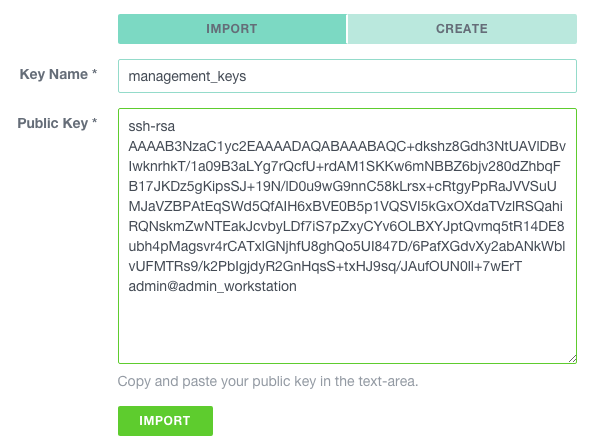
Copy the content of the (just created) ~/.ssh/id_rsa_bastion.pub file.
Navigate to COMPUTE > SSH KEYS and click on the ADD button.
Be sure that IMPORT is selected, name the key, paste the content
of the ~/.ssh/id_rsa_bastion.pub file and click IMPORT.
Important: Keep this private key and its pass phrase (I strongly encourage you to use one) in a safe place.
For more information about key pairs, please check the documentation.
Instance
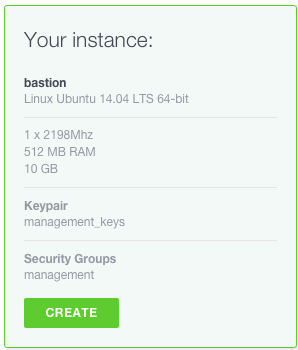
Now let’s create an instance in this newly created security group, using the management key-pair. Navigate to COMPUTE > INSTANCES and click on the ADD button.
Use the following specifications to create the bastion. Unless you plan to use resource heavy management tools to administrate your server, a micro instance should suffice.
Let’s test our instance by connecting to it; select it in the instance list and copy the SSH command in your shell on your admin workstation.
You should be logged in on the bastion.
Firewalling
From now on, each time you create an instance, make sure at least one security group has a rule authorizing connections from the bastion to the management port of this instance.
Example to create a rule authorizing SSH access from the bastion (in our example schema, this would be defined in the production security group):
Depending on the applications you will manage, you might want to add rules allowing different sets of ports.
Essential security measures to deploy on the bastion itself.
Automatic upgrades
You might want to allow for automatic upgrades, to be sure not to miss any security updates of OpenSSH or other critical system software:
$ dpkg-reconfigure -plow unattended-upgrades
Fail2ban
Fail2ban automatically blacklists IP addresses from which any tentative brute force attack on your sshd process is detected. Activate it with:
$ apt-get update && apt-get -y install fail2ban
The default settings should be sufficient in most cases.
(Optional) SSH strong authentication with google authenticator
Using two-factor authentication, it is possible to add extra security to the SSH server of your bastion. Each SSH connection will then require:
- your SSH Key
- your One Time Password
Let’s do this with the google authenticator application and the appropriate SSH pam module.
Install the pam google authenticator module with:
$ apt-get -y install libpam-google-authenticator
Activate it by adding the following line to your /etc/pam.d/sshd file
$ echo "auth required pam_google_authenticator.so" >> /etc/pam.d/sshd
Then add the following two lines to your /etc/ssh/sshd_config file to force the second factor in addition to your SSH key to logon the bastion:
```ChallengeResponseAuthentication yes
AuthenticationMethods publickey,keyboard-interactive```
And restart the SSH service with
$ service ssh restart
Run google-authenticator once on all the accounts you want to protect and follow the procedure.
Seamless connection to machines
To administrate your remote services from your local machine, you might want to create a local port forwarding using SSH
$ ssh -L [<LocalAddress>]:<LocalPort>:<RemoteHost>:<RemotePort> sshUser@remoteServer
This will allow a connection to a remote port as if the service was running locally.
For example, let’s say you would like to connect to a remote PostgreSQL instance which is accessible from your bastion only, you could type something like:
$ ssh -L 5000:postgresql-server-ip:5432 root@bastion
$ psql -p 5000 -h 127.0.0.1 -U postgres
This will mount an SSH tunnel from your workstation local port 5000 to the PostgreSQL server database port.
Going further
Maintaining a tight security on the bastion is not the only key to secure your production workload. You should also make sure that your workstation security and SSH client configuration is at its best. Mozilla maintains a good guide on SSH security guidelines where you can get best practices on using SSH Agent and forwarding accordingly.
Last but not least, additional open source tools that check your bastion integrity like OSSEC can be a nice addition to this setup and add intrusion detection to your security measures.