GPU Partitioning with MIG on Exoscale SKS
 Luc Juggery
GPUs are massively used in the age of AI, but depending on the workload we need to run, a single GPU can sometimes be over-dimensioned.
Imagine deploying a 7B model on a 48 GB GPU. More than half of the GPU would remain unused. MIG allows several independent inference services to share the same physical GPU without interfering with one another.
In this post, we’ll explore how MIG (Multi-Instance GPU) can partition a physical GPU into isolated slices, each with its own dedicated memory, compute, and bandwidth.
MIG is only available on specific NVIDIA GPUs. In the Exoscale offering, the following GPUs support MIG:
In this tutorial, we’ll explore MIG usage using an NVIDIA RTX Pro 6000 GPU.
Prerequisites
We’ll start with an Exoscale SKS cluster with 2 nodes. There is no GPU node involved yet. We’ll create a GPU node pool later, after showing the MIG configuration.
$ kubectl get node
NAME               STATUS   ROLES    AGE     VERSION
pool-58bd1-kziwu   Ready    <none>   3m41s   v1.36.0
pool-58bd1-qxvhw   Ready    <none>   3m47s   v1.36.0
Available MIG profiles
When an NVIDIA GPU supports MIG (list of supported GPUs), it is divided into GPU instances (GI), each of which is allocated a fixed fraction of the GPU’s compute engines and memory. Each GPU instance is isolated from the other ones, allowing multiple workloads to run on the same GPU without competing for resources. In other words, a workload running on one slice cannot access the memory or compute of another.
In this post, we’ll use an RTX Pro 6000. The available profiles are the following (source).
| MIG profile | # partitions |
|---|---|
1g.24gb | 4 |
1g.24gb+me | 1 |
1g.24gb+gfx | 4 |
1g.24gb+me.all | 1 |
1g.24gb-me | 4 |
2g.48gb | 2 |
2g.48gb+gfx | 2 |
2g.48gb+me.all | 1 |
2g.48gb-me | 2 |
4g.96gb | 1 |
4g.96gb+gfx | 1 |
For reference, the NVIDIA A30 (also included in the Exoscale offering) provides the following profiles (source).
| MIG profile | # partitions |
|---|---|
1g.6gb | 4 |
1g.6gb+me | 1 |
2g.12gb | 2 |
2g.12gb+me | 2 |
4g.24gb | 1 |
Different split strategies are possible. If we take the A30 as an example, we can use four 6GB slices for small models, two 12GB slices for mid-size models, or the full GPU for a single large model.
On top of CUDA cores, some MIG instances provide additional features:
- +me indicates the profile adds a Media Extension to the instance, which is useful for video analytics
- +gfx exposes the graphics engine, which is useful for remote desktop and CAD
- +me.all assigns all available media engines to the MIG instance, which is used, for example, for massive video transcoding
Configuring MIG partitions
The integration of MIG capabilities into Exoscale SKS was designed to make the configuration straightforward. Indeed, a user only needs to select the MIG profile of their choice while creating a GPU NodePool. This translates into a dropdown list in the portal.
There is no need to install the NVIDIA GPU Operator or any other utilities on the SKS cluster, as GPU nodes already have the NVIDIA drivers, CUDA toolkit, and device plugin pre-installed.
Adding a GPU node pool
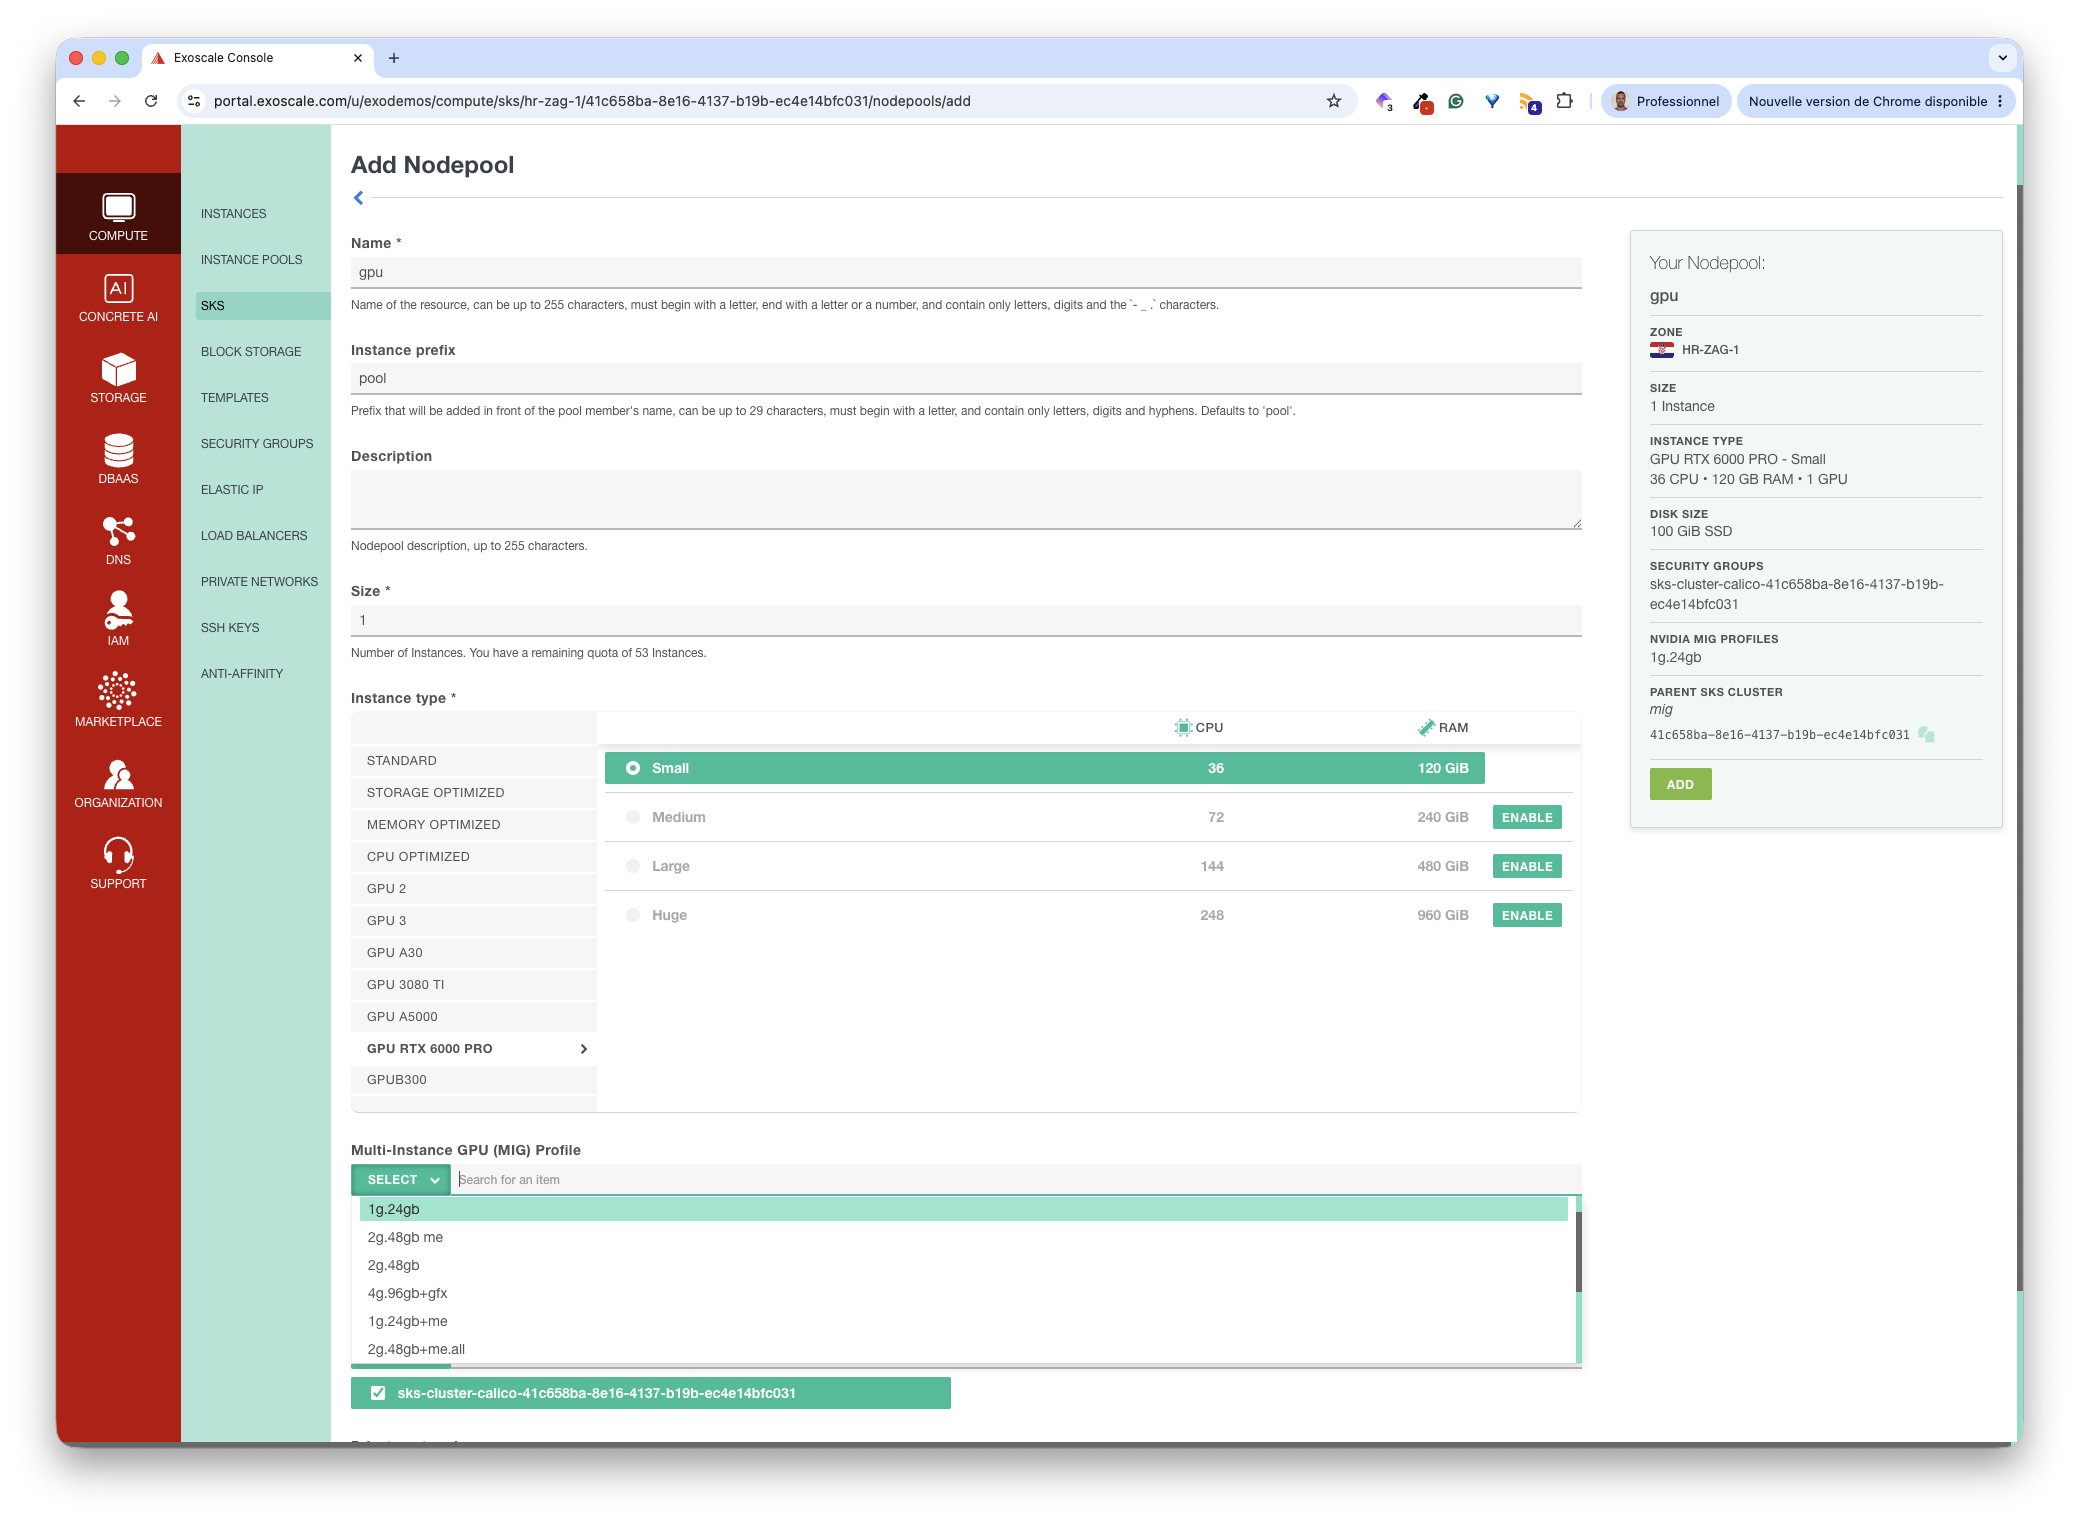
Using the Exoscale portal, we add a new nodepool to the cluster, selecting the GPU RTX 6000 PRO instance type. Thanks to the Multi-Instance GPU (MIG) Profile dropdown, we can select the MIG profile for our GPU right away.
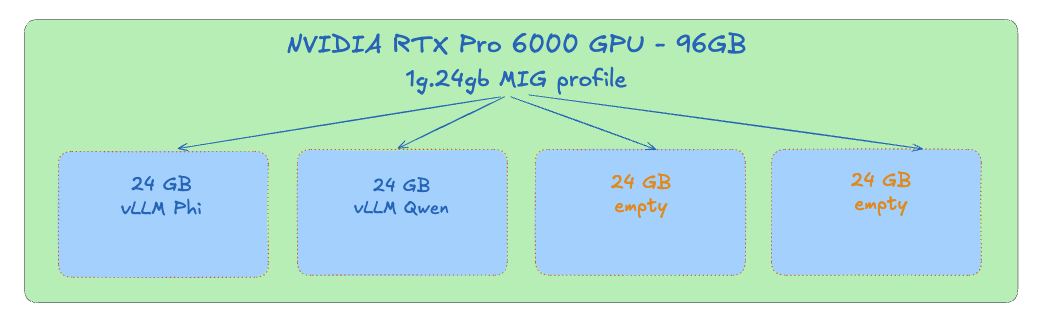
In this tutorial, we use the 1g.24gb MIG profile. This provides four partitions, each one with 24GB of VRAM, which is enough to run a small/medium-sized model, or even a larger quantized one.
Our cluster now has 3 nodes, one of which is attached to an RTX Pro 6000 GPU.
$ kubectl get node
NAME               STATUS   ROLES    AGE     VERSION
pool-58bd1-kziwu   Ready    <none>   15m25s  v1.36.0
pool-58bd1-qxvhw   Ready    <none>   15m32s  v1.36.0
pool-6d0a1-jnosj   Ready    <none>   3m48s   v1.36.0  <-- This one has an RTX Pro 6000 GPU
After the new nodepool is created, it takes a couple of minutes for the device plugin to detect the new resources. Then, the node appears to have 4 available GPUs; each one is a partition of the full RTX card.
$ k describe no pool-6d0a1-jnosj | grep Allocatable -A7
Allocatable:
  cpu:                35700m
  ephemeral-storage:  89785012888
  hugepages-1Gi:      0
  hugepages-2Mi:      0
  memory:             123120048Ki
  nvidia.com/gpu:     4                             <-- represents the 4 partitions of the MIG profile
  pods:               110
Deploying LLMs on MIG instances
We’ll deploy two vLLM instances, each will request its own MIG partition. The first vLLM instance will run the microsoft/Phi-4-mini-instruct model, whereas the second one will run the Qwen/Qwen2.5-7B-Instruct model.
| Deployment | Model | Family | Memory |
|---|---|---|---|
vllm-phi | microsoft/Phi-4-mini-instruct | Phi (Microsoft) | ~8 GB |
vllm-qwen | Qwen/Qwen2.5-7B-Instruct | Qwen (Alibaba) | ~14 GB |
The specifications of the two vLLM Deployments and Services are as follows.
apiVersion: apps/v1
kind: Deployment
metadata:
  name: vllm-phi
spec:
  replicas: 1
  selector:
    matchLabels:
      app: vllm-phi
  template:
    metadata:
      labels:
        app: vllm-phi
    spec:
      containers:
      - name: vllm
        image: vllm/vllm-openai:v0.22.1-cu129-ubuntu2404
        args:
        - microsoft/Phi-4-mini-instruct
        ports:
        - containerPort: 8000
        env:
        - name: HF_HOME
          value: /data/models
        resources:
          limits:
            nvidia.com/gpu: "1"
---
apiVersion: v1
kind: Service
metadata:
  name: vllm-phi
spec:
  selector:
    app: vllm-phi
  ports:
  - port: 8000
targetPort: 8000We create the two Deployments/Services.
kubectl apply -f vllm-phi.yaml
kubectl apply -f vllm-qwen.yaml
It takes a couple of minutes for the vLLM instances to be up and running. Then, we verify each Pod is scheduled on the GPU node.
$ kubectl get pods -o wide
NAME                         READY   STATUS    RESTARTS   AGE     IP               NODE               NOMINATED NODE   READINESS GATES
vllm-phi-79b47c68cc-7vp7r    1/1     Running   0          3m24s   192.168.143.66   pool-6d0a1-jnosj   <none>           <none>
vllm-qwen-78fbdcddcd-w2cw2   1/1     Running   0          3m24s   192.168.143.67   pool-6d0a1-jnosj   <none>           <none>
Two MIG partitions are used, the other two can be used for additional workloads.
Testing the models
To test that both vLLM inference servers are running correctly, we’ll use the Phi model to summarize a simple text, and the Qwen model to extract the sentiment from this same text.
First, we create our simple input file.
input.txt
Misery by Stephen King is an absolute masterpiece of psychological tension that I could not put down from the very first page. The premise is deceptively simple: a writer trapped in the home of his self-proclaimed number one fan, yet King transforms this confined setup into one of the most gripping stories I have ever read. Paul Sheldon is a deeply compelling protagonist, and watching him navigate his terrifying situation with both desperation and ingenuity kept me completely hooked throughout. Annie Wilkes is without question one of the greatest villains in all of fiction, unpredictable and terrifying in equal measure, yet written with enough complexity to feel disturbingly real. What makes this book so extraordinary is how King builds dread through small details rather than relying on supernatural elements, proving that human menace can be far scarier than any monster. The pacing is relentless, each chapter ending in a way that made it impossible to stop reading, and I found myself staying up far too late on more than one occasion. King’s prose is sharp and immediate, pulling you so deep into Paul’s perspective that the claustrophobia of his situation becomes almost physical. Beyond the thriller elements, the novel is also a fascinating meditation on the relationship between writers and their audience, and on the act of creation itself. It is a book that stays with you long after you finish it, the kind of story that makes you check the locks on your doors before going to bed. Misery is Stephen King at the very peak of his powers, and it remains essential reading for anyone who loves great storytelling.
Next, we forward the port for each service.
kubectl port-forward svc/vllm-phi 8001:8000 &
kubectl port-forward svc/vllm-qwen 8002:8000 &
Then, we send a request to each inference endpoint independently. Both receive the same input text and produce their own output file.
Sending the input file to the vLLM running microsoft/Phi-4-mini-instruct
jq -n --rawfile text input.txt '{
  model: "microsoft/Phi-4-mini-instruct",
  messages: [
    {role: "system", content: "You are a summarization engine. Summarize the input in 5 bullet points."},
    {role: "user", content: $text}
  ]
}' | curl -s http://localhost:8001/v1/chat/completions \
  -H "Content-Type: application/json" \
  -d @- | jq -r '.choices[0].message.content' > summary.txt
Content of the summary.txt file generated.
- "Misery" by Stephen King is a psychological thriller set in a confined home, featuring a writer and his crazed fan.
- Paul Sheldon, the protagonist, demonstrates desperation and ingenuity during his captivity.
- Annie Wilkes, the fan-turned-villain, is complex, unpredictable, and menacing.
- King masterfully builds tension with small details, focusing on human menace over supernatural elements.
- The novel explores the relationship between writers and their audience, leaving a lasting impact and heightened sense of self-protection.Thanks to MIG, two inference services can run in parallel, on a single physical GPU. For workloads composed of several small or medium-sized models, this improves GPU utilization while keeping strong isolation between deployments.
MIG usage with Karpenter
If you use Exoscale’s Karpenter implementation, we’ve got you covered too. When creating the ExoscaleNodeClass, you can specify the desired MIG profile of the GPU nodes.
apiVersion: karpenter.exoscale.com/v1
kind: ExoscaleNodeClass
metadata:
  name: nvidia-a30-2g-12gb
spec:
  imageTemplateSelector:
    variant: nvidia
  diskSize: 100
  securityGroupSelectorTerms:
  - id: SECURITY_GROUP

  userData: |
    [settings.kubelet-device-plugins.nvidia]
    device-partitioning-strategy = "mig"

    [settings.kubelet-device-plugins.nvidia.mig.profile]
    "rtxpro6000.96gb" = "1g.24gb"
Key takeaways
MIG allows a single GPU to run multiple isolated workloads. Each one gets its own compute, memory, and bandwidth resources.
Enabling MIG on an Exoscale SKS cluster is straightforward. Simply select the desired MIG profile when creating a GPU node pool. There is no manual GPU configuration required.
If MIG sounds interesting for your use cases, give it a try on Exoscale-managed Kubernetes.

