---
title: "Multi-host Private Networking with Docker"
description: "Learn how to create a multi-host private network with Docker, Docker Machine and Docker Swarm on the cloud. We show you how to setup such a network in a few simple steps."
date: 2016-03-16
author: "Vincent Bernat"
tags: ["compute","network"]
url: https://www.exoscale.com/blog/private-networking-with-docker/
---
# Multi-host Private Networking with Docker
**Quick summary of this article**
- Overlay networks enable communication across multiple hosts with automatic DNS-based service discovery and seamless reachability.
- Overlay networks require a distributed key value store like Consul to manage network state and discovery.
- You must configure security group rules for Consul and overlay ports to allow inter node networking.
- Use Docker Machine and Swarm with engine options to configure cluster store and advertise network addresses.
- Containers on the overlay network communicate privately without exposed ports unless explicitly published to host.
When using Docker on a single host, a local private network is created
and allows your containers to reach each others. It's easy to make your
application chat with your database:
$ docker run -itd --name=database -e MYSQL_ROOT_PASSWORD=secret mysql
48b1c34cc7bb5f171a5d51275928944bbe5355858500fc5903b5ac25af0650e6
$ docker run -it --rm --link database:database mysql bash
# mysql -p -h database
Enter password:
Welcome to the MySQL monitor. Commands end with ; or \g.
Your MySQL connection id is 3
Server version: 5.7.11 MySQL Community Server (GPL)
Copyright (c) 2000, 2016, Oracle and/or its affiliates. All rights reserved.
Oracle is a registered trademark of Oracle Corporation and/or its
affiliates. Other names may be trademarks of their respective
owners.
Type 'help;' or '\h' for help. Type '\c' to clear the current input statement.
mysql>
However, this relies on the fact that the two containers are running
on the same host. Since Docker 1.9, it's possible to have a similar
feature out-of-the-box inside a multi-host Docker cluster, thanks to
the new `overlay` network driver. Unlike `bridge` networks, overlay
networks require a key-value store. We will use *Consul*. We
demonstrate the setup using *Docker Machine* to deploy Docker hosts
and *Docker Swarm* to manage them seamlessly.
The steps we will follow are:
1. Configure *Docker* and *Docker Machine*.
2. Spawn a new Docker VM with *Docker Machine*.
3. Run *Consul*, a key-value store, on this new Docker VM.
4. Create a 3-node *Docker Swarm* cluster.
5. Create an overlay network.
6. Spawn containers on the *Docker Swarm* cluster and check they can
use the overlay network.
## Requirements
You will need to install a recent version of Docker Engine and Docker
Machine on your machine. You will also need an account on
[Exoscale](https://www.exoscale.com).
> [!NOTE]
> **Docker Machine is deprecated**
>
> Please consider using an alternative method to
> deploy a single container or a stack:
>
> * [SKS - Scalable Kubernetes Service](https://www.exoscale.com/sks/)
From your workstation, here is how to get started with *Docker Engine*
and *Docker Machine*:
$ mkdir docker-tutorial
$ cd docker-tutorial
$ curl -sLo docker https://get.docker.com/builds/`uname -s`/`uname -m`/docker-1.10.2
$ curl -sLo docker-machine https://github.com/docker/machine/releases/download/v0.6.0/docker-machine-`uname -s`-`uname -m`
$ chmod +x docker*
$ export PATH=$PWD:$PATH
$ docker --version
Docker version 1.10.2, build c3959b1
$ docker-machine --version
docker-machine version 0.6.0, build e27fb87
Ensure you stay in the same shell for the remaining of this tutorial.
Then, grab your credentials from the
[Exoscale console](https://portal.exoscale.com/account/profile/api) and
export your API key and secret key:
$ export EXOSCALE_API_KEY=xxxxxxxxxxxxxxxxx
$ export EXOSCALE_API_SECRET=xxxxxxxxxxxxxxxx
$ export EXOSCALE_AVAILABILITY_ZONE=ch-dk-2
## Set up a key-value store
An overlay network requires a key-value store. The key-value store
holds information about the network state which includes discovery,
networks, endpoints, IP addresses, and more. We will use
[Consul](https://www.consul.io/) for this purpose.
Currently, we don't have any Docker instance to host our key-value
store. Therefore, we will specifically, provision a new Docker
VM called `tuto-manager` for this purpose.
$ docker-machine create -d exoscale tuto-manager
Your new VM with a running Docker daemon should be ready in less than
2 minutes. You can see it in the web console:
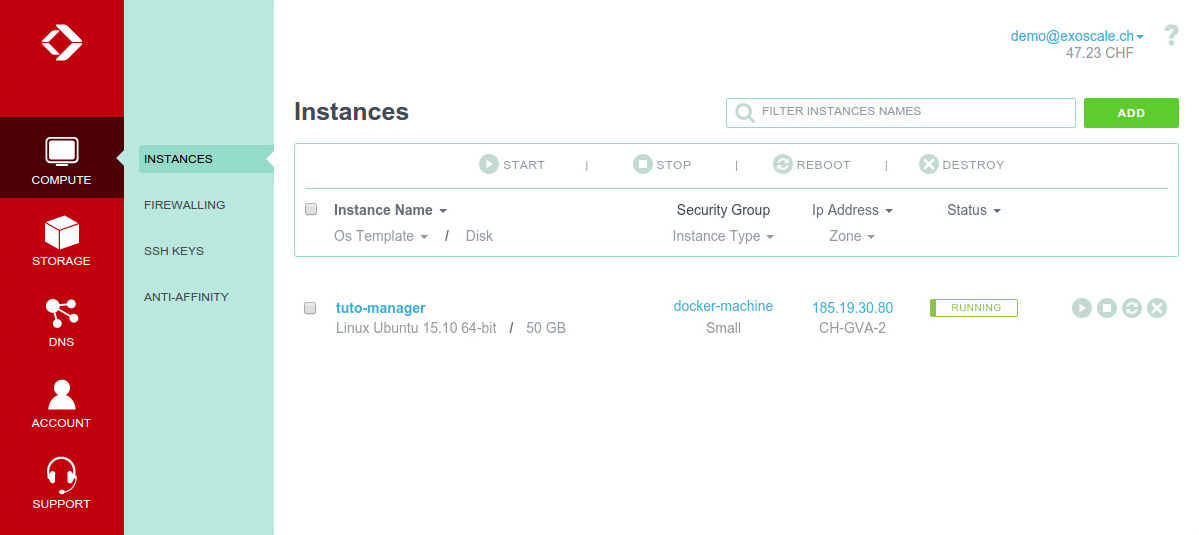
You can also check its status from the command line:
$ docker-machine ls
NAME ACTIVE DRIVER STATE URL SWARM DOCKER ERRORS
tuto-manager - exoscale Running tcp://185.19.30.80:2376 v1.10.2
Then, tell the `docker` command to use this VM for the next commands
and start a `progrium/consul` container:
$ eval $(docker-machine env tuto-manager)
$ docker run -d -p 8500:8500 -h consul progrium/consul -server -bootstrap
The remote Docker, running on `tuto-manager` VM, will fetch the
`progrium/consul` image and start a new container. You can check it is
running correctly with the `docker ps` command:
$ docker ps
CONTAINER ID IMAGE COMMAND CREATED STATUS PORTS NAMES
656fa10fb3d1 progrium/consul "/bin/start -server -" 34 seconds ago Up 34 seconds 53/tcp, 53/udp, 8300-8302/tcp, 8400/tcp, 8301-8302/udp, 0.0.0.0:8500->8500/tcp distracted_shaw
## Configure the security groups
While you now have a VM running *Consul* in a container, it is not
quite functional. At *Exoscale*, we put the security first and by
default, the VM has a restrictive firewall preventing any
incoming connection. *Docker Machine* did create a special security
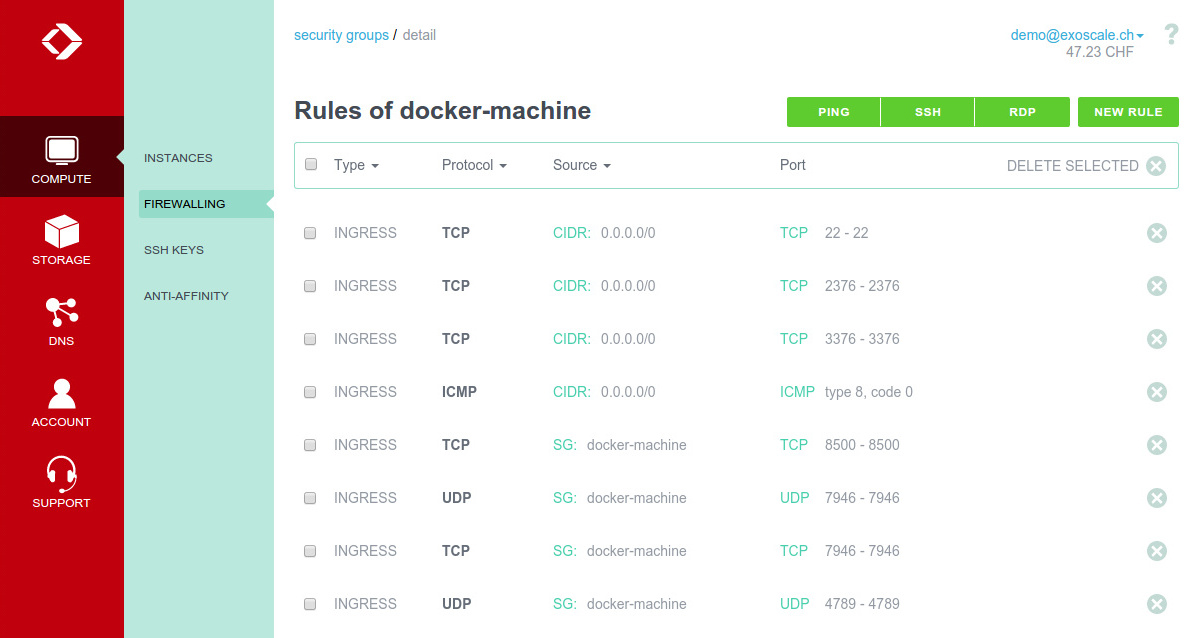
group, `docker-machine`, authorizing the following incoming
connections:
- TCP port 22 for SSH from any IP
- TCP port 2376 for Docker from any IP (secured by TLS)
- TCP port 3376 for Docker Swarm from any IP (secured by TLS)
- ICMP type 8, code 0 from any IP (ping)
We need additional rules to ensure our overlay network will work as
expected. Notably, any host in the Docker cluster should be able to
access the key-value store. Moreover, packets used by the overlay
network also need to be authorized. Therefore, you need to modify the
`docker-machine` security group with the following additional rules:
- TCP port 8500 for Consul from `docker-machine` security group
- TCP port 7946 for overlay network from `docker-machine` security group
- UDP port 7946 for overlay network from `docker-machine` security group
- TCP port 4789 for overlay network from `docker-machine` security group
We keep our setup secure by only authorizing access to the key-value
store and to the overlay network by machines in the same security
group. Here is what you should get when you are done:
## Create a Swarm cluster
We can now use `docker-machine` to provision the hosts for your
network. We will create 3 VM, each running a Docker Engine. They will
have to know how to contact the key-value store. The first one will
act as the Swarm master:
$ docker-machine create \
-d exoscale \
--swarm --swarm-master \
--swarm-discovery="consul://$(docker-machine ip tuto-manager):8500" \
--engine-opt="cluster-store=consul://$(docker-machine ip tuto-manager):8500" \
--engine-opt="cluster-advertise=eth0:2376" \
tuto-node1
At creation time, you supply the Docker Engine daemon with the
`--cluster-store` option. This option tells the location of the
key-value store for the overlay network. The shell expansion
`$(docker-machine ip tuto-manager)` resolves to the IP address of the
Consul server you created earlier.
Your new host should be available in less than two minutes. You can
create two additional hosts and make them join the cluster:
$ docker-machine create \
-d exoscale \
--swarm \
--swarm-discovery="consul://$(docker-machine ip tuto-manager):8500" \
--engine-opt="cluster-store=consul://$(docker-machine ip tuto-manager):8500" \
--engine-opt="cluster-advertise=eth0:2376" \
tuto-node2
$ docker-machine create \
-d exoscale \
--swarm \
--swarm-discovery="consul://$(docker-machine ip tuto-manager):8500" \
--engine-opt="cluster-store=consul://$(docker-machine ip tuto-manager):8500" \
--engine-opt="cluster-advertise=eth0:2376" \
tuto-node3
You can check they are all up and running with `docker-machine ls`:
$ docker-machine ls
NAME ACTIVE DRIVER STATE URL SWARM DOCKER ERRORS
tuto-manager * exoscale Running tcp://185.19.30.80:2376 v1.10.2
tuto-node1 - exoscale Running tcp://185.19.28.133:2376 tuto-node1 (master) v1.10.2
tuto-node2 - exoscale Running tcp://185.19.30.187:2376 tuto-node1 v1.10.2
tuto-node3 - exoscale Running tcp://185.19.30.9:2376 tuto-node1 v1.10.2
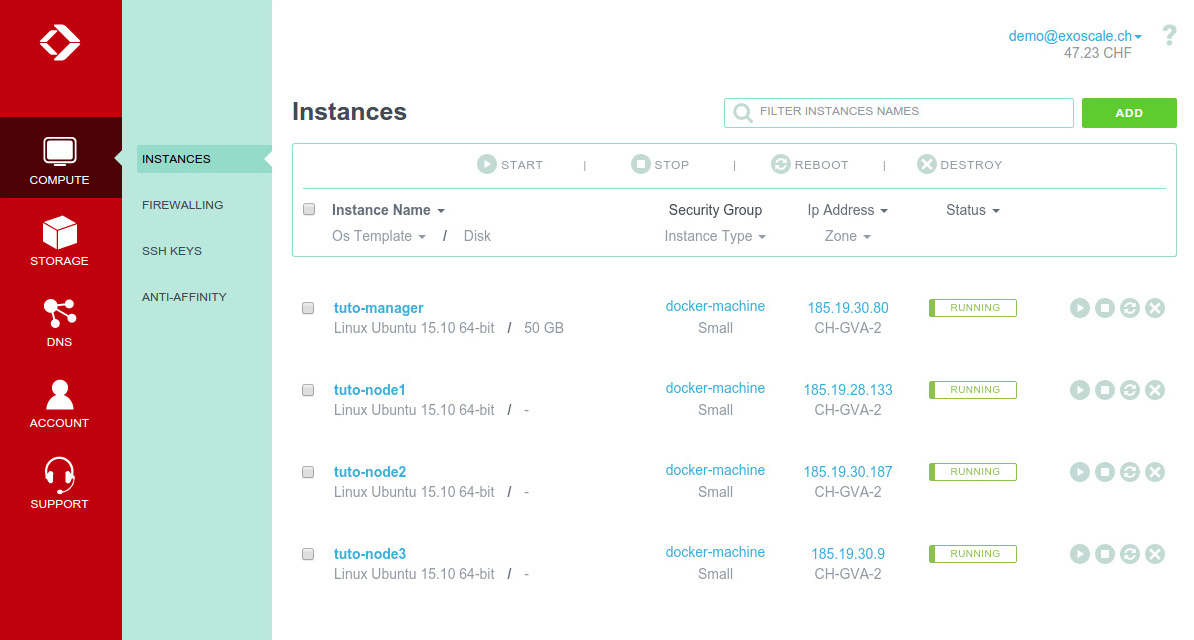
Each node is also available in the web console:
Let's tell Docker to use our Swarm cluster from now on:
$ eval $(docker-machine env --swarm tuto-node1)
$ docker info
Containers: 4
Running: 4
Paused: 0
Stopped: 0
Images: 3
Server Version: swarm/1.1.2
Role: primary
Strategy: spread
Filters: health, port, dependency, affinity, constraint
Nodes: 3
tuto-node1: 185.19.28.133:2376
└ Status: Healthy
└ Containers: 2
└ Reserved CPUs: 0 / 2
└ Reserved Memory: 0 B / 2.051 GiB
└ Labels: executiondriver=native-0.2, kernelversion=4.2.0-30-generic, operatingsystem=Ubuntu 15.10, provider=exoscale, storagedriver=aufs
└ Error: (none)
└ UpdatedAt: 2016-02-29T11:05:47Z
tuto-node2: 185.19.30.187:2376
└ Status: Healthy
└ Containers: 1
└ Reserved CPUs: 0 / 2
└ Reserved Memory: 0 B / 2.051 GiB
└ Labels: executiondriver=native-0.2, kernelversion=4.2.0-30-generic, operatingsystem=Ubuntu 15.10, provider=exoscale, storagedriver=aufs
└ Error: (none)
└ UpdatedAt: 2016-02-29T11:06:11Z
tuto-node3: 185.19.30.9:2376
└ Status: Healthy
└ Containers: 1
└ Reserved CPUs: 0 / 2
└ Reserved Memory: 0 B / 2.051 GiB
└ Labels: executiondriver=native-0.2, kernelversion=4.2.0-30-generic, operatingsystem=Ubuntu 15.10, provider=exoscale, storagedriver=aufs
└ Error: (none)
└ UpdatedAt: 2016-02-29T11:05:28Z
Plugins:
Volume:
Network:
Kernel Version: 4.2.0-30-generic
Operating System: linux
Architecture: amd64
CPUs: 6
Total Memory: 6.154 GiB
Name: tuto-node1
## Create the overlay network
Creating the overlay network is now quite simple:
$ docker network create --driver overlay --subnet=10.0.9.0/24 private-net
eb694ff309017e904a8d53accc55da6d199adf53f10903e4d1224a02a1446c83
$ docker network ls | grep overlay
eb694ff30901 private-net overlay
The overlay network is now available for all members of the Swarm
cluster.
## Run an application
We are now ready to start a container using the newly created
network. To demonstrate that the network work as expected, we will
ensure we put each container on different Docker VM. Let's start a
[MySQL](https://www.exoscale.com/dbaas/mysql/) container on the first node:
$ docker run -itd --name=database --net=private-net \
-e MYSQL_ROOT_PASSWORD=secret \
-e constraint:node==tuto-node1 mysql
The Docker Engine running on `tuto-node1` will fetch the `mysql` image
and run it in a container attached to the `private-net` network. Let's
also start a container with *Nginx* on the second node:
$ docker run -itd --name=web --net=private-net \
-e constraint:node==tuto-node2 nginx
Check that both containers are running:
$ CONTAINER ID IMAGE COMMAND CREATED STATUS PORTS NAMES
3425d27e2336 nginx "nginx -g 'daemon off" 2 seconds ago Up 1 seconds 80/tcp, 443/tcp tuto-node2/web
e412e4cf23e8 mysql "/entrypoint.sh mysql" 14 seconds ago Up 13 seconds 3306/tcp tuto-node1/database
We can spawn a shell in a third container to check everything works as
expected. Let's check we can connect to the MySQL database:
$ docker run -it --rm --net=private-net \
-e constraint:node==tuto-node3 mysql bash
root@b8b2496bb380:/# mysql -p -h database
Enter password:
Welcome to the MySQL monitor. Commands end with ; or \g.
Your MySQL connection id is 2
Server version: 5.7.11 MySQL Community Server (GPL)
Copyright (c) 2000, 2016, Oracle and/or its affiliates. All rights reserved.
Oracle is a registered trademark of Oracle Corporation and/or its
affiliates. Other names may be trademarks of their respective
owners.
Type 'help;' or '\h' for help. Type '\c' to clear the current input statement.
mysql> ^DBye
And we can also connect to the *Nginx* web server:
$ docker run -it --rm --net=private-net \
-e constraint:node==tuto-node3 busybox wget -O- http://web
Connecting to web (10.0.9.3:80)
Welcome to nginx!
Welcome to nginx!
If you see this page, the nginx web server is successfully installed and
working. Further configuration is required.
For online documentation and support please refer to
nginx.org.
Commercial support is available at
nginx.com.
Thank you for using nginx.
Note that we didn't expose any ports. Therefore, the *Nginx* daemon
and the *MySQL* database are not accessible from the outside. They can
only be accessed from the overlay network. However, we can also expose
ports. Let's destroy the `web` container a recreate a new one that
would also be accessible from outside:
$ docker kill web
$ docker rm web
$ docker run -itd --name=web --net=private-net \
-p 80:80 \
-e constraint:node==tuto-node2 nginx
Hold on! You also need to open the port 80 in the `docker-machine`
security group. Add the following rule:
- TCP port 80 for HTTP from any IP
You can now check that it works as expected:
$ curl -s http://$(docker inspect \
--format '{{ (index (index .NetworkSettings.Ports "80/tcp") 0).HostIp }}' \
web)
[...]
## Conclusion
Thanks to the new network overlay feature, it is now quite easy to
spread containers across a *Docker Swarm* cluster without worrying
about discovery (names are automatically exported through DNS in each
container) and network reachability.