Building a Data Lake on Exoscale
 David Lazarevic
Wait, we’re not building that kind of a Lake…
Quick summary of this article
- Building a data lake on a sovereign cloud like Exoscale avoids CLOUD Act related risks and vendor lock-in, while giving you full control over the tooling at the cost of self-managed deployment, maintenance and updates.
- The showcased data lake runs on a single CPU-optimized instance handling the ingestion (DLT), processing and access (DuckDB) layers, with Exoscale's Simple Object Storage (SOS) acting as the storage layer.
- A DLT pipeline fetches monthly AIS zip files, extracts the daily CSV files and loads them into an SOS bucket as parquet, with IAM roles and API keys scoping access to the source and destination buckets.
- Swapping pandas for PyArrow readers and parallelizing the per-day loads boosted the pipeline from ~30'000 to ~1'100'000 rows per second, cutting a monthly load from ~3 hours down to ~5 minutes.
- Hive-style partitioning and a 250MB file size cap keep the lake navigable and query-friendly, with the final parquet data ending up ~34.5% smaller than the original compressed zip.
- The setup still suffers from limited concurrency, basic governance and lackluster monitoring, the exact drawbacks a Data Lakehouse is built to solve.
A Data Lake and a Data Lakehouse are architectures allowing you to cheaply store large amounts of structured, semi-structured and unstructured data on object storage.
In the previous article about them we talked about their advantages and disadvantages, what they are and what they can bring to the table. Today, we are going to dive deeper into the topic and learn how we can deploy a Data Lake, step by step, on Exoscale.
The AIS data showcased in this article comes from the Danish Emergency Management Agency.
AIS, an Automatic Identification System, is a maritime communication and identification system used for marine vessels to enhance safety and navigation by transmitting and receiving the vessel’s unique identification, position, course, speed and other relevant information.
The dataset has been temporarily replicated onto SOS for the purposes of the article.
Why Build a Data Lake on Exoscale?
Storing your data, whether it is non-sensitive, open AIS data or something more sensitive like business-related data, on a non-sovereign cloud provider can come with its own set of risks.
While the goal of this article isn’t talking about the CLOUD Act and the risks that come with it, you are welcome to take a look at the following article: CLOUD Act vs. GDPR: The Conflict About Data Access Explained.
Besides this fact, deploying your data lake on a cloud provider could come with the cost of vendor lock-in as you could end up relying on their managed services, and while they can be useful, they can also be detrimental.
One of the most interesting things about data lakes is that they are also flexible architecture-wise. You have the choice of which tools you integrate into your data lake, and with this choice, you can optimize and build your data lake for your specific use case.
While it is a little bit more difficult to configure a data lake manually compared to a managed solution, doing so could offer you Further Reduced Costs, Easier Component Integration, Simpler Migrations and Detailed Pipeline Monitoring, among other benefits.
While there are advantages to not using managed services, it’s important to know that there are also disadvantages.
Mainly, the deployment, the maintenance, and the updates are all self managed.
Building a Data Lake
In this section we will go over the following topics:
- Setting up an instance that can be used to query, load and process data
- Setting up a DLT pipeline that can load one month’s worth of data into Exoscale’s SOS
- Setting up IAM keys
- Optimizing the DLT pipeline
1. The Architecture
Let’s start off with the core of a Data Lakehouse, a Data Lake. From the previous article, we know that a Data Lake consists of four layers:
| Layer | Use Case |
|---|---|
| Ingestion | Fetching data, both streaming and batch, from various sources and then loading it raw (unmodified) into the storage layer. |
| Storage | Object storage holding the raw, unmodified data. |
| Processing | Transforming the data so that it fits the schema enforced when reading/accessing it. |
| Access | Querying and analyzing the data stored within the data lake. |
The simplified architecture of a data lake allows it to be run on a single machine or even locally (although it’s not recommended to do so), making the deployment extremely easy.
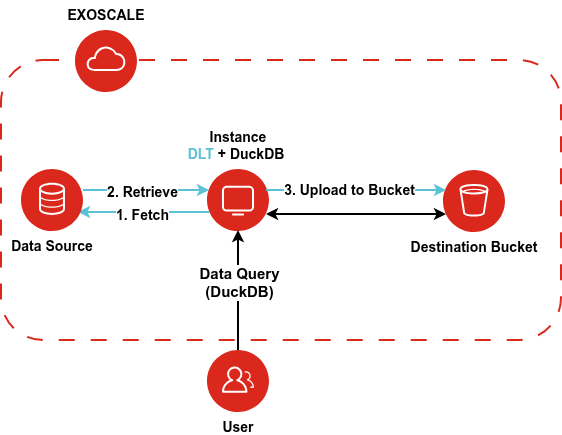
In this example, a single powerful instance will deal with the Ingestion, Processing and Access layers, and the storage layer will, of course, be Exoscale’s Simple Object Storage (SOS). The DLT pipeline configured on the instance will fetch the data from a data source, process it, and then load it into an SOS bucket. The end user may then use the DuckDB instance set up on the same instance (or even one set up locally) to query the data stored in the destination bucket.
2. The Tooling
As a Data Lake is meant to be straightforward, we will be relying on DLT in order to deal with the heavy lifting. DLT is a Python library that allows you to load data from various sources such as REST APIs, object storage or databases into destinations such as object storage. It is very efficient, supports schema evolution, incremental loading, parallelism and even infers schemas, data types and normalizes the data.
DuckDB, a fast, in-process analytical query engine, will be used as the access layer that will query the data stored on object storage, as it’s more than sufficient for this specific use case. If we were querying a larger amount of data (TBs) or if a large amount of people would have to query the data at the same time, we would have opted for a distributed query engine such as Trino.
3. The Deployment
As previously mentioned, in this article we will be working with DEMA’s AIS data from 2021 that has been replicated into an Exoscale SOS bucket.
In order to do so, we have:
- Created the source bucket:
data-lake-exoscale/data-lake on branch: main [?]
❯ exo storage mb sos://source-bucket -z hr-zag-1- Obtained the data from DEMA
# We only need one month's worth of data as it is all we will be using in this article
data-lake-exoscale/data-lake on branch: main [?]
❯ wget -P ./source-data "http://aisdata.ais.dk/2021/aisdk-2021-01.zip"- Pushed the data to the source bucket
data-lake-exoscale/data-lake on branch: main [?]
❯ exo storage put ./source-data/* sos://source-bucket/ais-data/* -z hr-zag-1
Please note that the DLT pipeline, the instance and its configuration have been adapted to this data, which is stored in monthly .zip files containing daily .csv files.
3.1 Prerequisites
You may find all of the Data Lake related configuration and commands in this public GitHub repository.
NOTE: The user data from the repository already writes the ais-pipeline.py along with the required DLT configuration into the instance.
Keep in mind that the code in the repository, along with the snippets shown in this article, is intended as an example. Use it as inspiration and adapt it to your own setup and use case.
We will first start off with deploying an instance along with setting up the DLT project through Cloud-Init.
#cloud-config
package_update: true
package_upgrade: true

runcmd:
  - [
      bash,
      -c,
      'curl -LsSf https://astral.sh/uv/install.sh | env UV_UNMANAGED_INSTALL="/usr/local/bin" sh',
    ]
  - [mkdir, -p, /home/ubuntu/exolake/.dlt]
  - [cd, /home/ubuntu/exolake]
  - [uv, init]
  - [uv, add, "dlt[filesystem]", pyarrow, duckdb-cli]
  - [touch, ./.dlt/{config,secrets}.toml]
  - [rm, ./main.py]
  - [chown, -R, ubuntu:ubuntu, /home/ubuntu/exolake]
In this case, we are setting up a virtual environment under /home/ubuntu/exolake with only the required packages, DLT with filesystem support, PyArrow and DuckDB-CLI.
The filesystem destination is used for both local and remote (cloud storage) filesystems, such as object storage.
We can now create a new Huge CPU Optimized, Ubuntu 26.04 instance with a disk size of 150GB, that references the user-data we have just written.
data-lake-exoscale/data-lake on branch: main [?]
❯ exo compute instance create ais-replication \
  --disk-size 150 \
  --cloud-init ./exoscale-config/user-data.yaml \
  --template "Linux Ubuntu 26.04 LTS 64-bit" \
  --instance-type cpu.huge \
  -z hr-zag-1
The disk size of 150GB was specifically chosen as fetching and storing one month’s worth of AIS data and then extracting it can take up to ~100GB.
The choice of the instance type will be explained when we talk about optimizing the DLT pipeline.
Now, we can proceed with creating the destination bucket, into which we will be loading the data. This bucket will act as the storage layer for the data lake.
data-lake-exoscale/data-lake on branch: main [?]
❯ exo storage mb sos://destination-bucket -z hr-zag-1hr-zag-1, in order to maximize the data throughput between them.3.2 Creating the DLT pipeline
As the data is stored in monthly .zip files, we will have to either (1) stream the .zip and process it while it’s being streamed or (2) fetch it, extract it and then process the extracted files.
data-lake-exoscale/data-lake on branch: main [?]
❯ exo storage ls sos://source-bucket/ais-data/ -z hr-zag-1
2026-06-01 09:29:12 UTC 15 GiB  ais-data/aisdk-2021-01.zip
2026-06-01 09:29:49 UTC 14 GiB  ais-data/aisdk-2021-02.zip
2026-06-01 09:30:35 UTC 17 GiB  ais-data/aisdk-2021-03.zip
2026-06-01 09:31:21 UTC 17 GiB  ais-data/aisdk-2021-04.zip
2026-06-01 09:32:16 UTC 18 GiB  ais-data/aisdk-2021-05.zip
2026-06-01 09:33:15 UTC 19 GiB  ais-data/aisdk-2021-06.zip
2026-06-01 09:34:15 UTC 20 GiB  ais-data/aisdk-2021-07.zip
2026-06-01 09:35:14 UTC 19 GiB  ais-data/aisdk-2021-08.zip
2026-06-01 09:36:09 UTC 18 GiB  ais-data/aisdk-2021-09.zip
2026-06-01 09:37:01 UTC 17 GiB  ais-data/aisdk-2021-10.zip
2026-06-01 09:37:46 UTC 16 GiB  ais-data/aisdk-2021-11.zip
2026-06-01 09:38:35 UTC 16 GiB  ais-data/aisdk-2021-12.zip
It is also possible to first fetch the zip, then stream it’s contents and read them with PyArrow. Doing so saves on storage space and reduces the memory usage while the pipeline is running.
While this approach is not explored in this article, it is used in the final version of the pipeline, available within the public GitHub repository.
For reference, one year’s worth of compressed AIS data takes up 206GiB. When extracted, this data will take up roughly 700GiB of storage in its raw .csv format, which is what we will be avoiding.
For the data lake example, we will only be fetching the AIS data for the month of January, in order to showcase the possibilities of DLT.
First of all, let’s SSH into the machine we have just created.
data-lake-exoscale/data-lake on branch: main [?]
❯ exo compute instance ssh ais-replication -z hr-zag-1
Now we can start writing the DLT pipeline. We will first need to fetch a .zip file from SOS, extract it, and then we can run the pipeline on the raw .csv files.
In order to do so, we must first create the DLT pipeline file. A DLT pipeline’s main purpose is to load data into a destination.
ubuntu@ais-replication ~> cd exolake
ubuntu@ais-replication ~/exolake (master)> touch ais-pipeline.py
ubuntu@ais-replication ~/exolake (master)> vi ais-pipeline.py
First of all, at the top of the file, let’s import the required modules and define the global variables that will be used by all functions.
from dlt.sources.filesystem import filesystem as fss, read_csv
from os.path import exists
from pathlib import Path
import dlt
import s3fs
import zipfile

# dlt.secrets and dlt.config read the values for these keys from the dlt config files

EXO_KEY = dlt.secrets["sources.filesystem.credentials.aws_access_key_id"]
EXO_SECRET = dlt.secrets["sources.filesystem.credentials.aws_secret_access_key"]
EXO_ENDPOINT = dlt.secrets["sources.filesystem.credentials.endpoint_url"]
EXO_BUCKET = dlt.config["sources.filesystem.bucket_url"]
OBJECT_KEY = "aisdk-2021-01.zip" # Hardcoded as we will be reading the data just for the month of January
The first function we write will fetch and extract the monthly zip files from Exoscale’s Object Storage, and is very specific to this use case, as we are adapting to the data source.
def fetch_monthly_zip(
    client: s3fs.S3FileSystem,
    bucket: str,
    remote_data_dir: str,
    object_name: str,
    local_raw_data_dir: str = "data",
    extracted_files_dir: str = "extracted",
):
    object_dir = f"{bucket}/{remote_data_dir}/"
    object_key = ""
    objects = client.ls(object_dir)

    is_object_available = False

    for obj in objects:
        if object_name == obj.split("/")[-1]:
            is_object_available = True
            object_key = obj

    if not is_object_available:
        print(
            f"The object with the name '{object_name}' was not found in 'sos://{bucket}/{remote_data_dir}'."
        )
        return

    extracted_files_path = f"{local_raw_data_dir}/{extracted_files_dir}/"

    Path(extracted_files_path).mkdir(parents=True, exist_ok=True)

    success_file = Path(extracted_files_path) / f".{object_name}.success"

    if not exists(f"{local_raw_data_dir}/{object_name}"):
        print(f"Downloading: 'sos://{object_key}'...")
        client.download(rpath=object_key, lpath=local_raw_data_dir)
    else:
        print(
            f"The file '{object_name}' is already present on the host. Skipping download..."
        )

    if not success_file.exists():
        print(
            f"Extracting '{local_raw_data_dir}/{object_name}' to '{extracted_files_path}'."
        )
        with zipfile.ZipFile(f"{local_raw_data_dir}/{object_name}") as monthly_zip:
            monthly_zip.extractall(path=extracted_files_path)

        success_file.touch()
    else:
        print(
            f"'{object_name}' has already been extracted on the host. Skipping extraction..."
        )
After successfully downloading and extracting the desired .zip file, the function will write a hidden success file, so that the extraction can be skipped on the next run.
Now, we will instantiate an s3fs client so that the files from the source bucket can be downloaded.
def get_ais_data(
    endpoint: str = EXO_ENDPOINT,
    bucket: str = EXO_BUCKET,
    key: str = OBJECT_KEY,
):
    # Instantiate an SOS Client
    sos = s3fs.S3FileSystem(
        endpoint_url=endpoint,
        key=EXO_KEY,
        secret=EXO_SECRET,
    )

    local_raw_data_dir = "data"
    extracted_data_dir = "extracted"

    fetch_monthly_zip(
        client=sos,
        object_name=key,
        bucket=bucket,
        remote_data_dir="ais-data",
        extracted_files_dir=extracted_data_dir,
        local_raw_data_dir=local_raw_data_dir,
    )

    # Close the client as it's no longer needed after fetching the data from SOS
    del sos

    # DLT Pipeline

    ais_resource = fss(
        bucket_url=f"{local_raw_data_dir}/{extracted_data_dir}/",
        file_glob="*.csv"
    )

    ais_pipe = ais_resource | read_csv()

    pipeline = dlt.pipeline(
        pipeline_name="aisdk_data",
        destination="filesystem",
        dataset_name="data_lake",
        progress="log",
    )

    load_info = pipeline.run(ais_pipe)

if __name__ == "__main__":
    get_ais_data()
get_ais_datainstantiates ans3fsclient, fetches a singular.zipfile, extracts it and then closes the connection with SOS.It then creates a
filesystemDLT resource that reads all of the extracted.csvfiles and pipes them intoread_csv().read_csv()usespandasto read the.csvfiles, one by one, and yield the output into the pipeline. The pipeline then normalizes this output and loads the data into the SOS bucket. Thefilesystemdestination stores normalized data in the.parquetformat by default.
3.3 Configuring DLT
With the basic pipeline completed, we will need to modify DLT’s configuration files as:
- It requires credentials in order to fetch data from the source bucket
- It requires credentials in order to push data to the destination bucket
DLT, by default, expects its configuration files,
config.tomlandsecrets.toml, to be within the.dltfolder.
First of all, let’s create an IAM role that allows DLT to fetch from the source bucket, and a role that allows it to push into (and fetch data from) the destination bucket, as we are using the same bucket as both the source and the destination.
{
	"default-service-strategy": "deny",
	"services": {
		"compute": {
			"type": "rules",
			"rules": [
				{
					"expression": "operation == 'list-zones'",
					"action": "allow"
				}
			]
		},
		"sos": {
			"type": "rules",
			"rules": [
				{
					"expression": "operation in ['head-bucket', 'list-buckets', 'list-objects', 'list-sos-buckets-usage'] && parameters.bucket == 'source-bucket'",
					"action": "allow"
				},
				{
					"expression": "operation == 'get-object' && parameters.key.startsWith('ais-data')",
					"action": "allow"
				}
			]
		}
	}
}{
"default-service-strategy": "deny",
"services": {
"compute": {
"type": "rules",
"rules": [
{
"expression": "operation == 'list-zones'",
"action": "allow"
}
]
},
"sos": {
"type": "rules",
"rules": [
{
"expression": "operation in ['head-bucket', 'list-buckets', 'list-objects', 'list-sos-buckets-usage'] && parameters.bucket == 'destination-bucket'",
"action": "allow"
},
{
"expression": "operation in ['delete-object', 'get-object', 'get-object-attributes', 'put-object'] && parameters.key.startsWith('data_lake')",
"action": "allow"
}
]
}
}
}source-bucket and destination with the names of your buckets used.We can now create the IAM roles from these policies and then create API key and secret pairs from the newly created IAM roles.
data-lake-exoscale/data-lake on branch: main [?]
❯ exo iam role create dlt-pipeline-source-demo --policy - < ./exoscale-config/ais-fetch-source-data-policy.json
 ✔ Creating IAM role... 0s
┼─────────────┼──────────────────────────────────────┼
│ ID          │ 55380ed4-xxxx-4634-b150-xxxxxxxxxxxx │
│ Name        │ dlt-pipeline-source-demo             │
│ Description │                                      │
│ Editable    │ true                                 │
│ Labels      │ n/a                                  │
│ Permissions │ n/a                                  │
┼─────────────┼──────────────────────────────────────┼

data-lake-exoscale/data-lake on branch: main [?]
❯ exo iam api-key create dlt-source-keypair dlt-pipeline-source-demo
┼────────┼─────────────────────────────────────────────┼
│ Name   │ dlt-source-keypair                          │
│ Key    │ YOUR_EXOSCALE_SOURCE_ACCESS_KEY             │
│ Secret │ YOUR_EXOSCALE_SOURCE_SECRET_KEY             │
│ Role   │ 55380ed4-xxxx-4634-b150-xxxxxxxxxxxx        │
┼────────┼─────────────────────────────────────────────┼

data-lake-exoscale/data-lake on branch: main [?]
❯ exo iam role create dlt-pipeline-dest-demo --policy - < ./exoscale-config/ais-dlt-pipeline-policy.json
 ✔ Creating IAM role... 0s
┼─────────────┼──────────────────────────────────────┼
│ ID          │ 67380ed4-xxxx-4634-b150-xxxxxxxxxxxx │
│ Name        │ dlt-pipeline-dest-demo               │
│ Description │                                      │
│ Editable    │ true                                 │
│ Labels      │ n/a                                  │
│ Permissions │ n/a                                  │
┼─────────────┼──────────────────────────────────────┼

data-lake-exoscale/data-lake on branch: main [?]
❯ exo iam api-key create dlt-dest-keypair dlt-pipeline-dest-demo
┼────────┼─────────────────────────────────────────────┼
│ Name   │ dlt-dest-keypair                            │
│ Key    │ YOUR_EXOSCALE_DESTINATION_ACCESS_KEY        │
│ Secret │ YOUR_EXOSCALE_DESTINATION_SECRET_KEY        │
│ Role   │ 67380ed4-xxxx-4634-b150-xxxxxxxxxxxx        │
┼────────┼─────────────────────────────────────────────┼
Now that we have obtained the required credentials, we need to modify DLT’s config.toml and secrets.toml files.
[runtime]
log_level = "WARNING"
dlthub_telemetry = false

[sources.filesystem]
bucket_url = "s3://source-bucket/"# NOTE: We are keeping the zone in `endpoint_url` as `hr-zag-1` as this is where we have created our bucket.
[sources.filesystem.credentials]
aws_access_key_id = "YOUR_EXOSCALE_SOURCE_ACCESS_KEY"
aws_secret_access_key = "YOUR_EXOSCALE_SOURCE_SECRET_KEY"
endpoint_url = "https://sos-hr-zag-1.exo.io"
[destination.filesystem]
bucket_url = "s3://destination-bucket/"
[destination.filesystem.credentials]
aws_access_key_id = "YOUR_EXOSCALE_DESTINATION_ACCESS_KEY"
aws_secret_access_key = "YOUR_EXOSCALE_DESTINATION_SECRET_KEY"
endpoint_url = "https://sos-hr-zag-1.exo.io".dlt/secrets.toml and/or .dlt/config.toml to your .gitignore file.
These files, specifically .dlt/secrets.toml, contain sensitive information and can potentially result in other people gaining access to your bucket if leaked.3.4 Optimizing the pipeline
After setting up everything, let’s try and run the pipeline. In order to make the run faster for demo purposes, the monthly .zip has already been downloaded and extracted onto the host.
Downloading and extracting the .zip took roughly ~5 minutes, as the extraction is single threaded, which leads to a performance bottleneck.
From this run we can obtain the following key information:
- A daily
.csvfile contains roughly 9.3 million rows - The current pipeline is capable of reading and normalizing at a rate of ~30'000 rows per second
This means that if we were to keep this pipeline as is, it would take roughly 6 minutes to read, normalize and load a single file into a bucket. For a whole month’s worth of data, this could go up to 3 hours, which is evidently not fast at all.
This happens due to two main reasons, the files are being read sequentially and DLT uses pandas.read_csv() by default to read .csv files, which has to convert the read data into a DataFrame before it’s normalized, leading to a performance decrease.
Thankfully, DLT allows us to optimize the pipeline in various ways, one of them being adding parallelization and even creating custom readers.
Let’s start off by adding some new imports at the top of the file, removing read_csv as we won’t be needing it and adding a new global variable that will fetch the configured MAX_WORKERS value.
+ from concurrent.futures import ThreadPoolExecutor
+ from dlt.destinations import filesystem as fsd
- from dlt.sources.filesystem import filesystem as fss, read_csv
+ from dlt.sources import TDataItem # Used for Type Hinting
+ from dlt.sources.filesystem import filesystem as fss
from os.path import exists
from pathlib import Path
+ from pyarrow import csv
import dlt
+ import pyarrow as pa
+ import re
import s3fs
import zipfile

# dlt.secrets and dlt.config read the values for these keys from the dlt config files

+ MAX_WORKERS = dlt.config["data_writer.workers"]
EXO_KEY = dlt.secrets["sources.filesystem.credentials.aws_access_key_id"]
EXO_SECRET = dlt.secrets["sources.filesystem.credentials.aws_secret_access_key"]
EXO_ENDPOINT = dlt.secrets["sources.filesystem.credentials.endpoint_url"]
EXO_BUCKET = dlt.config["sources.filesystem.bucket_url"]
OBJECT_KEY = "aisdk-2021-01.zip" # Hardcoded as we will be reading the data just for the month of January
Now we will create a new function that will read a single .csv file with PyArrow, yield the output as an Arrow Table and then execute a pipeline run with the data from the daily .csv file as its source.
def load_single_file(
    csv_file: TDataItem, zip_year: str, zip_month: str, file_position: int
):
    file_name = csv_file["file_name"]

    print(f"Reading: {file_name}")

    file_date = {
        "year": zip_year,
        "month": zip_month,
    }

    match = re.search(pattern=r"aisdk-(\d{4})-(\d{2})-(\d{2})\.csv", string=file_name)

    if match:
        file_date["year"], file_date["month"], file_date["day"] = match.groups()
    else:
        file_date["day"] = "missing"

    fpath = csv_file["file_url"].removeprefix("file://")

    @dlt.resource(name="danish_maritime_data")
    def read_csvfile():
        # Set block size to 128MiB
        read_options = csv.ReadOptions(block_size=134217728)

        convert_options = csv.ConvertOptions(
            column_types={"# Timestamp": pa.timestamp("s")},
            timestamp_parsers=["%d/%m/%Y %H:%M:%S"],
        )

        with csv.open_csv(
            fpath, convert_options=convert_options, read_options=read_options
        ) as f:
            for chunk in f:
                yield chunk

    pipeline = dlt.pipeline(
        pipeline_name=f"aisdk_{file_date.get('year', '')}_{file_date.get('month', '')}_{(file_date.get('day', '') if match else file_position)}",
        dataset_name="data_lake",
        progress="log",
        destination=fsd(
            layout="{table_name}/year={year}/month={month}/day={day}/{load_id}.{file_id}.{ext}",
            extra_placeholders={
                "year": file_date.get("year", ""),
                "month": file_date.get("month", ""),
                "day": file_date.get("day", ""),
            },
        ),
    )

    load_info = pipeline.run(data=read_csvfile())

    print(load_info)
In this case, we also defined a Hive-style partitioning layout for the load, that will allow us to easily find the data we are looking for in the lake, making the risk of the data lake turning into a data swamp way smaller.
We also have to make sure that the timestamp column is stored as an actual timestamp, so that engines such as DuckDB can have an easier time when searching through data between a specific time interval.
It’s crucial to know that DLT pipelines have a state. Running multiple pipelines in parallel with the same name could end up causing conflicts between the states of different pipelines.
This is why we extract the day, month and year information from each .csv file read by the function, and create a pipeline name from it.
The only thing left to do is add in parallelization. We will do this by running multiple occurrences of the load_single_file function and passing a daily file for each occurrence.
def get_ais_data(
    endpoint: str = EXO_ENDPOINT,
    bucket: str = EXO_BUCKET,
    key: str = OBJECT_KEY,
):
    # Instantiate an SOS Client
    sos = s3fs.S3FileSystem(
        endpoint_url=endpoint,
        key=EXO_KEY,
        secret=EXO_SECRET,
    )

    local_raw_data_dir = "data"
    extracted_data_dir = "extracted"

    fetch_monthly_zip(
        client=sos,
        object_name=key,
        bucket=bucket,
        remote_data_dir="ais-data",
        extracted_files_dir=extracted_data_dir,
        local_raw_data_dir=local_raw_data_dir,
    )

    # Close the client as it's no longer needed after fetching the data from SOS
    del sos

    # New Section - DLT Pipeline -> Removed

    zip_date = {}

    match_zip = re.match(r"aisdk-(\d{4})-(\d{2})\.zip", key)

    if match_zip:
        zip_date["year"], zip_date["month"] = match_zip.groups()

    files = fss(
        bucket_url=f"{local_raw_data_dir}/{extracted_data_dir}/", file_glob="*.csv"
    )

    # Convert the 'files' DLT Resource into a list before passing it
    files = list(files)

    with ThreadPoolExecutor(max_workers=MAX_WORKERS) as executor:
        futures = [
            executor.submit(
                load_single_file,
                file,
                zip_date.get("year", ""),
                zip_date.get("month", ""),
                file_position,
            )
            for file_position, file in enumerate(iterable=files, start=1)
        ]

        for future in futures:
            try:
                future.result()
            except Exception as e:
                print(f"Thread failed with error: {e}")
In the case that a daily file name has a different format so that the day, month and year values can’t be extracted, we also pass in the information from the zip file for the values required by the layout and the pipeline name.
Finally, we can update the .dlt/config.toml file and run the pipeline.
[runtime]
log_level="WARNING"
dlthub_telemetry = false

[sources.filesystem]
bucket_url = "s3://source-bucket/"

+ [data_writer]
+ file_max_bytes=250000000
+ workers = 11
The workers configured here set the limit on how many threads can be used to normalize the daily files. In this case, 11 pipelines can be run at the same time, allowing a monthly load to finish in 3 batches.
We also set
file_max_bytesso that each daily file written is limited to a maximum size of 250MB. This will lessen the load on the target platform, and makes it easier for the query engine to read the data efficiently. For example, if the normalized data for a single day is 500MB in size, the writer will split it into two.parquetfiles, each being 250MB for that day’s dataset.
You can see that with a small amount of changes we have achieved a huge performance increase, going from ~30'000 to ~1'100'000 reads per second, and at the same time, performing the reads on 11 files in parallel, which we can see based on the thread usage shown in the bottom tmux panel.
With all of these improvements, fetching, extracting, normalizing and loading a monthly AIS data set went down from ~3 hours to ~5 minutes, without adding too much complexity to the pipeline. At the same time, the final data size for the whole month’s worth of data ended up being smaller than the original compressed .zip file by ~34.5%.
The file size for the
.zipof January 2021 is ~14.9GiB. The normalized.parquetfiles loaded into SOS were 9.9GiB in total, meaning that they were roughly 5GiB smaller in size while being queryable.
You may also notice that one of the main “drawbacks” of this approach is that the cpu.huge instance is being used to its full potential. The memory usage spiked to ~90% of the total and almost all of the cores were being utilized to their maximum.
4. Querying the Data Lake
After loading the data into the Data Lake, we can now go ahead and query it with DuckDB.
All queries may be found in the public GitHub Repository.
However, you may also copy the queries from the asciinema files themselves.
In just a minute, we started our query engine, DuckDB, configured it to connect to SOS and, as you can see from this demo, we managed to perform a demanding query over ~300 million rows in a few seconds.
Of course, there are also disadvantages to what we just set up, mainly:
| Disadvantage | Details |
|---|---|
| Concurrency Limitations | While multiple people can connect to the instance and start their own DuckDB session, the performance will be limited to the instance’s available CPU and RAM memory resources. |
| Increased Network Traffic | Since there is no distributed query engine, all instances of the query engine, in this case, DuckDB, hit Object Storage in order to fetch all of the data required. |
| Limited Logging and Pipeline Monitoring | While it is possible to use the logs provided by DLT, it is inconvenient and they don’t provide much information. |
| Limited Pipeline Automation | While automating this singular pipeline is possible through Cron or systemd, it is not convenient and it is difficult to tie multiple pipelines together. |
| No Advanced Security & Governance | The only form of governance is the IAM role the API key used by DuckDB was created from. While we can restrict an API key so that it can query only a specific dataset, we can’t enforce column level governance. |
| Security & Governance Management | Managing governance through the use of IAM roles and API keys is possible for a small team, but not at all ideal as it can quickly become confusing. |
While the Concurrency Limitation can be solved, all of the solutions come with some sort of a tradeoff, as you can either:
- Bring up a powerful instance every time you would like to do a complex query
- Keep a few powerful instances running permanently so that they can be easily accessed, increasing costs
- Run DuckDB on personal machines with limited resources
Conclusion
And there you have it, a fully functional data lake running on Exoscale, built with nothing more than a single instance, an SOS bucket and a handful of open source tools.
Starting from an empty instance, we ended up with a DLT pipeline that fetches, extracts, normalizes and loads a whole month’s worth of AIS data in ~5 minutes instead of ~3 hours, with the loaded .parquet files taking up ~34.5% less storage than the original compressed .zip. And to top it all off, we managed to query ~300 million rows in a matter of seconds, using nothing but DuckDB and object storage.
Of course, as seen in the previous section, this setup is not without its flaws. Limited concurrency, basic governance and lackluster monitoring are exactly the drawbacks we talked about in the previous article, and exactly the reason why the Data Lakehouse exists.
Fixing these flaws by adding a metadata layer, a catalog and proper orchestration on top of the data lake we just built is where the real fun begins, and it is exactly what we will be covering in the near future.

